|
|
||||||||||||
Blog Talk and Tips -2009-2007An Aussie Carpentry book and a slight digression on modern Aussie Carpentry. Nov 17 2009The other day I got an email from a good friend of mine Nick N. who hails from Helena in Arkansas USA. Nick wanted to know if I had any recommendations for a good Aussie carpentry and Joinery book. Well the short answer Nick is not really. You probably have a lot better books on the subject over there. In Australia we used to build thousands of timber frame houses a year. As a young guy coming out from the UK (where 99.9% of houses were brick constructed) in the early 1960's, I was amazed at the extent of the timber frames being built. Talk about carpenter's heaven. No doubt about it. We got wiped out in Cyclone Tracy and so I lost all my old text books, photographs etc. but when I started this website I bought a few reference books from Ebay. The best one in my opinion is a four volume set "The Australian Carpenter and Joiner" by F.C. Bloomfield and others. As far as I know it is still in print, I saw some paperback versions of it at our local Uni library the other day. Best deal would always be on Ebay though.
There is a lot of stuff in any of the textbooks that does not get dated, geometry and calculations spring to mind, but I do think that any modern textbook is always struggling to keep up with modern trends. Look at the photo above taken in 1974, there is absolutely no way that we will build like that again. In the reconstruction of Darwin in 65-67 only one company, Orlit Pty Ltd opted to build with timber. They got huge amounts of a rough sawn Malaysian hardwood called Keruing. We had a joinery shop at the time with a big old four sided planer. We gauged all the timber and marked and pre cut all the the frames for 350 houses. With one exception, they were the last timber frames that I ever cut. Anti logging, rising costs of timber and the need for stronger connections has made traditional timber framing obsolete in Australia. I tend to think that true carpentry in the sense of all timber frame houses, walls and roofs from scratch is still practiced far more in the US than it is over here. I put this down to the fact that you still seem to have a large source of cheap timber over there. I have no doubt that you will correct me if I am wrong. To my way of thinking there are still modern Aussie carpenters (and builders for that matter) that are good all rounders, but they have to be capable of turning their hands to working with metal as well as timber. There are not many of them though. In the main our carpenters tend specialise in one section of the trade. Fixing doors or windows in multi storey work, formwork, truss fixing roofers etc. There would be few joinery shops in Aus. at present that are still capable of making their own doors, stairs and handrails. A trade apprentice armed with all the information from the text books finishes up screwing MDF cupboards together. A visit to a small concrete precast factory. - July 10ThThe other day I was peddling my bike around on of our Northern suburbs and I saw something that intrigued me. Yesterday I took a trip out to John Waldmann's small factory in the rural area outside of Darwin. I will be doing a page shortly in my Home Construction Innovations And Inventions section. Look out for it, it will be interesting. A point that stuck in my mind after talking to John about his concrete panel system was that while he is keen for me to do a page for his system on this site, he asked me not to put up on the web, any detailed photos or description of the actual process and techniques, plus details of the actual concrete mix proportions. Webmasters like myself squeal like hell when some ripoff merchant steals our content. How much worse must it be when it happens to an inventor. Check back in a few days and I'll show you this truly innovative building system. Another pat on the back 4/4/2008
Six months ago I was so chuffed with myself to the extent that I posted a little graphic here to have a little brag about how I was going with the site. (lower down on this page, just hit you back button to get back here} The mob that I am with for my web building journey, SBI have printed out their top 500 list. That is the top 500 sites that they are hosting. I shouldn't say hosting, every man and his dog can host web sites, what SBI does is mentor me through the process and take care of all the technical stuff. All the sites in the top 500 are in the top 1%, but there are a lot more SBI sites that get there too, they just publish a representative section in this list. The graphic above refers to my Alexa ranking, which is less than 1 million. To quote Ken the boss of SBI :- "The Top 1,000,000 represents the Top 1% out of 100,000,000
sites, which is the number of sites that existed the last
time around (or was it the time before?). So, last month April, I had visitors from 107 countries look at 38,000 pages. Staining a Masonite Door 101 - 25/3/2008I have had a couple of E-mails from Jonathan Hunt who lives in West Palm Beach US. Staining your Masonite door is a simple process that can achieve elaborate results. Three easy stages. Preparing, Staining, and Applying a top-coat, will allow you to increase both the aesthetics and value of your home. PreparationPreparing to stain your door just might be the most demanding step of the process. You will need access to a standard set of tools, acetone, and a quality stain. Doors can be stained either hanging in the opening or removed from the frame. To ensure an effective staining, it is important to keep your work-area and the door itself free of dust and debris at all times; this can be achieved by wiping all door-panel(s) and sidelite(s) thoroughly clean with acetone. It is recommended that you tape off any areas that you do not wish stained; this will give you the best results. Staining
Top-CoatThe top-coat, or sealant, is required to ensure your door's weatherability. It protects the stain and makes the surface washable. After you've allowed the door to completely dry, you will need to apply a high-quality, UV stabilized coating. Stir the top-coat as you did the stain and apply with even gentle strokes, pressing hard enough to lightly flex the bristles. Allow the first coat to dry before applying another. It is recommended that you apply a minimum of two coats to achieve complete surface protection. After both sides have completely dried, remove the paper and tape from the glass and protected surface, and replace the door back into the frame. By using this quick and simple method to stain your Masonite door, you are guaranteed results that infuse a lasting beauty to your door and home. About the author:Jonathan Hunt is a copywriter for THAT Agency, a Florida-based Web design and marketing firm. He owns several Masonite doors and stains them at whim, or whenever the mood strikes. Thanks for that Jonathon. Exposed aggregate decoration
A shot taken on one of my early morning bike rides. It is one of many stainless steel decorations inserted into exposed aggregate footpaths in a park at the new Lyons subdivision not far from where I live. There are many of these and each one is different. I am guessing here, but the seem to be profile cut on a CNC machine, from a drawings submitted by the artists. They would then have a couple of tags welded on them so that they would grip into the concrete. The whole project has a good feel about it, having sculptures by local Larrakeyah aboriginal artists. Bar Chairs for a raft slab - Jan-11
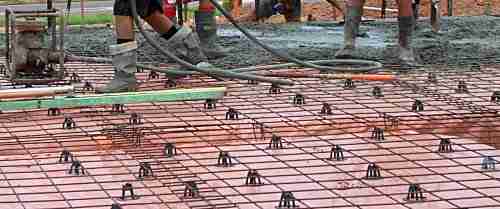
I have had a question from Shane M who lives in Cork in Ireland. Shane runs a landscaping business and he would like to know a bit more about chairs for a raft foundation.
Also in the photo, you can see the joints in the sheets of mesh. The mesh has to overlap at the joints at least two bars or one full bar spacing. The edge bars on full sheets where they overlap are usually thinner. Engineers like to see the rebar on slabs like this close to the top, and concretors want it lower down to stop the risk of it getting too high. So they have to get the chairs right, and then tie the steel at the joints now and again to stop it popping up. OK Shane, that's it, who woulda guessed that little things like bars chairs would be so important. Door Construction - Dec 19Here is one of my sketches from my upcoming series on doors, types of doors, construction and repair and hanging doors. In itself a huge subject. 
I have been writing a bit about doors recently, and working on my cad program, sharpening up my 3D drawing skills. Mow there's a learning curve I'll tell you. In the past I realise now that I was only just skimming the surface. I should have the first of them up in a few days. More On Asbestos - Nov 20This morning I visited a website Lidoran Roofing. They are commercial roofing contractors in Sydney. A large part of their work is in asbestos sheeting removal and replacing it with metal roof sheeting. Apart from their obvious expertise (some remarkably quick jobs), what gets me most about the site is the enormous size of some of the asbestos roofs that they have replaced. Some of them are quite literally as big as AFL playing fields. There must still be thousands of people working in sheds and factories all over Australia with those slowly deteriorating roofs above them. I tend to think just about domestic housing and I had no idea of the amount of commercial roofs done with corrugated fibro sheets. There must still be acres of it out there. I mean, with domestic roofing, there is always a ceiling between the roof and the occupants, but mostly with industrial warehouse there is nothing to stop the dust off the roof falling into the workers below. Check out my asbestos page if you have not already seen it. A home made concrete bullfloat - Nov 13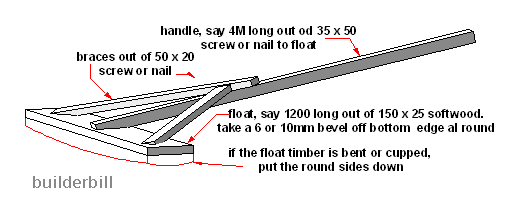 Here is a little something that I talked about on my new Concrete finishing page. It is easy to make out of recycled materials and does the same job as and expensive shop bought amgnesium bullfloat. It has many advantages over a small hand held wooden float, for the first float of freshly laid concrete, but the main one for me, at my age is I don't have to bend my back as much. Shotcrete spray concrete - Nov 7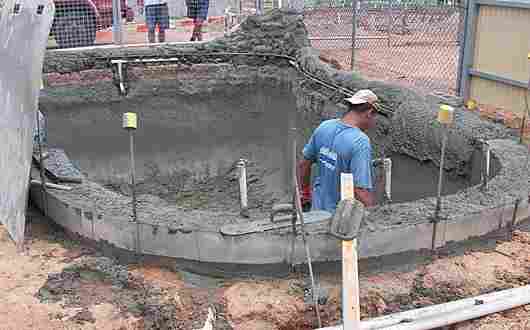 Here is my opening photo from a new page that I have just done, talking about the spray concrete or shotcrete system. As you can see from the photo, it is the way to go for free form curved shapes in concrete. This particular job is a small backyard swimming pool. Check out this new shotcrete page here. Concrete Basics - Concrete Test Cylinders - Nov-5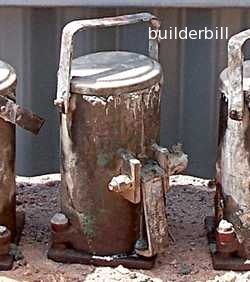 Here's a photo that I shot yesterday morning. I had arranged to be able to take some photos of a concrete pour. When I arrived a guy was setting up his gear do do some tests of the mix. Not at the request of the owner or the builder, but as an on going quality control for the supply company.
As you can imagine, rigorous testing is essential to being able to provide a quality product. Incidentally, if you ever come across a group of these tucked away on a building site, don't disturb them. What has happened is that the tester fills them up with wet concrete from the transit mixer, and he places them in an out of the way corner, to let them harden. He can't just throw them in the back of his ute, because the concrete could be disturbed at this most critical time. He will pick them up the following morning and put them under water in a tank back at the testing center. This to cure the concrete. See my concrete basics page for more on this. Decking,Batten screws - Oct31 I've just come back from my early morning bike ride and once again I pottered along the back of the beach and into the mangroves. Over one of a few boardwalk decks that span the tidal creeks. 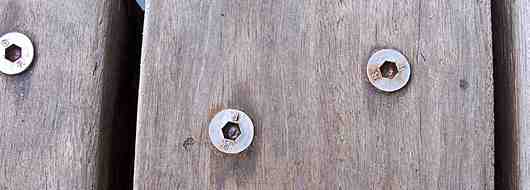 This is what the 45mm thick HW timber decking is fixed with. 14g x 100mm stainless steel batten screws. These are ideal for this type of heavy fixing. The hex socket driver really grips the screw and enormous torque can be applied without the screw or the driver bit slipping. unlike conventional Phillips type screw. Re-grouting Ceramic Tiles - Oct-30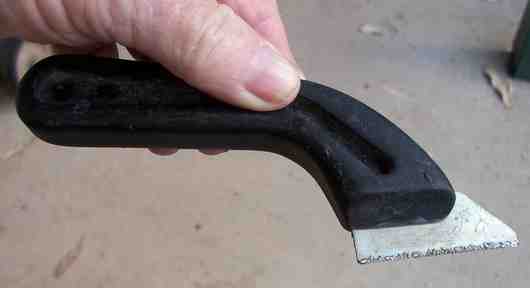 This is a little tool that I will be using later on this morning. It is a plastic handle with a thin blade that is tipped with what I think is diamond chips. I tried it yesterday and it is perfect, the old grout just falls out. I am going to re-grout my kitchen splashbacks and I have been putting it off as it is a pain in the bum scraping out the old grout. With this little tool it should be easy. The only thing is that I need to be careful, as the tiles are fairly soft and there is a tendency for it to shift the glaze off the tiles. I have no idea how much it caost (I am borrowing it off a mate), but it can't be too expensive, it's simple enough. Ready-mix concrete batching plant - Oct-26I had a wander around the batching plant of one of our local concrete supply companies this morning, taking photographs, so that I will be ready for when I extend my concrete basics page into something more detailed. Here is a shot of part of the control room As far as computerised technology goes, it is not up to space shuttle launch standards, but If I could show the full details in this one shot, you would be able to appreciate that every ingredient in a concrete mix that leaves this plant is totally controlled. Thanks to Mike Cull of HB Concretein Darwin for permission to take the shots. Concrete finishers-Another family team. -Oct -24 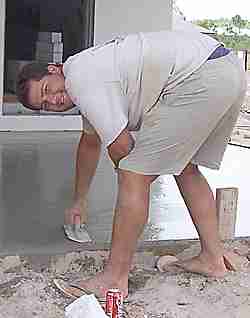 Yesterday morning I hung around with this father and son team, Savvas and Charley, taking photos for my upcoming concreting section. The other member of the three man team was the Charley's father-in-law! Andrew Andrew was told me that he was helping out, because it was so hard to find young guys willing to do the work. That's a ratio of 2:1. Two guys over fifty, one under fifty. On a well paid young man's job. I have said this before, In the last few years our kids seem to have been leaving school with the idea that manual work is somehow not a career to choose. High schools closing down trade skills workshops in favour of computer labs etc. Yet these guys are running a successful business and making incomes that many university graduates could only dream of. There's good money to be made and "somebody's gotta make it!" A hard hot job -Oct -23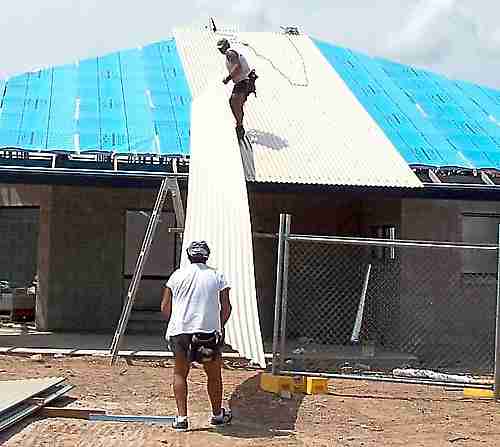
Our hottest and most humid time of the year is fast approaching. We get the heat and high humidity, but we don't yet get the cool relief of the rains. I had a chat to this father and son team of roofers yesterday morning. They had just started sheeting a large four bedroom house with what is commonly referred to as corrugated iron. The old guy told me that the two of them will take about a week to fix the roof. Apart from the high ambient temperature and lack of shade, these guys are also getting a heck of a lot of reflected heat from the surface of the sheets. The reason this type of roofing is popular is it's ability to reflect rather than absorb the heat from the sun. When I first started fixing this type of roof, the reflective foil underlay (the blue stuff) was the natural bright aluminium finish, and on days like yesterday it was absolutely blinding. The manufacturers found out that the thin coat of blue paint on one side, did not affect the thermal efficiency of the material, and so gave us all a measure of relief. You will see on some of my roofing pages, that this blue spray has also started to be used on the coil sheets that are used to rollform the metal roofing battens also. My parting remark to the old guy was "you got a tough job, keep up the good work" and he came back with the predictable "Yeah, but somebody's gotta do it". Concrete basics oct 18 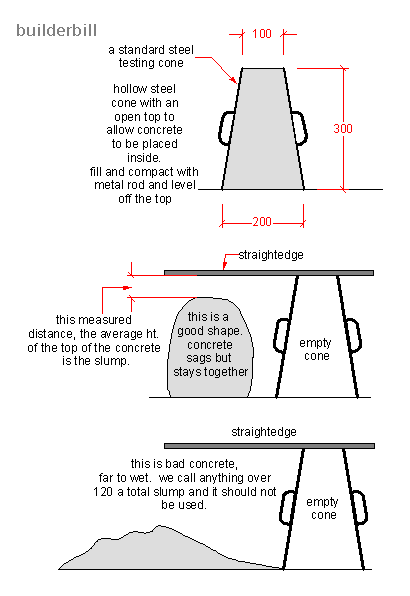 Above is a sketch from my new page on concrete basics, showing how to check the slump of wet or plastic concrete. This will be an ongoing series. Check it out here. 
Pat on the backSketch says it all, just giving myself a pat on the back, as I am "as pleased as Punch" with my progress on the site. This month I have had a great ego booster. Apart from my usual questions and and kind comments from readers, I have had been contacted by a State TAFE organisation with a view to them using some of my content for their apprenticeship training material.Also as if that wasn't enough a lady who has a very popular European based building related website has commissioned me to write five articles for her site. Gainful employment! There's life after retirement after all. Sawing down doorjambs for fitting a floating floor under. Oct -14 Here's a preview shot from my upcoming floating floor page. I fit a cheap floating floor to three bedrooms and a corridor.
In a small area I had to fit to five timber door jambs. I cut underneath four of them with my old crosscut saw. I would have preferred to have used one of my panel saws for the job (finer teeth, neater cut) but they were both a bit dull. So is the crosscut now, as I caught the concrete walls that the jambs were fixed to a couple of times. Pressure Cleaner Oct -10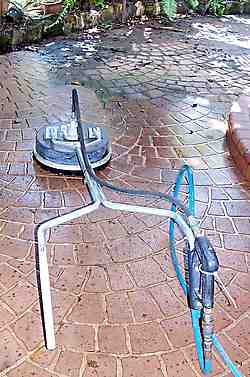 Recently I hired a pressure cleaner, or water blaster to clean up the concrete in my pergola / spa area, and around the concrete verandah to our house.
The stamped concrete was done about ten years ago and was sealed when it was new. Unfortunately the owner (that's me) has been a bit slack and not bothered re-sealing it, ever. Concrete like this in an area that gets watered every day, should be re-sealed say about every two or three years to keep the mildew at bay, and the surface looking good and easy to clean. More on pressure cleaner and sealing concrete. Annual Roof MaintenanceI have been pressure cleaning my concrete, and while I had the cleaner on hand I used it to help clean my roof.We are coming to the end of our dry season now, so most of the leaves that are going to fall have already dropped. 
Taking Out Old Screws -Oct-5th While laying of my floating floor in the bedrooms, I got away with leaving four out of the five doors in place.
Normally I would have just taken them off, but they didn't have loose pin hinges, and the screws were clogged with layers of paint. There one door that I had to take off to take a few mm off the bottom. In a nutshell it boils down to
Using a Jointer or Surfacer-Aug 4th  I was responding to a query this morning about straightening timber among other things, and I went to Wikipedia to lift off an image that I put on there a few months ago. what's the point I thought, this lot should be on my site, so here it is. Overflow Relief Gully, Gully Trap, or Plain Old ORG, Sept 20 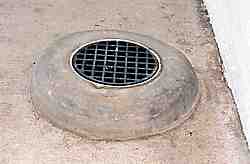 Have a look at this little beauty. He doesn't ask much, he's misunderstood, sometimes people run rainwater into him, sometimes idiots rip him up or cover him over.
 Yet he doesn't ask much, he's almost maintenance free but he is always there there to protect us when things start to go wrong. He is of course, our old mate the ORG. More about the ORG Correct amount of fall for a gutter. - Sept 19thI answered a query about fall in gutters the other day.I have always just put about 20 to 25 fall in any one stretch of gutter. I just measured off the fascia, until the time we had to refix a long length. The owner got up on a ladder after we left the job and put water up there with a hose pipe. Water ponded at the wrong end. I then did what I should have done in the first place and put a level on the fascia. It was about 45mm out of level in a 9m run. When we refixed the gutter it looked terrible, but it had to be. Just to expand on that.
Efflorescence in concrete, brick and block walls - Sept 18th 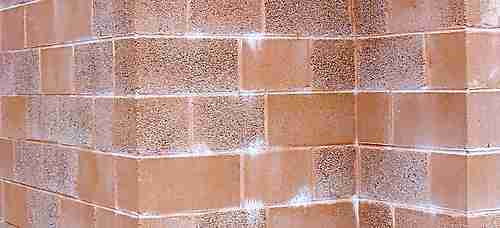 Above, efflorescence in a reinforced concrete blockwork wall, 200 thick. Mostly houses built with concrete blockwork walls are either:-
Unfortunately any cement or concrete based product can be prone to the big "E", efflorescence. read full blog post Curing Concrete - Sept. 17  Curing concrete is the term we use for stopping freshly poured concete from drying out too quickly. The reason that we do this, is because if we let concrete dry out of it's own accord, it will be weaker and tend to crack more than if we in some way control the drying process.
 There are quite a few ways of doing this. Full blog post Cleaning Grout and Other Spots off Ceramic tiles - Sept 14 Here's a message about cleaning ceramic tiles that I recieved yesterday from Deborah In the US. Hi Bill, My name is deborah and i recently had my bathroom renovated. the only problem is that the contractor got grout and plaster on my ceramic tile floor. how do i get this off my tile. he did a beautiful job but the spots of grout and plaster specks look awful please help thanks very much  More........ Fixing to steel, a Curtain Track To Steel Lintel-Sept14 Here's a letter about fixing to steel, that I got from Sarah in the UK. Hi Bill, I'm trying to drill into a thick metal lintel to put up a curtain pole and blind. I have a high speed drill bit and a cordless drill. I hardly seem to be making a dent in the metal. Do you have any tips? I'm also having the same problem under the stairs to put up some coat hooks. Assuming I can drill a hole, what sort of rawl plugs would you use? More.................... Not found it yet? Try this FAST SITE SEARCH or the whole web |
Hire Equipment Furniture Fittings - Architectural Hardware - Electronic Locking Systems - Technical Hardware BuilderBill sponsorship Older Blog PostsBlog posts on this pageAnother pat on the back - 4/4/2008Staining a Masonite Door 101 - 25/3/2008 Exposed aggregate decoration - 14/2/2008 Bar Chairs for a raft slab - Jan-11 Door Construction - Dec 19 More On Asbestos - Nov 20 A home made concrete bullfloat - Nov 13 Shotcrete spray concrete - Nov 7 Decking,Batten screws - Oct-31 Re-grouting Ceramic Tiles - Oct-30 Ready-mix concrete batching plant - Oct-26 Concrete finishers-Another family team. -Oct -24 A hard hot job -Oct -23 Concrete basics Pat on the back fitting a floating floor Pressure Cleaner Annual Roof Maintenance Taking Out Old Screws -Oct-5th Using a Jointer or Surfacer-Aug 4th Overflow Relief Gully Fall for a gutter - Sept 19th Efflorescence - Sept 18th Curing Concrete - Sept. 17 Cleaning Grout, Ceramic tiles - Sept 14 Fixing to steel, a Curtain Track To Steel Lintel-Sept14 |
|||||||||||
|
|
||||||||||||
|
Please Note! The information on this site is offered as a guide only! When we are talking about areas where building regulations or safety regulations could exist,the information here could be wrong for your area. It could be out of date! Regulations breed faster than rabbits! You must check your own local conditions. Copyright © Bill Bradley 2007-2012. All rights reserved. |
||||||||||||