|
|
|||||||||||
Underpinning, or repair and strengthening of faulty foundations.There are quite a few different methods of underpinning damaged, faulty or subsiding foundations. I have split this page into the sections below.
Modern methods, high pressure grout injection.
Sometimes called in the US "Mud Jacking". This method of underpinning I must confess that I have never seen it done, I don't live in an area where it has become effective. As a result I am only surmising here. If any of my readers have any experience of this method I'd be glad of the feedback.
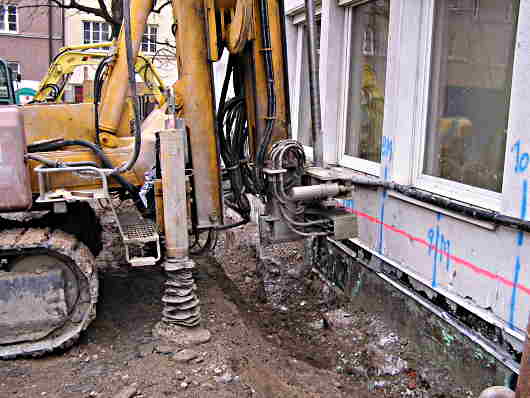
Modern methods,screw piles, micro piles etc.There are various non intrusive methods of placing piles under weakened foundations to stiffen up and provide greater bearing capacity for the sub grade soil By non obtrusive I mean piles that are not dynamically driven into the ground by impact with any of the versions of the traditional pile driver. Which in many cases could do more harm than good.
Micro pile, mini piles.
Used mainly on commercial and civil engineering jobs, these small piles, 125mm to 300mm rely on the surface friction between gout and the surrounding soil. Micro piles were first used in Italy and they have gained immediate acceptance in the field of stabilizing historic building because of their non-intrusive nature.
This type of underpinning work is also used extensively under existing buildings to stabilise them, prior to deep excavation work being done on the adjacent property. Bored or drilled, cast in-situ concrete piles
Other methods of underpinning are in my new glossary section. Leave this underpinning page and back to home. Not found it yet? Try this FAST SITE SEARCH or the whole web |
Hire Equipment Furniture Fittings - Architectural Hardware - Electronic Locking Systems - Technical Hardware BuilderBill sponsorship Hire Equipment Furniture Fittings - Architectural Hardware - Electronic Locking Systems - Technical Hardware BuilderBill sponsorship
Quick definitions
Define: Bearing capacity. The amount of pressure that a soil can withstand. Taking into account the sub grade conditions within a zone of influence of the foundation. Define: Geotechnical Report. A report by a suitably qualified person that ground conditions on the site. A report that defines the bearing capacity of the site. Define: Raking Shore. A raking shore is a type of prop that leans against a wall to stop it falling sideways. Define: Grout. A mortar mixture of various types. Many prepackaged grouts are polymer modified for various uses, non-shrink, self leveling, tile setting etc. For the applications on this page, micro piles may be filled with a grout mixture of just cement and water, other grouts contain sand and yet other could contain a mixture of soil from the site, water and cement. Other foundation related Pages.
|
||||||||||
|
|
|||||||||||
|
Please Note! The information on this site is offered as a guide only! When we are talking about areas where building regulations or safety regulations could exist,the information here could be wrong for your area. It could be out of date! Regulations breed faster than rabbits! You must check your own local conditions. Copyright © Bill Bradley 2007-2012. All rights reserved. |
|||||||||||