|
|
|||||||||||||||||||||||||||||
Hand Tools
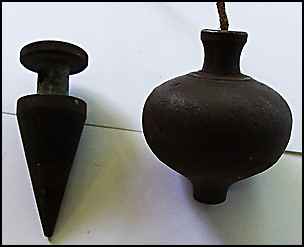
Hand tools are basic items for DIY and home improvement, but I am not about to go into any great detail here. the main reason is that a basic set of these tools is quite small, certainly when you start out, and there is heaps of stuff on the web about them. If you have a leaning towards fine joinery, there are a lot of websites and user groups out there, with loads of good information. I am not at this stage going into sharpening chisels etc. It has been done already and better than I can do it. "just Google it!" What I will do, as something occurs to me that I think is a bit different from the norm, or not really mentioned elsewhere I will jot it down here. So this will be a work in progress for a while. If you have a question, send me an email, I'll do my best to answer it. Any hand tools that are used by a particular trade like metal roofing snips or concrete finishing tools are in that particular section. So to fire up a page on hand tools what could be more quirky than a section on one of the oldest, the cheapest, always overlooked and not considered a tool by many? The humble string line and plumb bob. String Line, Plumb BobEvery builder, carpenter, plumber, landscape gardener, etc. all use one of the oldest and most basic of tools. A string line, which will when pulled tight, give you a straight line between two points. I can bang a series of steel pickets in the ground, stretch a string line between them and spray marker paint over it, (or sprinkle lime, or plaster, or cement etc.) and I have marked out a sewerage line for the plumber. Carpenters use string lines all the time, straightening walls, floor joists and rafters etc. The get a bit more sophisticated than that, they use the line offset, as shown in the link below. Get good quality braided line (often called bricklayers line), that has a bit of stretch in it. Tie a fixed loop on one end of the line, drop it over your first nail. Run it out to your second nail, spin it around with your finger about 8 time and drop it on your second nail. It will have 8 twists in the line. pull it tight and then as you ease off the pressure the twists will take hold and grip around the nail. A half hitch on top is all you need to hold it then. Easy to tighten and easy to undo. no complicated knots. A handy Item is a chalk line. This is a reel of string inside a container of chalk powder. Quite often they are made to look like a plumb bob. When the line is stretched between two points on a flat surface, and then given a sharp flick, a line of chalk dust is transferred to the surface. Just like magic. Great for marking out wall line on floors, screw lines on ceiling sheets etc. Be careful selecting the chalk. Some of the red stuff is ochre based and hard to clean off. Never use it on anything to be painted.
My old mate Holmesy who has hung hundreds of rolls of of wallpaper in his time, uses a length of string with a small brass weight on it called a plumb bob. He doesn't trust the walls to be plumb, ("bloody builders"). To start each wall off vertical, he climbs up his step ladder and hold his line with the plumb bob hanging down. He puts four or five pencil marks along the line and then repeats the process lower down, so that he has a true vertical line to work to, (He probably then turns on his radio, as he's done his thinking for the day :-) click here for sketches on setting up lines, a bit more on plumb bobs, and a digression on medieval building construction.Spirit LevelsA level to most people is the common mass produced usually aluminium framed, spirit level. So called because the first ones were a bubble of air trapped in a curved glass cylinder filled with spirit, ethanol, because of it's low freezing point. (You can't give the boys a chance to stop work just coz their levels freeze up, eh! ) Get a good solid one with the bubbles set in clear resin/plastic. I like Stabila. I bought my first Stabila when I was 18 after being invited by a salesman to belt a sample of one of the resin protected bubbles with a hammer. Prior to that the bubbles were glass and easily broken. That level lasted years. I got rid of it when it became too hard to read. The plastic was so scratched. To check a spirit level, for level or plumb (vertical) put it to a surface, read the bubble, then flip the level 180 deg. (back to the same location, don't move about any) and read the same bubble again. If it gives a different reading then the bubble is out. There are a other levels as well:-There are spirit levels built into squares, that hook on to string lines, that are magnetic so they stick to your steel etc etc. Mostly they are just gimmicks. Boat builders, ceiling fixers (until lasers came out), swimming pool installers etc. use the humble water level. A length of garden hose will do, with a bit of clear pipe at each end, filled up with water. Cheap and easy to use. Spirit level with on board computer chip that reads out angles, percent grades etc. A specialist tool.
Builder's auto level, for years a builder's main tool for setting out foundations etc. It is a small telescope that is set up to read level (horizontal) only. No vertical movement. It needs two men to use, one to read the level and one to hold the staff. The staff being an extending aluminium extrusion with graduations on the face. It could also be as simple as a piece of timber that the guy on the staff puts a pencil mark on at the instructions of the guy reading the level. They are nearly always called a dumpy level, after a much older instrument. They are easy to use and extremely accurate. Here's a trick to setting up any of these type of levels with the three knurled nobs for setting the thing level. Place the thumb and forefinger of each hand on two of the knobs. Turn each thumb either towards or away from each other. The bubble will move in the direction of the left thumb. Laser Level. They are getting cheaper all the time and entering the DIY arena. Not only for leveling, but will also read verticals. One man operation, set it up in a safe corner and walk around with a staff and mark the levels. A must for all builders, concretors, ceiling fixers. click here for more on leveling, laser level in use, dumpy level,setting up and checking levels. Hard to define if they are hand tools or power tools, take your pick.SawsI don't do a lot of joinery any more, so a crosscut saw, and a panel saw ,would be all I use. My only back saw, is a medium size tenon saw . The rest is done with power saws. As far as brands go I have always liked Sandvik, great steel, comfortable grip. Almost unbreakable handle. They are known to be a bit brittle, so unlike other saws that I sharpen and set myself, I don't put extra set on them as they tend to snap off teeth if I overdo it. For a start, a good enough hand saw is one of the cheap throw away models, with the hardened teeth. The teeth are sort of blue coloured at the tips. The hardening makes them stay sharp longer, but also makes them not able to be sharpened by hand. Use it, look after it and DON'T LEND IT and you will get your monies worth. This way there is no cost of resharpening or learning how to do it. click here for a home made miter box to make your hand sawing neater. click here for more on hand saws and using them. Squares
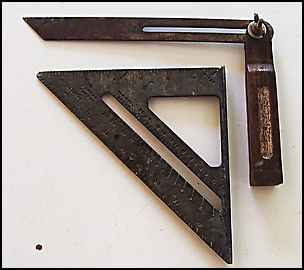
I used to have two or three nice carpenter's try squares, timber stocks with brass edges and steel blades, but when they got lost I never replaced them. I get by with a Stanley 45 deg. angle type square, and a 600mm steel square. Both of which lay some claim to being roofing squares. I just use them as plain squares. Check a square by marking a pencil line on a piece of straight board, flip the square 180 deg. and the pencil line should still be spot on. If not your square is not square. (90 deg.). Similar to a square is an adjustable bevel, used for marking specific angles. Once I have the angle set, I mark a piece of board with the angle and write on it what the angle is. Then throughout the job I check it from time to time to make sure the angle hasn't changed. click here for more about squares, squaring larger areas setting out with a square etc. Hammers
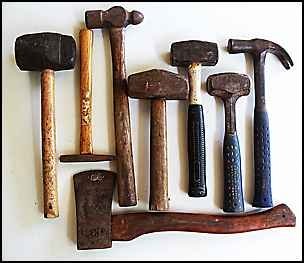
A carpenter's claw hammer, an Estwing 26 oz. does me for nearly everything. I have a few lump hammers, for heavier work with cold chisels etc. I stopped using the ones with wooden handles a while ago, in favour of an Estwing steel shaft, and I have one with a fairly long fiberglass handle. I have never had a hammer with a waffle or checkered surface, so I can't advise. They certainly look interesting Lighter hammers are OK too, it depends on how it feels and what you will be using it for. I know heaps of tradesmen who use lighter hammers than me and they are fine. Never tap two hammer faces together, they are hardened steel and could chip. Keep the face of your hammer clean. As soon a I start bending a few more nails than normal, like one in every 200, (ha ha only joking) a quick glance at the face of my hammer usually reveals a bit of resinous gunk there. A quick rub on a rough surface (sandpaper if you have it handy) usually fixes the problem. Do you want to win a beer off your mates after work? Or challenge the boyfriend to a nail driving competition and win? Click here to find out how to drive a 3 or 4 inch nail into a lump of wood with one swipe. click here for more on the hammers in the photo, and what they are used for. Measuring Tools
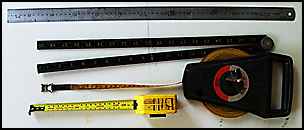
In the photo to the right is a stainless steel rule with imperial one side and metric the other. I surprise myself by using it quite a lot, because it is clear to read and fine graduations. Below that is a plastic folding three foot rule, that is a reminder of the boxwood ones I used as an apprentice. Needless to say I don't use it now. The one under is a 30 meter fiberglass tape used for setting out. Good for a quick job, almost unbreakable. It has lasted years. It is not the most accurate, but after breaking a few steel ones, I put up with a little stretching, and check the set out later with a steel tape when the rough set out has been done. Underneath that is my main measuring tool. An 8 meter metric only Stanley. I don't so much as go by brand when I am buying tapes, but go for what's on special. I don't see any point in paying top price for one, when it can get broken or lost just as easy as a cheapie. One thing I hate though are these imperial / metric mixes. Every time I get one by mistake I get rid of it. Too confusing.
Here is a trammel. They can be used as you might guess for scribing circles. They can indeed replace a compass, but they can do more than that. Click here for more on trammels. Cramps, Clamps
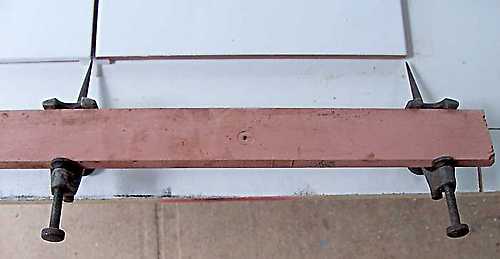
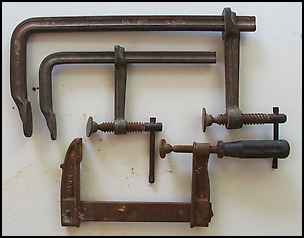
I love my clamps, I couldn't work without them. They are indispensable. Just like having a good mate on the job to hold and steady things for me. I have had heaps in my time, sash clamps, flooring cramps, hand clamps,etc. They all have their own specialty so it is not all that easy to choose. My favourite by miles is they large Bessy 300 mm. I once had a temporary steel brace slip on me because of a cheap clamp. I went out and bought 8 of the Bessys. Cost me heaps, dearest clamps on the market. I have never regretted it. They have an unbelievable grip. A trifle clumsy for joinery work, but I manage. back to topTin Snips
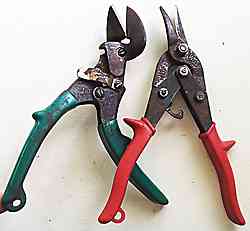
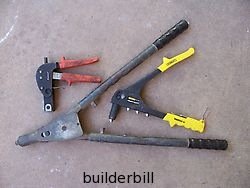
I use my tin snips, mostly for cutting sheets and flashings on roofing jobs. If you get a nice new pair, look after them as they are a delight to use when they are sharp. Don't lend them out. Don't use them for cutting heavy material they are not designed for. (I you want to be told where to go in basic Anglo Saxon, just ask a roofer if you can borrow his snips to cut open a pallet:-) More on snips in my roof sheeting page.back to top Vise Grips, Mole Grips.
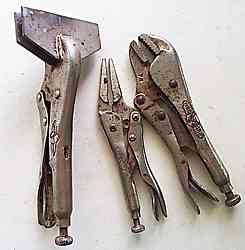
They come in a variety patterns used for many specialist job, apart from the original type, on the right of the photo. In roofing I use them for holding the sheets when starting off. Bending flashings. Gripping rounded off nuts that nothing else will shift. When Mig welding steel wall frames they are used to quickly clip studs to plates etc. The screw at the bottom adjusts the amount of pressure exerted. back to top Pop Riveters
They smaller Stanley set, with the yellow handles would have done the job OK, with a strong squeeze, but the large ones are so much easier. Both of them come with extra nozzles, for different size rivets, and a small spanner to change the nozzles. I always l look for a slim barrel that holds the nozzle, so that it is possible to squeeze into small gaps. The small set with red handles is a crimping tool that sets Ramset screw fittings into 10mm plasterboard. back to top Caulking Gun
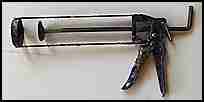
What it has to do, is deliver a smooth constant pressure to the cartridge as you slowly pull the trigger. If it is smooth and not jerky you can get a consistent bead. Don't try to do too much in one hit, most of the stuff forms a skin on it fairly quickly and it gets messy to smooth out after that. As soon as you have done a bead, click the button at the back to release the pressure and put the gun down on a bit of newspaper or scrap, for the excess to dribble onto. If you don't release the pressure a lot more dribbles out. I keep plenty of cleaning rags near as some of that gunk is real sticky and messy. Try a small run first. Get used to the material, if it is silicone around something easily seen, consider masking tape, but don't leave it on too long. As soon as you have smoothed out the bead, I use a wet finger, strip off the masking before the skin gets well formed. back to top Fibro Cutter
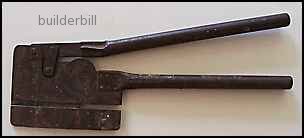
It is a fibro cutter. Used for cutting AC sheeting. That is, fibrous asbestos cement sheeting. These things probably saved me an heaps of others like me from getting asbestosis. They cut with very little dust. It is a pity that they are useless for the modern sheets that are not as brittle as the old stuff. A word on old AC sheeting, If you are removing any old AC sheets where I live in Australia, you have a requirement to use a licensed asbestos removalist. If it is anything more than a few square M. he has to notify the authorities. It is a big deal to take off and dispose of AC sheeting legally. Think carefully and get advice before you do anything. click here for more on Asbestos cement sheet, fibro, asbestos removal etc. Leave hand tools and back to home page. Not found it yet? Try this FAST SITE SEARCH or the whole web |
Hire Equipment Furniture Fittings - Architectural Hardware - Electronic Locking Systems - Technical Hardware BuilderBill sponsorship Other Pages.
"When I were a Lad"My dad gave me his old 1930's Philadelphia Diston. I still have it, but I won't recommend one for the average DIYer. Although...... if you see one at a lawn sale....grab it! The first time I took it to work as an apprentice, the foreman picked it up, gave a smile and bent it into a circle with the end going straight through the handle about 4 inches. After easing off and letting go of the end, he sighted down the blade. Do they make steel like that anymore? Try it on one of your saws and see :-) Once again, "When I were a Lad"Looking at my old folding three foot rule makes me think about the fact that certain tools have not changed much since the middle ages when they were invented. My old boss (who himself hadn't changed much since the middle ages) had a two foot rule, while everybody else used three footers. He went to measure the length of a wall one time with the workshop foreman. On a long measure, if there were two of you the trick was for say "A" to hold his rule to the start point, and then "B" would lay his rule touching the end of "A"s. Each in turn would walk around the back of the other repeating this and carrying on a really accurate total measure. Perfect every time. Except that in this instance "Old Guffy" was using a two foot rule and saying to himself "2, 4, 6, ....." and the foreman was going "3, 6, 9......". They got to the end and compared lengths. Something like 18'7" and 27'7". |
||||||||||||||||||||||||||||
|
|
|||||||||||||||||||||||||||||
|
Please Note! The information on this site is offered as a guide only! When we are talking about areas where building regulations or safety regulations could exist,the information here could be wrong for your area. It could be out of date! Regulations breed faster than rabbits! You must check your own local conditions. Copyright © Bill Bradley 2007-2012. All rights reserved. |
|||||||||||||||||||||||||||||