|
Placing concrete.
Placing concrete is the hardest part of concreting. I will class it as getting the concrete to the job, placing it into the formwork and leveling so that the finishing can start. Before this of course you should have done all the preparation work. This should be done in the previous days, leaving the placing and finishing to be done on a separate day.
So here are the jobs that I like to see finished completely before I order the concrete.
- Remove vegetable matter. I am not talking about market gardening here, I just mean that top layer that contains grass or weeds and other crap. Get down to subsoil. By hand or with a machine ( "Bobcat" or similar skid steer loader). Cut out tree roots and so on.
- Compaction. If you then have to add fill to get the correct levels, make sure that it is compacted. This could be as simple as watered sand or sand or gravel fill compacted with a machine, say a plate compactor.
- Formwork. You will need formwork of some sort to contain the concrete, to define the edges. On small jobs like shown here, it also is a guide for the top of the concrete.
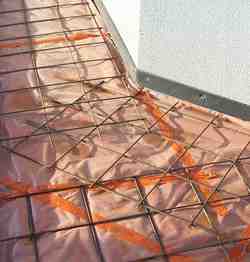
- Vapour barrier. I like to see a plastic membrane laid under the concrete. On house slabs it is mandatory, to stop dampness rising through the concrete slab, but for driveways it is optional, and so you don't have to do it, but using a membrane underlay stops the plastic concrete (that's concrete that is still in a wet, manageable state) from drying out too quickly or unevenly. If you pour concrete onto dry earth, a percentage of the water in the concrete will soak into the soil, so changing your precious water cement ratio. At the very least if you are not using a vapour barrier, water the earth down to stop too much water being sucked out of the concrete.
- You will need your rebar or reinforcing mesh in place, if it is needed. Packed up to the correct height with bar chairs.
That is the main work done but then I also:-
- Tidy up the site, as I have said before, things get a bit intense when pouring concrete, so do yourself and your mates a favour and shift the crap from out of your way.
- If you are using wheelbarrows, pump up the tyres. If you are a first time concreter, make sure you have a decent solid wheelbarrow. Garden barrows just won't handle the loads.
- Make sure the tools etc. that you need are on site and good to go. Fuel up vibrators etc.
- Make sure that the access for the concrete truck is clear, I have on occasions parked my own vehicle in it, to stop a stranger parking there and then disappearing.
Placing the concrete
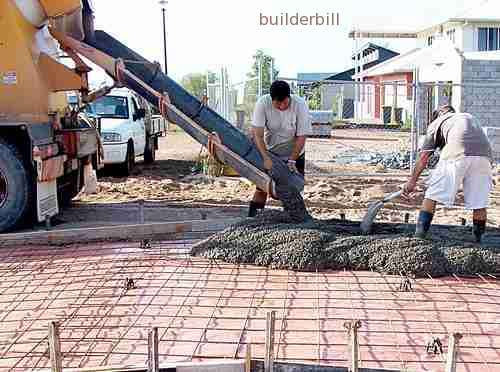 |
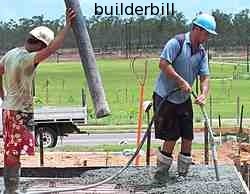
| Placing concrete - Charley and Andrew started at the bottom of the slope working uphill. Note the height of the chute and the consistency of the concrete. Savvas is tapping the forms with a hammer, now and again he heaves up on the mesh if it is sagging. |
OK, so we are all ready to go, nice and early in the morning. All the preparation work has been done the previous day, to avoid any unnecessary delay when the truck arrives. The correct mix has just arrived in a transit mixer truck. The guys in the photos were going to do an exposed aggregate concrete finish, and so had ordered a mix with a maximum 10mm aggregate size.
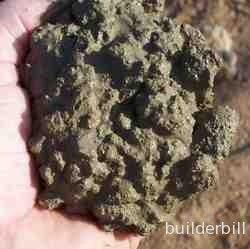 |
| Placing concrete - A hand full of the first concrete out of the chute. Experienced concreters get a feel for the concrete and can tell by the look and feel if it is a good mix. This is a 10mm paving mix that will have an exposed aggregate finish. |
- The concrete that arrives at the job will normally be as good as it gets. You can of course stuff it up, by adding extra water, and I have already said that adding extra water is equivalent to throwing $50 bills into it. There are exceptions of course, where conditions change, like you have underestimated the time it will take you to place the concrete, but on a well organised job there is no reason to add extra water.
- Segregation. You can stuff up a good mix in another way too. That is allowing the concrete to segregate into it's component parts.
- Concrete should not be allowed to fall freely more than a 1.5M.
- You are pouring a basement floor, you must not just dump the concrete in there. Either provide extra chutes or hire a pump.
- Pouring concrete stairs, start at the bottom and place the fresh concrete on top of the already placed stuff. Don't let it slide downhill.
- The reason that the transit mixer always has the bowl slowly turning is to keep the correct consistency of the concrete.
- Transporting wet concrete over a distance, say in the bucket of a loader, or in a trailer, just does not work. What happens is that the heavy solids gravitate to the bottom, the lighter sand and cement is in the middle and the water is on the top. So much so that it becomes almost impossible to dig out with a shovel. This is concrete segregation at it's worst.
- The following points all apply to whatever is the physical method of getting the concrete into place. That is b pump, by the chutes of the transit mixer or a wheelbarrow.
- So, back to our normal job, Start at the low end. Work uphill.
- Keep the chute low and close to the placed concrete. Try not to drop it or drag it too far.
- Place fresh concrete up to the older concrete.
- Keep one face working at a time, that is don't do odd patches here and there.
Vibration or compaction of the concrete
Another way to devalue the quality of your concrete that you have forked out good cash for, is to not compact it correctly. Concrete when mixed in the bowl of the mixer entraps a certain amount of air.
In the process of getting it out of the truck and into position on the job, there is inevitably a certain amount of more air trapped in the mix. Apart from some special concrete mixes, this air is not wanted. We remove the air, to compact the mix back to it's basic ingredients by vibration. This liquefies the mix and allows the air bubbles to rise to the surface.
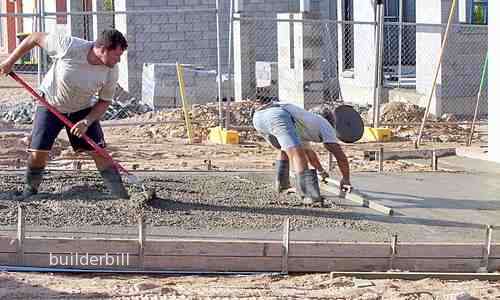 |
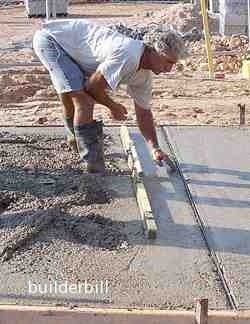
| Placing concrete - Savvas works around the outer edge with a 3M. long aluminium screed, (he has a selection of different screeds) leveling a strip about 400mm wide to work from, using the top of the formwork as his guide. He then uses those strips as guides, to screed off the main area He does not actually screed off the top of the forms. Charley works with him leveling and raking away the excess. |
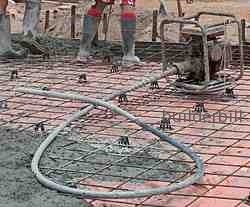 |
| Placing concrete - By far the most commonly used concrete vibrator on house building sites. Petrol engine driven 1 1/4" flexible shaft. |
 |
| Placing concrete - keep the poker vertical and slowly dip it in and out. |
- For the job pictured above, a 100 thick driveway, the vibration was done by hand.
- From time to time as the pour progressed one of the guys would grab a hammer and tap the formwork, setting up a vibration along the timber form. When this is done, you can actually see bubbles rising to the surface. Apart from the quality of the concrete aspect of this, there is also a visual aspect. If you don't do it, you get unsightly air holes on the edge of the concrete when the formwork is stripped.
- When the concrete is being placed and levelled the guys on the shovel and the rake work the mix up and down to compact it.
- The guy on the screed again tamps the surface up and down, as he starts levelling it.
- On thin slabs on the ground that are more critical than a residential driveway, like road surfaces or tilt slab panels, it is common to use large powered mechanical screeds that vibrate the surface and the edge forms consistently.
- For deeper concrete, like in foundations or walls it is essential to use a powered vibrator. Then the concrete is vibrated on the inside, rather than external vibration mentioned before.
- These consist of a motor driving a flexible shaft with a steel vibrator head on it. Commonly called pokers.
- They range from small 20mm or 25mm models, electric motor driven, to the normal 30mm petrol engined machine. Larger models still are compressed air driven.
- When using a poker, keep the thing vertical and drop it in and out every say 150mm.
- Don't lie the poker flat and drag it, that tends to segregate the concrete and leave weak areas. Don't try to use the poker to shift the concrete, let the guys on the shovel or rake do that.
- It seems very satisfying to wedge the poker between the rebar, and spread the vibration through the reo steel. Don't do it. This can move the steel from it's design position.
- Same again, don't wedge it between the formwork and the rebar. It seems like a good Idea when the whole thing is shaking, but you could be dislodging bar chairs that are providing the correct concrete over for the steel. You can mar the face of the formply with poker scars.
- Pre-cast makers of things like concrete blocks, pavers, and garden ornaments use vibrating tables.
- On large construction jobs engineers design purpose made bolt on external vibrators for steel formwork.
So, to recap this section, no matter how you do it, one way or another vibrate that concrete!
Getting the finish height.
On small jobs it is common to set up the top of the forms at the exact finish height, and then screed off them to get the concrete height. Doing it this way if you use timber pegs to hold the forms, you can saw them off flush with the top so that they are not in the way of the screed.
In this way, you can set up something like a 3M wide driveway, and using a straight length of timber about 4M long, two men can work together at each end first tamping the concrete in an up and down motion, to compact it and then working in a sideways sawing motion screed the slab from the edges.
Three or four metres is about the limit that you can do it like that, so you have to set up temporary screeding rails for wider pours.
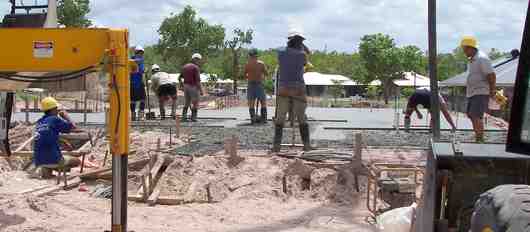 |
| Placing concrete - In this shot of a larger slab, the boss is to my right with a dumpy level, when required the boys smooth a small patch and he checks it for level. A couple of patches are joined with a screed, to give the strips shown. Note! the guy with the yellow helmet on the right is the concrete pump operator. He is holding the remote control behind his back. |
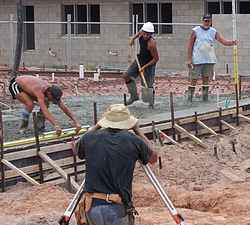 |
| Placing concrete - The guy with is back to me is using a builder's auto level to give spot heights to the guy in the light blue shirt with the staff. Note this shot shows a crap method of forming up the edges, relying on pickets and the timber braces against them with no way of stopping them slipping. The guy had string lines on the forms and he needed them as he spent most of his time frigging about keeping the shutters straight. |
A lot easier way is to get spot levels with a laser level or a dumpy level. (I don't really mean a dumpy level, I mean a builder's auto level, but old habits die hard). This is a lot easier, but demands a fair bit of skill from the guys on the screeds.
- The formwork is set up as close to level as possible, to give the guys a visual reference when pouring.
- The boss takes a reading all round and finds the lowest spot. He works from that height.
- The pegs and odd bits of formwork can be higher than the finish levels.
- The first section of concrete is poured raked out and vibrated.
- A guy with a staff and a steel float levels and smooths a small patch and they check it with the dumpy.
- He adjusts it up or down, and then carries on and does another say 3M away.
- The bloke on the screed levels between the two then they repeat the process at 3M parallel.
- Then using the leveled strips as guides the rest is screeded by hand and by eye.
Control Joints
 |
| Placing concrete - A metal control joint that causes a weak line in the slab, so the concrete will crack under, but the top will have a straight, 10mm wide rubber insert. |
 |
| Placing concrete - Savvas laying a metal control joint into the freshly screeded concrete. |
 |
| Placing concrete - a foam isolation joint fixed to the plastered surface of the house slab/wall. Fixed with masonry nails. The mesh will be lifted by hand as the concrete is poured. |
We have to have joints in concrete. They are there to stop random cracking. As concrete dries out it shrinks, so it will crack. So one of the main reasons for putting in a control joint is to, guess what? Control where the crack will be, rather than leave it to the concrete to decide. Sometimes in spite of all our best efforts the stuff cracks.
Quite a while ago I built a house on a large triangular plan, and it had cut-outs in the slab with acute angled internal corners. (Like the inside corner of a letter "V"). I had put heaps of extra rebar across those internal corners, to try to stop cracking. The day before the pour the owner ask myself and the three concreters if it would crack at those awkward places. We looked at each other and all we could say was "probably not", "maybe yes maybe no". that sort of stuff. I worked it out later that between the four of us we had something like 120 years of concreting experience and yet we couldn't come up with a yes or no answer.
Joints weaken the concrete in places we choose, and so the concrete cracks where we want it to crack and not randomly. On the driveway job pictured the boys used a few different types of joints.
- A 12mm thick by 100mm deep bitumen impregnated foam strip, around the whole perimeter of the existing house slab, where the new concrete paths abut it. This material is commonly called an expansion joint. Or in this case it is used as an isolation joint That is, it separates two distinct parts of the building, and allows each them to move without affecting the other.
- At the end of a days work just a plain butt joint. On more critical jobs, key joints are sometimes used.
- Every 4M. or 5M. in the driveway, and say every 1.5M. in the footpath, a metal strip about 35 deep with a rubber cap is set into the wet concrete.
|

Hire Equipment

Furniture Fittings - Architectural Hardware - Electronic Locking Systems - Technical Hardware
BuilderBill sponsorship
Joints in concrete flatwork
One of the first houses that I built, (in 1968) taught me a couple of lessons I will never forget.
I had the concrete ordered and was rushing to knock some steel pegs out of the ground, I hadn't even put my boots on, but was wearing rubber thongs (flip flops).
I took a swing with the 14lb. sledge hammer and it glanced of another peg and it took my left big toe nail almost completely off. I sent my offsider to go and get some bandages etc and I was hobbling about about removing the rest of the pegs when the concrete truck arrived.
Hopping on one leg while guiding him in I got him too close, and he knocked over a 15ft high gable end cavity brick wall.
Not a good start to the day.
The lessons that I learned that day was to get ready before the concrete arrives and to keep calm and safety conscious when the pressure is on.
|