|
|
||||||||||||
Trim Carpentry.
Trim Carpentry, Internal Carpentry, Second Fix, It's all the same.We used to call the trim carpentry second fix. That is after the first fix which for the carpenter was floor joists, roof timbers and ceiling joists etc. Again I am not going to go into specifics of fine joinery work here, this page is more of a few general notes, and a jump off spot for more detailed pages as I build them. I have done a bit web browsing, and it is fairly obvious that we all seem to use different names for the same things. If any of you are using a different term and I appear to be ignorant of it let me know. Door Frames, Doors, Architraves.Fitting a new door or doors and maybe the frames as well, begins at the hardware warehouse where you buy your gear. The place that I get my gear has come up with an alarming trend. They used to stack the doors flat, which was good, but now they have got them in vertical slot type things, so that the customers can see better what they look like. A great idea, except that the customers pull them out, look at them and then shove them back any old way, with the result that half the things are twisted.
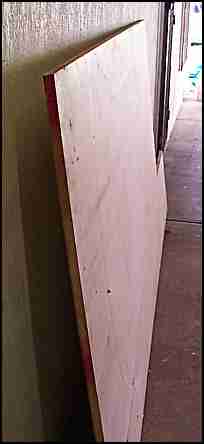
The photo here is of a sheet of MDF board, and if left in this position it will twist. A door will do the same. So lean your door against a wall with the full edge in contact to stop it twisting. Of course you could do this on purpose to try and reverse twist that is already in the door. In brickwork and blockwork construction the door frames are usually of pressed steel and built in by the brickie, at the same time he is building in the window frames. On some residential work and most commercial work the openings are left by the brickie and fixers come along after and install, the window and door frames. Architraves are sort of optional nowadays on new residential jobs. The hardball plaster finishes neatly to the frames in masonry construction. Similarly metal frames have the external and internal linings trimmed neatly to them without the need of architraves in stud wall construction. click here for fixing door frames. click here for hanging doors and fitting locks. Skirting Boards, Base boardsIf you have a timber floor you have to leave a gap around the outside edge to allow the boards to expand and contract with the seasons. Skirting boards cover that gap nicely. They also protect the bottom of the wall surface from marking when sweeping or cleaning the floor. For this reason they are usually painted with a full gloss enamel (oil based) paint that is tougher and easier to clean than your average acrylic wall paint. Usually they are timber, sometimes natural timber, more often now they are finger jointed pine, that is short lengths joined into long straight lengths or even, MDF extrusions. They come in a variety of patterns, some still using very traditional shapes. Quite often with masonry walls and concrete floors we use ceramic tiles and tile skirtings also. They are a fair bit dearer than timber, so now and again a timber skirting is used over tiles to save money. Click here for fixing skirting boards, baseboards etc. Scribes and MitresThe meaning in the joiners prayer at the right, being that scribes and mitres were in those days pretty tricky stuff and that butt joints and batten doors were a piece of p...s. Well... I'll give you the drum, Scribes and mitres are easy too. At least they are on average paint finish jobs. Don't come back at me if you make a mess up of a clear finished 12' inch deep oak skirting. As I said they are easy now, cos nearly everybody has a power mitre saw, they mitre the joint quick as, and fill em up with gap filler. This is not as bad as it sounds, I am a great fan of the painters acrylic gap fillers, because they expand and contract with the movement of the surface underneath. So for the most part, scribes are not used much any more and mitres are easy. If you don't have a power mitre saw here is link to a home made mitre box. If you want to do some nice clear finish timber trim you will want to make scribed joints, so for more info see the link below. Click here for more about scribes and mitres, copes, fitting around odd shapes. Here is another page which shows cutting scribes to a cornice or crown mold with a coping saw Laying a Timber Internal Floor.In the UK we used to lay timber floors and then cover them up with various floor coverings. They were usually cheap softwood timber. Here in Australia we put timber down and clear finish it and make a feature out of it. Rightly so, as a good timber floor well finished is an asset to any home. It looks good and it's easy to clean. For the most part the floors are all hardwood, except that here in the NT we had at one stage a thriving cypress pine industry so we used a lot of these light yellowy coloured floors also. Our houses fall into two types, high level, stud wall construction (recently steel stud walls) with polished timber floors, and on the ground masonry construction, with typically ceramic tile floors. Note I have done secret nailed floors, but I am not too keen. They never cramp up tight enough for me. You don't see the fixings, but you see the gaps in the joints when the flooring shrinks.
If you want to glue and secret nail on a sub floor, and maybe use a 'T" nailer, there are plenty of web sites that will help you out, Quite frankly I've never done it. Here is a page where I go into flooring, laying timber floor boards in a bit more detail. Cornice or Crown MouldingCornices, even on top class jobs are almost always done in plasterboard now. (Australia) Available in different sizes, and sometimes in quite involved patterns. Along with various pre made ceiling roses they can be very effective in rooms that have high ceilings. I had a friend Roger, who knew an old school master plasterer, and he taught Roger how to make his own moulds for large plaster cornices. He made the moulds as he made the actual cornices out of plaster reinforced with a fibrous material. (it used to be horsehair in the old days)He had a fancy curved piece of tin all quadrants and ogees that he had made himself with tin snips and a file. He screeded the wet plaster for the moulds with this and got a mould that lasted dozens of uses. From a couple of home made moulds he went on to make many lengths of totally unique plaster cornices for the whole of his house. He was a total amateur, but the finished job was remarkable. It could not be faulted.
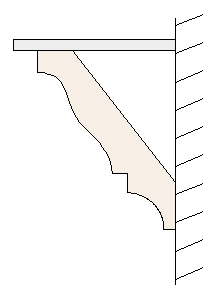
We used to fix a timber moulding that we called Scotia before the cheaper and larger plasterboard versions came out. To the right is a sketch of a typical plasterboard cornice that is set at 45 deg. In N America I understand you still do a lot of this sort of work in timber, and quite large and beautiful patterns are used. These are called crown Moulding. My sketch here is of a crown moulding set at 38 deg. I have had a question from Jan R. in Canada and he says:- Well for what it's worth Jan, here is a run down on what I would do if I had some crown mouldings like the one in my sketch on the right to fix. I would use a tip from the plasterboard fixers and measure down from the ceiling the exact distance to get the moulding in the true position, and put pins in the wall to help keep it true. In my experience, the main problem with fitting miters and scribes is when one of the pieces has slipped or is leaning out of true. I would build a miter box specifically to suit the particular moulding and use a sharp panel saw to cut them. No calculations etc. Simple. However if I had enough to do I would buy a compound mitres saw. (I just need a good excuse :-). I might do a quick Google for "crown moulding angles" and find any number of sites with calculators on them. Some of them might be understandable even. I would use the angles given, and do a few test cuts on scrap material just to confirm that all is OK and then go for it. When I say scrap material, I mean you can use plain 6" x 1" or whatever, without the feature moulding on it, to check that your angles conform to the rise and go, and remain at 90 deg when pinned together. If I was working out bush with no computer access, or if the angles from the computer seemed to need trimming, I would drop back to the basics. Crown mouldings after all are horizontal members, on a slope, mitered at the corners. The geometry is the same as under purlins on a hip roof. I'd sketch it out full size or larger on a bit of ply similar to the way I describe in my roofing calculations page. Think about it, thousands of guys have no trouble with the theory and practice of cutting the compound angles on jack rafters etc. So there you have it Jan, I hope it helps you a bit. Jack Churchill who has been over 30 years in the carpentry game writes to me from Connecticut USA with his take on crown mouldings. "Crown has puzzled me for a long time. In the last couple of years I figured it out. The first thing I do is use an angle finder that gives the mitered angles on the inside and outside corners, then write the angles on the wall. I have not seen a true 90 ° in a long time usually they are 89.5°, 90.6°etc. On wide moulding .5 ° is significant enough to have gaps. The other key thing is having the crown lock into stops so that when you are cutting the crown does not move. When cutting inside and outside corners , I cut the moulding upside down and on the angle that it would be on the wall. Cutting the moulding on the flat side seems too confusing when the angle is not 90 °. Your point is important also about making sure that it is fit on the ceiling in the right position. This is just my method and there are many others. " I hope I explained this well enough. For example if the measured angle is 89.5 then the miter is set to 44.75° but the angle finder tells you that. Then you cut the left and right hand angle inside or outside corner with the crown upside down and the angles resting on the wall of the fence and the base of the box and lock it in place with guides so you can repeat the thing over again. Some people run one side square into the wall and cope fit the other piece into it. This system works well as long as you have narrow pieces and not a lot of profile on it. As the width and profile increases and the angle varies from 90° this system becomes extremely difficult and the gaps start showing more prominently. I went to a trade show a couple of years ago and watched a demo on cutting crown. This guy, an inventor, created these beds that the crown sits in. There are 2 different spring angles on crown moulding. The crown hits the ceiling at one angle and hits the wall at another angle. There are 2 basic variations of this and there are some irregular angles also to make things more complicated. Anyways, I bought the jig and have yet to use it. The inventor made 2 indisputable arguments about miter boxes. He stated that on any miter box a right hand 45° and a left hand 45° rarely form an exact 90°. This is due to the fact that all miter boxes are machined with an error in them. What his system does is only cut on one side of the miter box. You never move the angle, it stays fixed. He did some real quick cuts inside and outside corners and they were perfect. I still use my system. If something works don't fix it. He also asked when was the last time you saw a 90° inside or outside angle? It does happen that a room can be so close that the error never reveals itself but when you go to 5-6" Crown there is no escaping even a .25° difference. " Thanks again for that Jack, good stuff. I take your point about corners never being a true 90 deg. The plasterer or the drywall flusher always builds them out a touch. In some cases a lot more than a touch. I am always conscious when writing a page like this that there are an awful lot of my readers who are in North America, where there are different names, and also a heck of a lot of readily available products for DIY-ers that are not available in my neck of the woods. Pre-hung doors and frames come to mind. So if you would like another take on trim carpentry with a North American slant try Pat Fisher's excellent finish carpentry site. Leave trim carpentry and back to home page Not found it yet? Try this FAST SITE SEARCH or the whole web |
Hire Equipment Furniture Fittings - Architectural Hardware - Electronic Locking Systems - Technical Hardware BuilderBill sponsorship Other Carpentry and joinery related pages.
"When I were a Lad"We used to recite these lines from the joiner's prayer. (Mostly after making a less than perfect joint.)"Scribes and mitres ...I must confess.... but butt joints and batten doors, I fear no man" We also used to say, "all internal mitres must be scribed". |
|||||||||||
|
|
||||||||||||
|
Please Note! The information on this site is offered as a guide only! When we are talking about areas where building regulations or safety regulations could exist,the information here could be wrong for your area. It could be out of date! Regulations breed faster than rabbits! You must check your own local conditions. Copyright © Bill Bradley 2007-2012. All rights reserved. |
||||||||||||