|
|
||||||||||||||
Ceramic Tiles for Walls and FloorsI have not done a lot of ceramic tile laying or setting. I've only done work on my own houses, for myself. Certainly I am not an expert tiler, but I have worked with many excellent ceramic tilers over my years as a builder, so here are some of my thoughts on tiles and tiling.
IntroductionCeramic tiles have been around for centuries. They are capable of providing extremely durable hard wearing surfaces from warehouse floors to space shuttle exteriors. Tiles have long been a medium of artistic expression. It would be very hard to remain unmoved, when viewing the complex geometric patterns of the ceramic tiles of the Alhambra in Spain, or the Byzantine mosaics in the churches of the Italian city of Ravenna
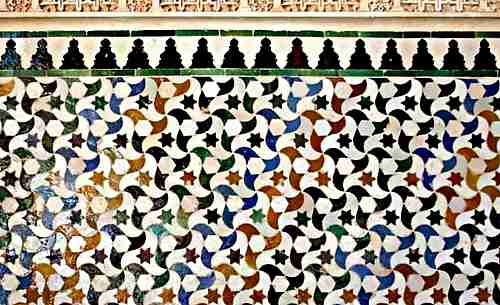
Above is a photo of just some of the highly complex geometric patterns in the ceramic tiles covering the walls, ceilings and floors of the Alhambra Palace in Granada, Spain. Built by the moors in the 13th century. I have a good friend who has told me (more than once after a few beers), that he well remembers going to an archaeological dig in southern England when he was a boy. They were unearthing the floor of a 2000 year old Roman villa, and fifty or more years later he can still remember his amazement at how fresh and perfect those floor mosaics were. There is a temple in Bangkok, Wat Arun (Temple of the dawn) that under certain light conditions glows with a strange and beautiful light. When you approach it you begin to see that the whole surface of the external stucco has had embedded into it hundreds of thousands of pottery shards. Parts of rice bowls, tea cups, plates and dishes of many different colours arranged in patterns. The builders could not afford the cost of purpose made ceramic tiles, and so the people donated their pottery. Tile ManufactureWhen I was a kid, my dad was a keen amateur potter. We made our own ceramic tiles. He bought bags of powdered clay and mixed it with water until it became malleable. Then he would thump a two or three kilo lump down onto his bench, cut it in half with a wire, bash it together again in a different position and repeat the process. Again and again, Thump,cut,bash. This process of thoroughly mixing the clay and removing all the air bubbles was known as wedging. I have done my share of it I'll tell you, Thumping,cutting,and bashing. A basic machine that took over wedging by hand is the pug mill. He then rolled the clay with a rolling pin on a sheet of glass (a flat surface), cut it into shapes and left it to dry. Later the tiles would be painted with a slurry of water and a powdered glaze. After more drying and more painting they were loaded into a small electric kiln and fired at the appropriate temperature for the type of tile and glaze. We got a few pleasant and happy results, but the vast majority of our ceramic tiles had some or many defects. They could bend, twist, crack, stick together with runny glaze, the glaze might run off completely, if we opened to kiln too soon the glaze would craze, (crack all over). We made some truly terrible tiles. It was all good fun though and I I still have a regard for hand made pottery. Knowing how hard a thing is to do, increases the admiration and respect for the people who do it well. So at the most basic level that is how ceramic tiles are made. I wouldn't begin to guess the complexities of a modern ceramic tile plant, with the differences between wet pressed tiles, dry pressed tiles, extruded tiles or the many types of continuous kilns. Back to topTiles Used Around the HomeThere are so many variations on the theme, I doubt if anyone has a full list, but here is my shot at it, with a few comments.
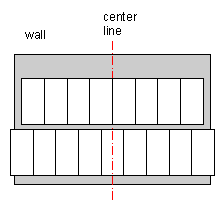
Setting Out Ceramic TilesHere are a few guideline for setting out a tile job. I say guidelines and not rules, because every job is different, and a rule that works in one place may look silly in another. Always try to keep cut tiles at least a half tile or greater. The reason for this is that it just looks better. Also small differences the walls are not seen. A wall that is 5mm out of plumb or out of square will not be obvious when a 140mm cut tile abuts it, but if the cut tile row is 20mm to 15mm, then the eye will be able to pick this.
In the sketch on the right, the grey are is to be tiled. Lets say it is a bathroom wall. I mark a center line on the wall and pencil in a row of tiles (top row). Straight away I can see that I will have a small cut tile at each end. So I start again, this time with the first tile half way on the center line. This looks far better. Note that by doing it this way, I still only use the same number of tiles. So to start tiling that wall I would find the center of the wall, and half a tile left or right of it I would make a vertical line the full height of the proposed tiles. This line is my starting line. I wouldn't start at the side. By starting at the middle I minimise any creep or discrepancy that may build up as I go along.
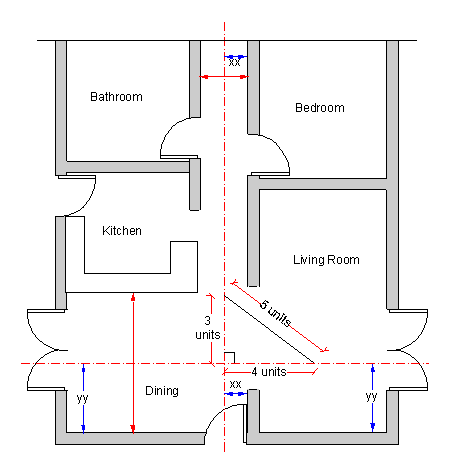
In the house floor plan that I have sketched out above
I would most probably find that the two line are square. If not I would adjust one or even both of them to get a square set out. The tiles will be laid out on a square grid so I have to start off right, and I also at this stage need to know if the walls are running out of square in any way.
Out Of Square SetoutWhat to do if a wall or walls are out of square.
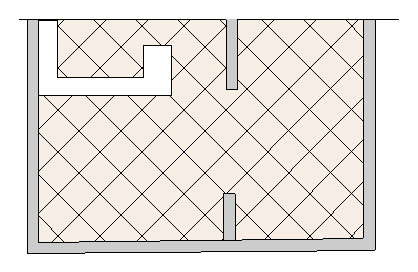
More difficult are the ones that are not obvious, only the tile pattern will show up any discrepancies in the wall layout. An option is a diagonal set out. In the sketch above, I have made the bottom wall out of square with the rest and the two middle/corridor walls offset from each other. The 45 degree pattern lessens the impact of any irregularities. To do a floor like this, there is more work involved and more tile wastage. I have seen diagonal floors like this, combined with a border tile that runs parallel with the walls that look very effective. If you are an owner builder and starting from the ground up, the old saying "measure twice and cut once" is always good to bear in mind. A small mistake in the foundations can be hidden for ages, the formworkers and concreters have been paid and long gone. Then at the end of the job the tiler picks it. Check your setting out! When to Lay Tiles On A New Concrete SlabEasy answer, leave it as long as you can. The longer the better. It is ironic that we spend the first four weeks or longer trying to cure the concrete, that is slow down the drying process, by keeping it wet etc. Then we have to wait for it to dry out before we can tile. Concrete when it is first poured, shrinks as it dries out. This is a process that is fairly rapid to start off, most of it happens in the first few hours, then the process slows down gradually. In the normal construction period of a house, the floor tiles are laid when most of the house is finished, many times this may be over 12 weeks after the slab has been poured. The slab has to be fully cured and dry before tiles are laid, and in part this depends on the thickness of the slab. An average house slab is say 100mm (4") thick. I would never lay tiles on a slab this thick in less than 8 weeks. I have heard a rule of thumb saying one month drying time for each inch of thickness in the slab. So if you have a small addition that went up really quickly, hold off on laying the tiles. One trick that I always do on new jobs, is to tape a small piece of plastic to the concrete, and if after a day or so small beads of moisture show up underneath, then the concrete is still actively drying out and I leave it a week or so and try again. The BCA states that all concrete floors on the ground, used for a habitable space should have an approved waterproof membrane under the concrete. This is to stop dampness coming up through the concrete. I have seen floor tiles separating from damp floors like this, and after being relaid, those coming up again. Typically a room is later made on a slab that was never intended for a habitable room. I you want to tile a slab that you are not sure of, then take advice from a good quality tile shop, there are membrane/underlay/isolation type products that will allow you to do this. Expansion Joints-Movement Joints-Control JointsMost materials used in home building move over time. This can be due to thermal movement or other causes. Ceramic tiles are no exception, so knowing this, in order to stop unsightly cracks we allow for any movement by using expansion joints. Put expansion joints at the following locations:-
Not found it yet? Try this FAST SITE SEARCH or the whole web |
Hire Equipment Furniture Fittings - Architectural Hardware - Electronic Locking Systems - Technical Hardware BuilderBill sponsorship |
|||||||||||||
|
|
||||||||||||||
|
Please Note! The information on this site is offered as a guide only! When we are talking about areas where building regulations or safety regulations could exist,the information here could be wrong for your area. It could be out of date! Regulations breed faster than rabbits! You must check your own local conditions. Copyright © Bill Bradley 2007-2012. All rights reserved. |
||||||||||||||