|
|
||||||||||||||||||||||||||||||||||
Roof sheeting fixing
I can't recall doing a job with short sheets, that do not span the full length of the roof surface. We measure the roof from the ridge to the fascia, and say allow 30 or 50 shorter at the ridge and add say 80 for the overhang at the fascia. We order this length and it comes exact, cut with square ends. The length of roof sheet that can used is only governed by the transport available from the factory.
Don't be tempted to let it overhang a lot, just because you have extra length on your sheets. We have a maximum unsupported length of about 200 for standard "Custom Orb " and for the slightly thicker stuff it is only 250. This means also that your bottom batten has to be in the right place also. Use a bit of scrap and put a string line the length of the fascia you are working to. In the photo above the roofers have used a bit of "Speed Brace" material, screwed to the end purlin. Back to top. Fixings, Roof Screws, Wall ScrewsAlways use the correct fixings. I did a job for a neighbour a few months ago, he had his house almost sold, and right at the last minute the buyer's engineering inspection turned up the fact that the screws on his wall cladding were the wrong thickness. It was a large high set house, and apart from the fact that he had the worry of nearly loosing the sale, he had the extra expense. In the photo, the thick 14 Gauge screws with timber threads and metal threads, were the replacements for the ones in the middle, that were only 12 Gauge with no seals. In a couple of later additions to the house, the fixers had blindly followed what the previous guys had used. Don't assume that old fixings etc. are still OK for your new job. The building codes are changing all the time. (By the way, I've got the odd few thousand of those old screws if anyone's interested :-)
This month I have had visitors to this website from over 60 different countries, so there is no point in me trying to guess your conditions. All I can say is check your building regulations, if any for the specifics of the fasteners for fixing roof sheeting in your area.
Check for SquareBefore you start fixing roof sheeting, you should do a couple of checks.
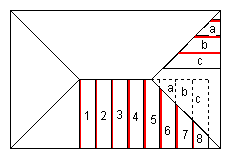
The First Few SheetsIn the sketch below I show part of a gable roof, and how I set out the first few sheets of roof sheeting to start me off. Quite often if we already have the scaffold on site, I set a plank up at the eaves, with the fascia about waist height. One guy works on that fixing the bottom row of screw, adjusting the sheets etc. I set a string line parallel to the fascia at about 80 away. I line the sheets up to the line, not quite touching.
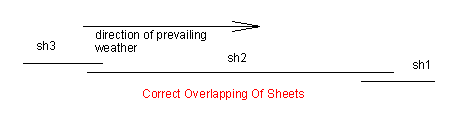
It is important to get the first sheet right, and a very small difference starting off can be a lot after say 20 sheets. To this end I use a few pairs of multi grips to hold a few sheets together temporarily until I have the bottom edges just right. In a small roof like this with only four battens I would fix each sheet on the joint at position "1" first, then at position "2" then remove the multi grip and fix another one. Doing them all. Then screw all the others off afterwards. If you try to screw off the full sheet before fixing the next one, you could spread out the sheet more than you should. Say the guy at the top was screwing down a bit more than the guy at the bottom, the sheet could be 10mm wider at the top. There'd be strife in no time. Of course you may want to do that on purpose. Spread say the last 5 sheets say 5mm each to pull back a 25 mm difference in parallel. I nearly always use a chalk line for marking the batten positions. I like the blue chalk. Don't ever use the red oxide based chalk, it is hell to shift. Whatever way you do it, chalk line or straightedge and marker, make sure it wipes off easy. Don't use a black pencil. The old days of punching the sheets with a prick punch are well and truly gone. Don't do it. The roof screw will do it all. Just press the screw firmly down and press the trigger. Hold the gun and the screw square off the roof, not vertical. Don't try to start the screw while the driver is still spinning. Back to top.Sheet OverlapsPick the correct end of the roof to start laying the roof sheeting, so that the prevailing weather is blowing over the lap join, not into it.
Roof sheeting fixing - 5 screws per sheet is on the top. For less wind loadings 3 per sheet may be OK. Back to top. Hip RoofsWith a hip roof, lay the longest sheets first to start off and then work your way into the hip roof corners.
As the sheets abut the hip, they get shorter. The amount they get shorter is the diminish. See my roof angles page to calculate the diminish. When marking out the cut sheets don't forget to allow for the overlap. In the above sketch I have represented the join on the sheets in red. You will see that if you order extra full length sheets, you will be able to use the offcuts on the opposite corner. If you are meticulous with the calculation, and then still allow a bit extra you may save a few dollars. I say may, cos I've tried it a few times and finished up short. It works, but don't depend on it if you are not certain. I finished up ordering a few shorter sheets for the hips. with plenty of allowance for waste. Back to top.Capillary Attraction.When two surfaces are close together, due to capillary action, water will tend to creep along the gap. Even going uphill.
To counteract this the manufacturers have built into the sheets features that stop this. Look at your profile and make sure you are fixing them the right way. Custom Orb is reversible, so you can't go wrong, but I have seen the odd Trimdek sheet fixed with the capillary notch on the top and not underneath. Quite often when you get to the finish at a gable end, you may think you will have to cut up the full length of a sheet. Sometimes you can just overlap the last sheet more to save cutting it. (The off cut will be useless anyway). Just make sure you keep the the screw pattern right. Back to top.Laying Short SheetsI can't remember the last time when I laid short sheets, (we can some awfully long sheets on a semi-trailer).
For guys like the motorcycle rider on the previous page, the theory is that you lay them like in the sketch. Just as though the separate sheets were joined together. On some profiles especially in heavier thicknesses, you have to cut a notch out of one of the sheets at the spot where they all join. Check the manufacturer's details. I have done heaps of verandah type additions where we added another row of sheets under an existing roof, and with the correct lap and fixings they never leak. So If you have a particular reason to want to fix the whole bottom row first, then I'd say go for it, at least with corrugated profile. In corrugated sheets I can't see it making any difference. Back to top.Infill Strips.Closed cell foam infill strips are produced to seal various roof sheeting profile. On the right is one for Custom Orb.
They can be fixed one piece at a time as the fixing progresses, or by leaving the bottom sheet not screwed (fixed) they can usually be slipped into position afterwards. Back to top.Turn Ups and Turn DownsThe top edge of all roof sheets, the part that goes under the flashing, must be turned up. This is to stop wind driven rain from creeping uphill under the flashing.
Here you can see a hips in Custom Orb that are turned up after the sheeting is fixed. The valley (the low portion of the profile) is simply given a small kink with a shifting spanner. For cladding with trays, the manufacturer's sell tools to turn up the ends. Many roofers make their own, or just use wide flat jawed multi grips. You need to get a feel for it, don't be to severe, as it is easy to tear the material. Remember the stuff is less than half a millimeter thick in most cases. With pan turn ups, like in Trimdek, Kliplok etc. it is possible to turn up the sheets at the ridge after the sheets have been fixed, but mostly the turn up is done before the sheets are fixed.
Not quite as critical as turn ups are turn downs at the eaves. With profiles like the Klip-Lok pictured it is common to see it fixed with very shallow roof pitches, down to 1 degree. When water is slowly running off a sheet edge with very little fall to it, it is possible for it to run back uphill on the underside, to the fascia or wall edge and cause staining. What causes it to go uphill is our old mate, capillary action. It is made worse of course by wind. So to stop this happening the pans of the sheets are turned down, as they are in the photo, to make the last bit of the edge steeper which causes the drips to drop off cleanly. Turn downs are not done with corrugated sheeting, as the profile would split, but with corrugated the pitches are generally steeper anyway, so the turn down is not needed.
Here are the contact phone numbers for a couple of Aussie guys who have invented a fold up tool for corrugated sheets. As I mentioned early,there are tools for wide pan type profiles, but this is the only one I have seen for corrugated iron. Not found it yet? Try this FAST SITE SEARCH or the whole web |
Hire Equipment Furniture Fittings - Architectural Hardware - Electronic Locking Systems - Technical Hardware BuilderBill sponsorship Other Related Pages.
BuilderBill Books Building Maths |
|||||||||||||||||||||||||||||||||
|
|
||||||||||||||||||||||||||||||||||
|
Please Note! The information on this site is offered as a guide only! When we are talking about areas where building regulations or safety regulations could exist,the information here could be wrong for your area. It could be out of date! Regulations breed faster than rabbits! You must check your own local conditions. Copyright © Bill Bradley 2007-2012. All rights reserved. |
||||||||||||||||||||||||||||||||||