Deck Building, some details.
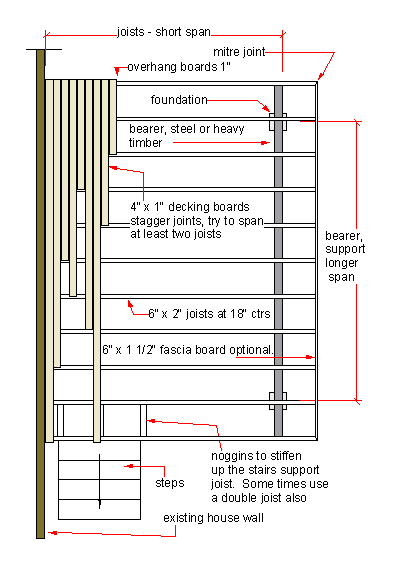 |
| Deck - A plan layout of timber joists and boards with steel supports beams . |
A simple decking plan.
- I
have not used timber bearers for years, The fixings and the surface between the joist and the timber bearer seems to hold moisture and promote rot. Partly because of this, but also the rising cost of timber has made steel bearers more cost effective.
- Yet I must admit, that I have not gone on to steel for the joists yet, even though a lot of builders use "C" purlin sections. The advantages of low cost, straight, long lengths can't be ignored, and I would probably use steel joists if I had another deck to build.
- So I have always used timber,
hardwood floor joists, and usually hardwood decking.
- I ALWAYS put timber preservative on the joists before fixing them, then
more on the tops of the joists before fixing the decking.
- The same applies to the decking boards. You can never have too much
preservative. Many times I have supplied the timber to the job,
along with decking oil and saw stools, and the owner in his spare time
has managed to get three or four coats on before we fix.
- I also dab plenty oil onto the end grain of the boards. Again as much as
possible. It soaks in easily at first so do as much as you can.
- This is all good sound common sense, because the underside of the boards and tops of joists will never get oiled again.
Fixing Decking Boards
I always hand nail the decking boards with 2" bullet head nails.
The thickness is 2.8mm (sorry not got the US equivalent).
The reason I hand nail is that the nails are hot dipped
galvanised. I have not seen a nail gun nail with a good
enough coating to last as long as standard galv. nails.
Once a nail starts to rust, it expands (rust takes up something like 7 times as
much space as the metal it comes from) and tends to split the joist,
which lets in more moisture, and so and so on.
I don't pre drill for the nails much, except for the joints and near cutouts. Using a 2.5mm drill. Of course this all depends on the timber that is being used. Typically I have used new full packs of imported timber that takes the nails well, but that same timber if it has been laying around in opened packs in a timber yard for a year of so could be as hard as the hobs of hell and ever nail will have to be pre-drilled then.
I have never seen the need for twist grip nails, because
all the joist timbers I have used have been F17 or stronger hardwood,
and they grip the ordinary galv nails to the point of breaking.
In softwood of course it will be different.
Here are some
other options for fixing decking boards:
- Another nail
that is popular is a full galv, with a spiral grip to the
side, Titadeck is a trade name. Although I have not used them
myself
I have heard good reports from guys that have used them.
50mm into hardwood and 65mm into softwood.
- Stainless
steel screws. I have only used screws, when screwing into
steel supports.
- They
are becoming very popular though with amateur deck builders into
hardwood, because not everyone can spend hours at a time bumping a
nailed floor down.
- Use 50 x 10 g square
drive. into
hardwood, longer into softwood. You will be doing a lot of
screwing so the square drive will be so much more positive in the gun.
- Pre
drill with a good quality tungsten tipped combination drill and
countersink bit. Self embedding heads leave a ragged look and
don't work well in tough hardwood.
- I am not alone in favouring
an impact driver for this sort of work. Gavan in Sydney who
runs Dialadeck and has done heaps more decks than I have, recommends one
also. They have to be used to appreciate how good
they are.
- Mick in Kunundra,
North Queensland has done heaps of decks, and a couple using
secret fixing clips.
- He
says you have to fix the first and last boards in the normal way, and
the rest are fixed with the clips they are called Decktights or
something like that.
- They allow the
board to sit up off the joist a touch which provide an air gap, which
has got to be a good thing.
- Mick
says he is not keen on using them on jobs, because they take 2 to 3
times as long to fix, BUT, he says he would use them on a job for
himself.
In a perfect world we would be using dead straight timber with no
twists. We very rarely get it. I have used mostly
Selangan Batu, which is a cheap Malaysian hardwood, and out of the pack, it still has
many bends in it. Below is my method of fixing bent decking
boards. This method allows me to fix a few boards at a time
without a lot of effort.
Back to top
Fixing the boards straight over a long run.
 |
| Deck - A system of fixing boards to keep them straight and even over long runs |
- I
start from a couple of fully nailed off boards that are
fixed straight.
- Then I measure off a
distance for say six or eight boards. I clamp
down to the joists one (or more if necessary) aluminium planks. You
could use any straight piece of stiff timber or steel, whatever.
This is one of many jobs where my big Bessy clamps have paid
or
themselves.
- I lay the boards in position, cut at
the joists.
The offcut from the far end piece usually starts the next row
at
the other end.
- Sometimes
the last board in a set has to be forced into position because of the
bends in it and the others. This is acceptable, because I
know that I
am forcing them straight.
- Working by eye only, I
tap in my wedges so that all the gaps look even.
- Usually
I put the wedges in at about every 4th joist or so.
- When
it is all looking OK to start nailing I go to the ends and tap the
joints up tight. The wedges hold the boards firm.
- I
nail up a few selected boards here and there to keep them in position
and I nail the last one solid for the next lot to push to.
- This
method keeps the boards not only straight, but also parallel.
- When
I am getting close to finishing off I start measuring to the finish
edge and if there is a difference in parallel it is easy to set the
plank wider at one end than the other to creep a bit at a time to get
back to parallel. A difference of say 20mm over the last 16
boards just can't be seen by eye.
- If I have to rip
a board to width at the edge, I use it one board back, with a full size
board finishing off.