|
|
||||||||||||||||||||||
Roofing ToolsRoofing tools were very simple in the dim and distant past, I can remember galvanised roofing nails. About 65 long, fairly thick and with built in galv. washers. They were driven into timber battens through the crest of the corrugations, with a fine touch that held the sheet firmly, but didn't squash it flat either. Until these were superseded by roofing screws, it was possible to fix whole roofs with just a bare minimum of hand tools. Even now, sheeting fixers don't need a lot of tools to do the job. The vise grips on the right are part of the kit I use for fixing roof iron. The flat jaws one I use for turning up the pans in Trimdek type sheets, and two of them together with a couple of bits of flat timber or steel I use for bending hip and barge flashings at the roof edge.
The ordinary type vise grips, I like to have a few on the job, for temporary clipping sheets together at the joints, before actually screwing the sheets off. I have a few pairs of snips in different patterns. The main thing to know is that the red handled ones are right handed, leaving the material to the right of the cut straight, and imparting a spiral twist to the off cut on the left. The green handled ones are opposite, or left handed. You need at least a set of each, when cutting things like flashings with a few bends in them. I use the red ones from choice whenever I can, cutting with my right hand and pulling the off cut up and away with my left hand. Other times I have to use the green ones and I have become fairly comfortable with the left hand doing the cutting.
Quite often you need a fair old force pulling on the off cut, almost on the point of tearing the sheet, and then the snips cut easily. Usually it takes a foot on the sheet at the same time to hold things solid. The green one in the picture has an offset to the handles, that gives a lot more knuckle space when cutting across the profiles of the sheets. The red ones are a more standard pattern, and get right into the corners of flashings. You may also come across yellow handled ones which are biased neither way. The are used just for odd jobs that you just need a snip for now and again, but they are not used much by roofers. Used for cutting things like pallet straps or heavier thicker gauge stuff that would take the edge off good snips. Also I used to have a pair that were yellow handled with a shears type set up that was a manual version of the Makita power shears below. A bit clumsy to use and I never replaced them when they got lost. If you want to do a rough cut, snip the edge a sheet, put a foot on one side of the snip, grab the sheet with gloved hands the other side of the snip and just rip it straight across. Easy peasy. For a lengthwise cut, score along with something sharp, like a scriber or such and fold away from the score, and the sheet will snap off.
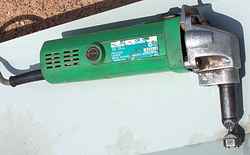
Most of the roofs we fixed in the early days were into hardwood timber battens, and the screwdriver guns worked extremely hard. We used to have a large "D" handle type Wolf screwdriver gun that had two speeds, and it was unbeatable on timber battens. Any of the other ones, we used until they got hot and then gave them a rest while using another gun. I have seen guys running a hot roof gun, trigger on but no load, saying that the built in fan cools it quicker that way. In operation, the clutch does not set the screw like a plasterboard gun, very precise. On a roof the operator has the control and he can easily drive a screw in too far, flattening the profile of the sheet. Below is a shot of my Makita straight shears running down a sheet of Custom Orb, Zincalume finish. An excellent roofing tool for cutting sheet metal in general. It will cut curves, down to about a 50mm radius, but it's main job is long fast straight cuts.
These shears do not damage either side of the cut, so many times when I have been fixing sheet metal wall cladding I have used the offcuts and saved a few sheets.
I wouldn't say that they are as fast as a good guy with snips, on a straight cut, but they can of course do a lot of other work, like holes for roof penetration or down pipe holes in gutters. back to top Using snips and shears on sheet metal seems to be totally in harmony with the material. I never see edges that have been cut this way, going rusty. The action of the tools must help to seal the bare metal that is exposed.
Check out these power snips on one of my inventors pages. Not found it yet? Try this FAST SITE SEARCH or the whole web |
Hire Equipment Furniture Fittings - Architectural Hardware - Electronic Locking Systems - Technical Hardware BuilderBill sponsorship Other Related Pages.
BuilderBill Books Building Maths Old fart digressionIf you ever come across and old iron roof that has been fixed with the galv roofing nails, and you have to take some sheets off, and them maybe even put the sheets back, here is a way to get the nails out.
|
|||||||||||||||||||||
|
some text or whatever.
|
||||||||||||||||||||||
|
Please Note! The information on this site is offered as a guide only! When we are talking about areas where building regulations or safety regulations could exist,the information here could be wrong for your area. It could be out of date! Regulations breed faster than rabbits! You must check your own local conditions. Copyright © Bill Bradley 2007-2012. All rights reserved. |
||||||||||||||||||||||


 Roofing tools - Makita cold saw
 Roofing tools - cold saw blade