Setting out, pegging out for a slab on the ground.
Setting out is a fairly quick exercise in the scale of things, but obviously it has to be done with great care. A few of the things that I will be mentioning below might sound like I am writing a how to for dummies. Believe me mistakes made in the setting out can come back to haunt you.
I have heard of houses being built on the wrong blocks. I have a friend who when he was planning an extension to his house, found out that his side fence was 1.5M out of position at one corner, in his neighbours favour. The neighbour had a nice brick barbecue built partly on the wrong block land. the neighbour was understandably peeved when he was asked to remove it. (Plus the expense of new fence etc.).
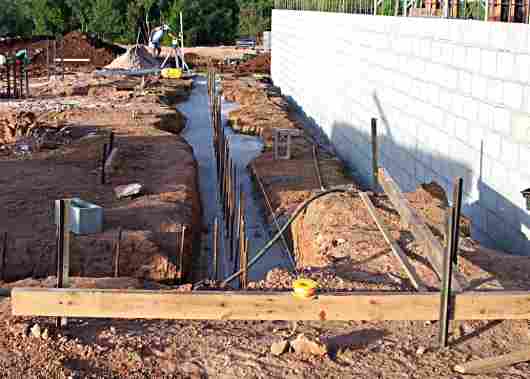 |
| Setting out - A concrete footing with a profile in the foreground. In this case it uses star pickets for the pegs and the timber is fixed with tek screws through the holes in the picket. Quick, solid, easy and reusable. |
Back to top
First checks, before you start.
- I am assuming that the relevant permits to build have been obtained.
- You should have an accurate block plan, with the lengths and angles of all the boundaries marked on it.
- Use it to check every fence line. You may have to buy or hire a long tape measure for this. I have used steel ones in the past, but they are expensive and prone to damage. I have had a 50M fibreglass one for years. It is not as accurate as a steel one (they stretch a touch) but it is indestructible.
- Every time that I have built on a boundary line (not a fence, but a proper building) I have had a certified surveyor to do a check. I just don't trust the existing fences. The very last job that I did, our surveyor pitched up an 85 to 50 discrepancy in one of the boundary walls. (The builder who put it in was a bit like me, and on the cautious side, he gave us the odd 50mm just to make sure). I could quite easily have assumed that the wall was OK and built partly on his block.
Back to top
Preliminary site works.
First off tidy up the site, remove all trees that are in the way. We all love trees on our blocks, but don't try to save ones that are just too close to the new building. They are an absolute pain to work around with scaffold etc. and they usually have to go in the end anyway.
- On the drawing there is always one point and one line, or two reference lines that cross one another, given to start the set out.
- Usually they are referenced to a couple of boundary lines, or an existing building.
- Go around with a few steel pegs and bang them in near enough at the corners of the proposed slab.
- From them mark out roughly the area of the job.
Somewhere on your drawings or in the building specifications there will be a clause that says something to the effect that you should strip the area of the work plus an extra 1m all around, of all topsoil and deleterious materials to a min. depth of 150. before starting to place the compacted approved fill. This means get rid of all vegetable matter, grass tree roots etc.
Get a machine in to clean up and remove top soil.
Back to top
first layout
- Go around again and put in pegs for the corners more accurately this time.
- At this stage your pegs can be short wooden things that you can tap a nail in, steel rods, even screwdrivers or just besser blocks placed on the ground.
- Anything that will give you the positions of the corners.
- As you do this do checks for square. (See section on squaring below).
- At this stage, if the job is small and you getting machinery in for excavation work, you may put string lines between the pegs, and mark out the lines of trenches, or pier holes with lime.
- You could then get the excavation work done first, before going on to the next stage.
Back to top
Profiles, batter boards or hurdles.
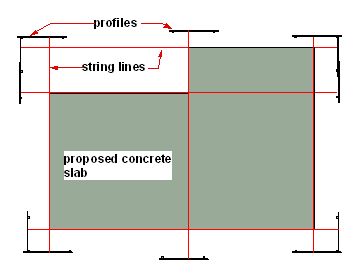 |
| Setting out - A plan of a concrete slab showing the profile positions. |
Profiles consist of pegs, stakes or pickets, driven into the ground, with cross piece of timber attached to them.
Like formwork they are only temporary and as such they don't always look too neat, made up of all sorts of odds and ends and yet they have to contain quite a lot of information, even on a simple house extension.
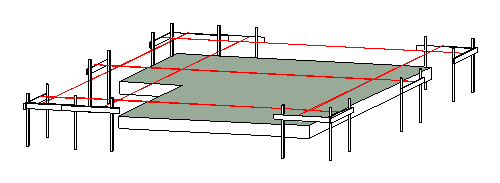 |
| Setting out - A 3D view showing the use of profiles on the above slab. |
They are used to transform the original pegs in the ground to something that is a semi permanent but accurate reference of the important sizes, measurements and offsets etc for a particular stage of a job. In the case above, when the concrete slab is poured the profiles can then be removed, because further measurements can be made from the actual concrete.
For the slab drawn, you may have marked on the profiles, before the excavator starts work:-
- The position of all the foundations, for external and internal walls.
- The wall positions to let the plumber accurately to position his sewerage pipes and floor wastes. To let the concretor place wall starter bars in the slab or column HD bolts.
- Possibly underground power supply and entry point.
- The first trade to use the profiles will be the excavator, so a reasonable clearance between the work and the profile itself is needed, to allow the machine to do it's job without squashing a hurdle her of there.
- In the sketches shown here I have shown them marked out with the overall sizes of a concrete slab.
- They could just as easily have a set out for the width of excavation trenches etc.
- Quite often a profile may consist of a board nailed to an existing boundary fence. There is no absolute rule, just something that can be marked out, take a nail or a screw and is fairly robust so it can't get moved out of position easily.
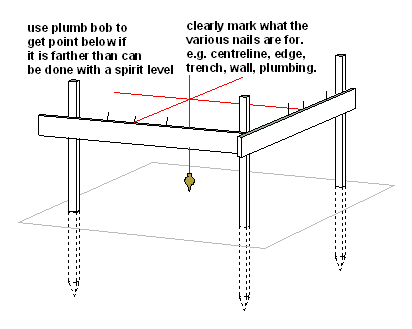 |
| Setting out - A hurdle or profile used for setting out. |
In most cases the guy on the job, say the plumber setting a floor waste or the carpenter fixing the perimeter formwork, will use a spirit level to plumb down from the string line to his job.
Many times, in sloping ground or when working in an excavation where it is hard to use a level, then the plumb bob can be very effective. I have used it in basement type situations where I simply hang the plumb line off the profile lines. I use a tie wire hook through a slip knotted loop to adjust the length of the plumb line.
A lot more convenient than straight edges and spirit levels.
Back to top
Getting it square.
In my opening paragraph I mentioned that mistakes in setting out can come back to haunt you. One of the classic mistakes is getting the floor plan out of square. It has repercussions for the roofer, but worse still is when you have the floor tiler in towards the end of the job and you can't escape the fact that the width of the tiles varies from one end of a wall to the other. Far easier to get it right in the setting out, right in the concrete (check the formwork before the pour) and right when laying out the internal walls.
We mainly work with rectangles in building work. A rectangle has the following attributes which help us in setting out building work.
- Each of the four angles is 90 degrees, or square as we call it.
Great, this means that if we have a base line side set up, and then get a second line set up off it at the right spot, at 90 degrees to the first we have two of our side done.
- The opposite sides are parallel, that is, they are the same distance apart.
That is it! Measure the correct length from one end of the first side and the same length from the other end and we have our third side fixed. Do the same again and we have our fourth side. That could be it - finished.
- The diagonals are equal lengths. That is the length from one set of opposite corners is the same or equal to the length from the other set. This means that if we have got a touch out with either of the first two steps (as you do:-), we have an excellent way of checking our set out
Diagonal measures work well when they are at a reasonable angle. When the rectangle is long and narrow then the angle is flatter this way is a less reliable way of checking.
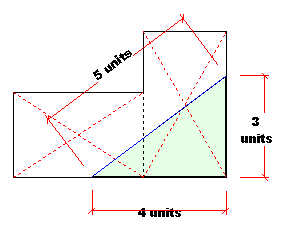 |
| Setting out - Using a 3,4,5 triangle |
Look at the sketch here. Let's say it is a plan of a house slab that you have to form up.
- You should first have an idea of which will be the most important side, that the rest are made square and parallel to it.
- Split it into rectangles and check the diagonals for equal. The dotted red lines.
Also on this plan I have incorporated a right angle triangle known to builder's the world over as a three four five triangle.
In our setting out of the rectangles in the sketch you can clearly see that each rectangle could be also seen as two triangles.
- Two thousand five hundred years ago the ancient Greek philosopher and mathematician Pythagoras discovered his truths about right angle triangles.
- Anyone with a cheap student's calculator can use Pythagoras' theorem to get the length of the diagonal side if you know the lengths of the other two sides. (The sum of the squares of the two shorter sides is equal to the square of the other).
- There is a unique triangle that is often used to demonstrate this principle, 3,4,5. ( (3x3=9)+(4x4=16) 9+15=25, so does 5x5=25)
- So any triangle in this ratio, will have a 90 degree corner opposite the long side.
- Ratio is the key word.
- The units don't matter as long as the ratio is the same.
- 3,4,5 miles, or 3,4,5 centimeters, the right angle is still there.
- So If we are looking at a house plan in the sketch above, I could use say 2M as my unit.
- I would bang a nail in the formwork 8M (that is 4units of 2M each) from the bottom right hand corner.
- Another one would go in at 6M (3units of 2M) along the other edge.
- I would check the distance with my long tape between the two nails and if it was within 5mm of the 10M (5units at 2m) that I was expecting, I would modestly say to my offsider, "crikey we were lucky there mate".
- If it was a bit more out like 40mm or so then I would move the nail holding my string line on the profile to correct the error, and then work from the altered line, thinking myself lucky that I had checked the set out before we had done a lot more work.
Back to top
Offsets
 |
| Setting out - Offset line around obstacles. |
It is not good practice to use only a short section of an existing wall to get a line that is a continuation of it. Far better to try to use as much of the existing wall as possible, even if the wall has obstruction in the way. The way to do it is simple, offset the line around the obstacles.
Even if the wall is clear, using an offset is the more accurate way, because there could be local bumps in the wall that could throw your line off.
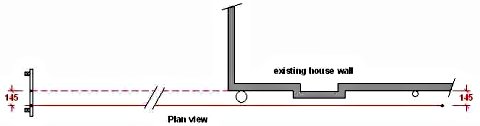
- In the sketch above I show a method of using the profile to offset the line to miss obstacles and then reset to get the point that is a true extension of the main building line.
- I want to mark out, on my profile (to the left), a building line for a new extension, that is exactly a straight continuation of the main house wall.
- I just pick a distance from the house that gets me clear of the various obstructions.
In this case it is 145mm.
- I make sure the string line is offset the same distance from the house,and then I put a nail or a screw into my profile at the continuation of that line. That is I place a line parallel to the wall 145 off it.
- I then measure back the offset distance to get a point exactly in line with the wall.
- I bang a nail into a brick joint or a peg touching the wall, and string a line, shown dashed, to fix the true building line.
One a similar vein, sometimes when you have to get machinery into a job, rather than just pull out the profiles that are in his way, first set up some offset or recovery profiles. Say you set the recovery profile 6M away from the real one, then it is a case of a simple 6M measurement offset to get back to the original set out, and reinstate the original profiles, rather than starting from scratch again, squaring etc.
Back to top
Leave this setting out page and back to home.