Door Repair
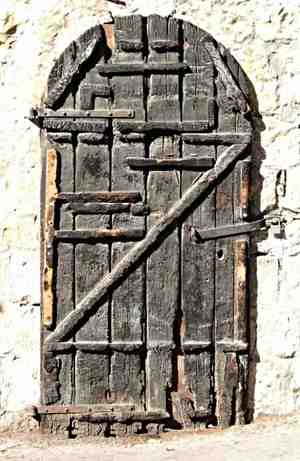 |
| Door repair - I suspect a terminal case, this old batten door looks a bit like I feel some mornings. Photo thanks to kepeter and Morguefile. |
I have lived in a city that is in terms of world standards is very young, no more than 130 years, and given a couple of natural disasters we don't have any of the real old heritage style houses that other places do. So what I am talking about here is not from a point of view as an expert in renovating old doors, but just a few comments on what little bit I can remember from when I was younger and just any tips that come to mind.
In this article I am going to run through a few of my thoughts on repairing doors. I will be talking mainly about old solid timber doors and door jambs or frames. To certain extent a lot of what I have to say applies to timber windows also.
- The joiner made solid timber door, well constructed with good materials if kept well maintained can have a lifespan of say 200 years.
- Many old doors are on heritage property, and so have to be repaired or replaced with the same type of construction, but there are lots of other old doors that should be kept and repaired instead replacing with an inferior product, especially in a period style house.
- Modern mass produced timber doors have a life span of say 30 to 40 years if kept well maintained, but quite often when they get damaged or deteriorate, it is cheaper to just replace them.
- I have worked with and installed many Aluminium doors. The could be expected to have a lifespan of say 50 years, but I have repaired very few, just the odd straightening and adding reinforcing angle around lock areas after break-ins. Again with break-ins it is usually a re glazing job for a specialist contractor.
- Aluminium sliding door that are over 20 or so years old can sometimes be revived with replacement rollers, but usually the bottom track wears (aluminum is soft) and it is better to replace the full thing.
- I have no experience at all with uPVC doors, so I can't offer any help on them.
Back to top
Door Repair - Causes of damage.
There are a few reasons why doors will need working on, and each one has a few options as to how to fix the problem.
- Wet rot Sometimes called brown rot. The timber gets soft and spongy, first signs are a sort of hollowing look to the surface, under the paint. The affected part turns black. A poke with a screwdriver will easily go into the soft spots. Caused by timber decaying naturally when there is a lot of moisture about, so it's usually poor maintenance, or an exposed location. Quite often bogged up and painted over, but this rarely fixes it.
- Dry rot is a bit of a misnomer, because it does thrive in damp and airless conditions, and so it doesn't appear in doors too much. The difference is that it is caused and spread by a fungus, which shows up in extreme cases as a soft white covering, spreading tentacles out into good timber.
- Insect pests. Death Watch Beetle and various other borers. Just about unheard of in doors (because of their function) but sometimes in jambs or doors that have been stored.
- Criminal Damage. Quite common in my experience, unfortunately.
In the cases above, apart from simply replacing the door or jamb with new, when the damage is less severe there are a couple of options to fix it.
Back to top
Door Repair - Splicing in a new piece of timber.
- Splicing is the term we use when joining two things together, in this case joining a new piece of timber to and old door.
- In many cases splices in timber are just simply long beveled joints where two pieces overlap, and the fact that they join on a slope to each other, means that the surfaces in contact are greater, so that the glue that is used has a greater surface area to work on, than if the timber was simply butted.
- The angled cuts that I show here, do have a greater surface area than simple butt joints, but I think that to a certain extent the angles also perform another function.
- They can be angled in such a way that say in the case of a door or window, the upper piece would angle over the lower piece to help stop water running easily into the joint.
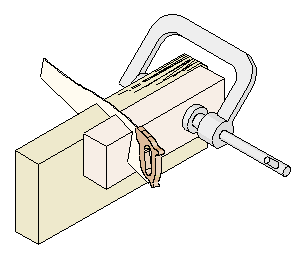 |
| Door repair - Set up for sawing a splice piece into a door. |
It is usual to cut the splices at an angle both ways, say mark with an adjustable bevel set at say 20 degrees across the door edge, and with the same bevel carry it over the face.
- Take the door off and work on a pair of saw stools, preferably padded to protect the door from damage.
- Mark out the area to be removed, and for the depth of cut I like to use a marking gauge on both faces of the door.
- Prepare the piece of timber that will be used for the splice, and make it a little wider and a little thicker than the finished size would be.
- This allows you to dress off (plane it down wit a smoothing plane) the splice to a perfect fit.
- Clamp it to the door as in the sketch, with the splice piece being a touch higher, and saw both the door and the splice with a sharp saw.
- Doing the cuts this way removes the need for great accuracy in following your marking out. Any running off line when sawing happens to both pieces.
- Saw, or saw and chisel the remainder out of the door and try them for a fit.
- If the angled cuts are not fitting perfectly, it is easy to clamp the splice piece in position, tap it tight with a hammer, and then run the saw down the joint again. This takes out a slice the thickness of the saw blade and improves the joint by that amount.
If you have to d a splice say in the middle of a stile around the lock area, then the same principle can apply, that is make the cuts through both pieces at the same time.
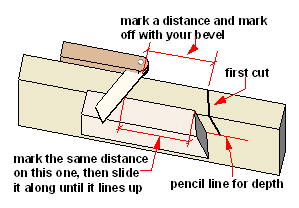 |
| Door repair - Offset for a second cut. |
- This time you have to offset the cut to allow for the angles.
- If you get the splice piece too long you just adjust the length, but if it is too short then this is where your extra width come in.
- It is a lot easier to plane of the excess width than start making a new piece.
When I first used this technique we were working on old rotten windows and sometimes door jambs that were invariable paint finished. So the joint was made also with paint and putty (not much putty, honest). We nailed the pieces in position.
The paint was red lead primer, which did an excellent job, but is no longer with us. The nailing and using paint allowed us to finish the job in one session.
Doing the same job today, on a painted job, I would use modern paint (hopefully on a door or window it will be oil based) and putty, and fix with screws.
If it was a clear finished job or if time wasn't a consideration, I would use epoxy glue and screws. Of course this means that the job has to wait while the epoxy sets before dressing off and finishing. Depending on the situation, I wouldn't use any other fixings.
Doors that have sustained wet rot damage have of course a higher moisture content than is good for most epoxies. The answer is to simply dry it out some way, or if time is a factor there are available hydrophillic epoxy mixes. That is they work in damp conditions.
Back to top
Door Repair - Epoxy repairs.
Epoxy compounds, primers,fillers and glues have been around for years, ask the wooden boat builders, but even though they they are so good for small repairs like we are talking about here, they had the drawback of being hard to finish. The average epoxy job would need power grinders and sanders to finish.
Not any more, now there are specialist supplies coming onto the scene catering specifically for building repair work. I have heard good reports from a product called "Senseal" that although it is expensive, is very easy to work with and finish.
- The usual method is to remove all the rotten or damaged timber, and then prime the area with a thin two pack primer.
- Form up around the edges to hold the epoxy in position while it is setting.
- It is tempting to skip the forming, if you are using a thick bog like mix. Don't do it, you will use more material then necessary and it will sag, then you have a lot more to sand off etc.
- I stick packaging tape on the face of any timber that I use to form up the mould for the epoxy, this stops the epoxy gluing the lot together.
- The Epoxy filler will be a two pack also, and should be applied within a certain time after the primer for one to chemically bond to the other.
As with all products like this read the manufactures instructions and follow them. Quite often they will have data sheets and spec sheets on line, and these are well worth reading.
Back to top
Door Repair - Other Methods.
- Borer damage can be repaired as detailed above, but first you have to get rid of the infestation and treat the timber with insecticide. Check out specialist suppliers.
- The same thing with dry rot. The fungus has to be neutralised and the timber treated to stop it occurring again. Take specialist advice.
- Old timber doors that are simply tired and sagging can sometimes be pulled apart and then re-assembled with new glue and wedges.
- Another way to pull a sagging door back into line is to wedge it back into position and screw or bolt fix flat metal "L" or "T" plates to reinforce the corners.
Back to top
Door Repair - Repairing break-in or burglary damage
Over a period of a few years I did a number of quite large jobs (for me that is) at a boarding high school. To keep in consideration for the next big job, I got to doing quite a lot of smaller jobs that their own maintenance guys should have done. As you may guess I replaced or fixed and then reinforced and made stronger quite a few vandalised doors.
- I guess really there was a small amount of repair work, but our main job was mainly replacement with a view to upgrading the doors to stop it happening again.
- A basic thing was, any door that had been badly damaged if it wasn't a solid core door to start with, was replaced. Invariably with 42mm thick, very heavy so always three 100mm heavy butt hinges.
- If the hinges had been sprung, they were replaced and larger screws used, but a lot of times we also added extra hinges, especially at the top.
- A lot of times we had to re-fix the door jamb also, and this was a case of 8mm or 10mm Dynabolts (expanding masonry anchors). Plastic Rawlplugs and screws were not good enough. We were after security not looks.
- One particular door to a paint store had suffered a few times, and I remember at the time being so dumb as wonder what the hell they were breaking into this place for, "nothing valuable here". Wrong! They were after paint thinners to sniff.
- That particular door I replaced with a 42mm thick solid core door. Then bolted and screwed a 50 x 50 x 4 steel angle to the brickwork around the inside of the jamb. I had made up a 3mm steel "U" section that I fit around the lock stile to reinforce that whole edge.
- We invariably used full on mortise locks and dead locks. Always with escape functions on the inside. (Fire safety regs.),
- The locks built into handle types (with the 42mm hole) were not very secure. Even the expensive ones.
- Always after working at that place if I ever have to fix a door jamb, I will put extra fixings around the lock receiver area.