Paneled Doors, Glazed Doors, Construction
 |
 |
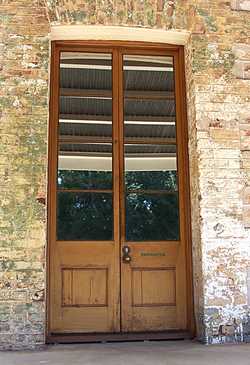
| Timber panels under the lock rail and glass above |
A pair of fully paneled doors. |
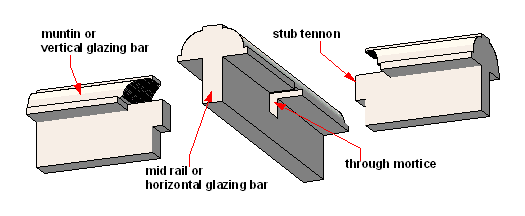
Parts of a door
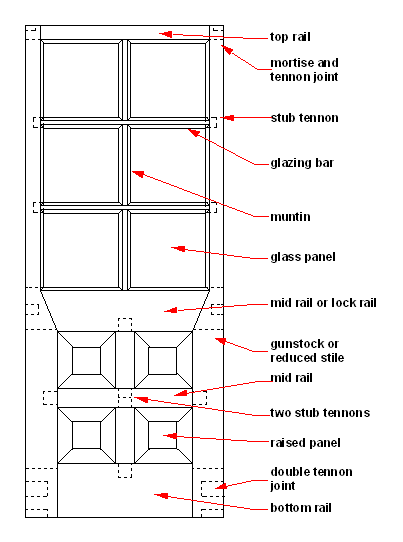 |
| Paneled doors - Parts of a timber door, using a reduced or gun stock stile door as an example. |
The sketch above shows a door that would have been used in offices and commercial buildings, but it is not too common these days. it is a hybrid of a panel door and a glassed door, if the door was made either all glass or all panels, then the stile would be full width all the way. This door does well to illustrate a few of the terms and joints that we use.
- stiles, are the main side pieces of the door and can referred to as the lock stile and the hanging stile.
- Rails, again can be further defined by their position in the door. Wider bottom rails and lock rails to provide stiffness and strength in their joints with the stiles and the top rail is usually the same width as the stiles.
- Muntins are vertical members and when smaller can be called glazing bars.
- Transoms or transom bars are extra horizontal rails usually a lot narrower than the main rails. Again when used with glass also get called glazing bars.
- Mortise and Tenons are the main joints connecting the whole together. The mortises in the stiles and some rails, and the tenons in the rails.
- Through mortises and tenons go completely through the stiles and are wedged.
- Stub mortise and tenons go part way into the members being joined.
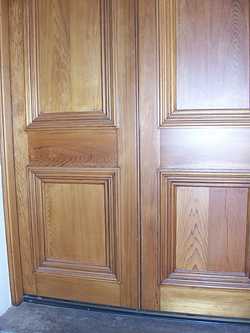
- Panels can be flat, raised one side, raised two sides.
- Panel Mouldings are optional, as the panel will be fitted into grooves in the stile and rails.
- Panels are always made with the grain of the timber vertical.
- Panels are lightly pinned in position at the mid top an bottom only, this is to allow them top expand an contract without forcing them to split. This is because they are very often the widest pieces of timber in the door, sometimes two or more pieces after glued together.
Back to top
Top rail joint detail
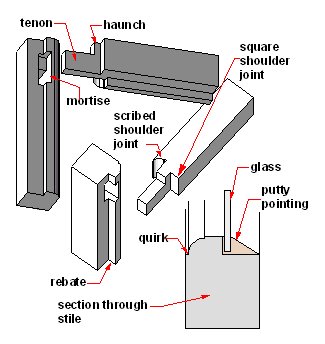 |
| Paneled doors - Top rail joint. |
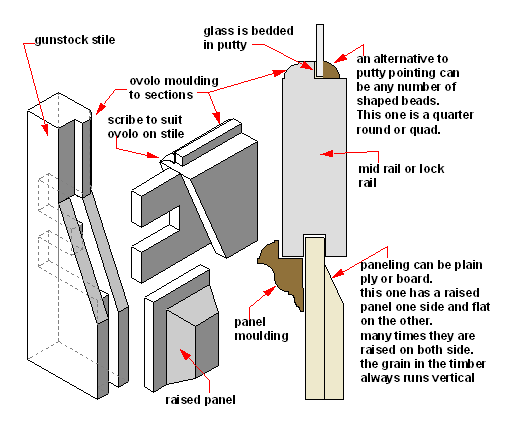
- The top rail joint shown here is just about the same joint that sash windows use, except that the haunch is beveled in a window, so that it is not seen.
Another obvious similarity is that I have chosen to show the glass bedded in putty. and putty pointed.
- Even if the glass is being fixed with timber beads like in the section below, it is never put in dry.
- The glazing in modern metal doors is fixed with rubber type sections, but even with all the modern tubes of gunk available I think that if I had to replace glass in an old door that was painted with oil base, I would use
- If the door was painted with water base paint, then I would use an acrylic gap filler type.
- The actual putty pointing is an art in itself.
- A good plumber/glazier could point up a door like the one shown above in a very quick time, using a lump of putty in each hand and running it into the frame with hands crossed.
The tool used to trim it off is called a putty knife. (Common still in paint sections, but not used by plumbers any more).
- The tool used to remove the old hard putty is a hacking knife, that has a strong back edge that can be tapped with a hammer.
Back to top
Glazing bar detail.
 |
| Paneled doors - Joining glazing bars. |
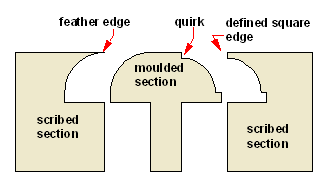 |
| Paneled doors - Ovolo mould. Without the quirk it would be hard to get a defined sharp joint |
- Above is one method of jointing glazing bars, or glazing rails and muntins.
- I tend to use the term glazing bars in general, doors and windows, but I have seen the terms mullions and muntins muntins, referring to vertical members in either doors or window.
- Another method of making this joint is with a halving joint.
- The mould on the stock that I have drawn as a simple ovolo.
- This is a standard mould used often with doors and windows.
- The essential part of any mould used in doors like these is the quirk.
- Always set at the exact same depth as the rebate it makes fitting the shoulders of the tenons a doddle.
- More often than not the tenons are cut square and then a small scribe is cut to match the profile with a a coping saw and trimmed with a sharp gouge.
Back to top
Mid rail Detail
 |
| Paneled doors - Detail of the joint between a stile and the middle rail. On the left is an isometric (3D) view and on the right is a section through the rail. |
Quite large mortise and tenon joints like these are set out in this way, which is a compromise. The bigger we make the tenons, the large mortises need to be for them, and this would weaken the stiles
The haunch is there to try to stop the rail cupping, and to keep the two timbers aligned for the full length of the joint, but at the same time it is not so deep that the mortise takes too much strength away from the stile.
- The shoulders of the tenons in this case are angled to suit the different widths of the stile..
- More often than not though, in a standard door, they are cut square and then a small scribe is cut to match the profile with a sharp gouge.
- The stiles where the joint is are just cut back to the quirk with a chisel, leaving just enough of the mould left to fit the scribe to.
- Large door manufacturers use tenoning machines that do the Scribe in the one pass of the tenon head, so there id no need to change the stile.
Back to top
Bottom rail detail
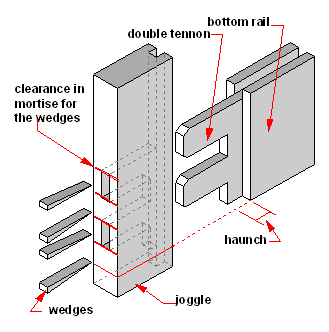 |
| Paneled doors - Bottom rail detail. |
The bottom rail and to a certain extent the lock rail provide most of the strength that stops the door from sagging. So we always try to get timber that wide enough to do the job.
- If no good pieces are available then it is fairly common to glue two pieces together.
- This makes it easy to get a decent width, and also reduces the tendency of the timber to cup.
- When the joiner marks out a door he always allows for the stiles to be longer than necessary for just the door itself. the excess bits that overhang the perimeter of the door are called joggles.
- The joggles add extra strength when the door is clamped and being wedged. We used to leave them on during transport, and the carpenter on site would cut them off when he was fixing the door.