How to hurricane upgrade an existing house to make it hurricane resistant
To do a hurricane upgrade to an existing house, is perfectly feasible. Notice that I use the word upgrade, not proof. It used to be common here where I live to hear the words "cyclone proof".
I believe that there is no such thing as truly hurricane or cyclone proof house. (Except maybe a concrete bunker).
Strengthening existing houses, why bother?
- In the first few years after Tracy, it was fairly common to do a full upgrade to the new building codes.
- In Australia where I live we have had strong building codes specifically for cyclonic areas for over thirty years, so any houses that require upgrading are getting a bit old now, and more and more the option to bulldoze the old house and build a new one is taken.
- A few years ago it was possible to build a new extension that complied to the new codes onto an old house that did't comply. We just upgraded the old where it touched the new.
- However things have changed in that respect. The authorities now require a full upgrade of the whole house if the additions are over a certain percentage of the whole. It is around 50%, but check your regs. If you are contemplating a large renovation or extension.
- Because of this, it is common to see new extensions that are structurally separate from the old house. It may be better to have them "look like they grew there", but unfortunately it just costs too much.
So for those of you that live somewhere without stringent building regulations, I offer the rest of this page as a guide only. It shows just a few of the possibilities.
When you have read the rest of this page you will begin understand why it is so very expensive.
Back to top
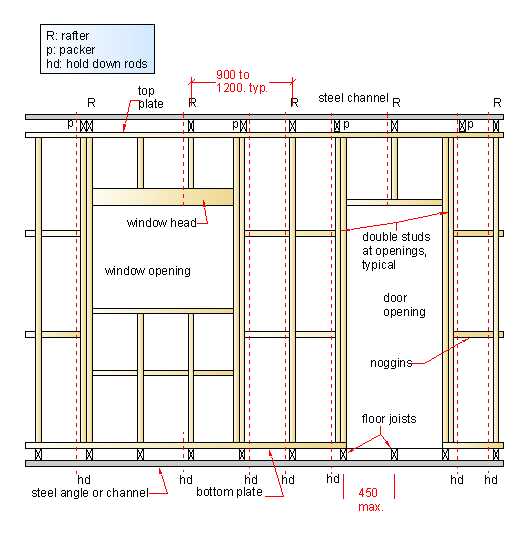
A look at an external timber frame wall.
 |
| Hurricane upgrade- |
Note! These are just Typical examples from my own experience, for a 75 hardwood wall frame. Obviously if using different sizes and materials, then the structural engineer will change things.
- The red dotted lines indicate the position of what we call hold down rods. Usually 12mm threaded rods, and sometimes 16mm
- A HUD rod must be placed at every rafter (usually 900 centers, but up to 1200), at the corners, alongside each window / door opening or otherwise at 900 centers.
- Each stud is fixed to the top and bottom plate with 2/nail plates.
- The window and door openings have double studs on either side.
- The window and door heads are all out of full thickness timber, in this case 75mm. They vary in depth, so it is quite common to see 150 x 75 or 200 x 75 heads. These are fixed to the studs again with nail plates.
- The noggins are fixed with 2/75 nails each end.
Back to top
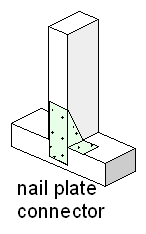
Nail plate fasteners, timber connectors
 |
| Hurricane upgrade- Triple grip |
There are now on the market many types of timber connectors. In fact there is a list of them that would make a full page here, so I will not dwell on them too long here.
The triple grip connector is the first one that I ever came across, and that was in the late sixty's, which would make it one of the first. One of the first and definitely one of the best.
- The important thing with all of these connectors is to use the correct nails.
- It is not just that the manufacturers recommend a certain nail, but the type and number of nails to be used on each particular nail plate is defined in the building codes.
- Our DTCM says that triple grips are to be fixed with 10/30 x 2.8 thick nails as supplied by Teco.
- OK, what they are saying is that the engineering properties of this connector have been determined by tests using this nail.
- Use the wrong nail and you could get knocked back by an inspector.
- With hand nailing the heads have a short thicker shoulder on them, similar to a countersunk screw, and different to other flat head nails.
- Just about all the tradesmen that fix these things use a coil nailer, that is a nailgun that has the nails arranged in a coil. These nails also have been approved, so if you are using one of these, check that you are using the correct nail!
Back to top
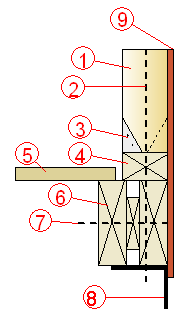
Wall detail at bottom of a high set house.
 |
| Hurricane upgrade- wall detail |
- Stud. 450 centers
- HD bolt
- Triple grip, one each side of stud.
- Bottom plate.
- Flooring
- Floor joists
- Bolt fixing floor joists together. Say at max 900 centers.
- 100 x 77 x 6 mild steel angle.
- 7.5mm structural shear ply.
The wall cladding is not shown on the sketch. What I have shown is the shear ply. This ply is doing two jobs.
- As it's name suggests, the ply is used as a bracing to resist shear. That is the wind forces that want to push the wall frame out of square.
- Also the ply is is providing impact resistance to the face of the wall. Some of the wall cladding (PVC-Vinyl) requires extra support to resist punctured by flying objects.
Back to top
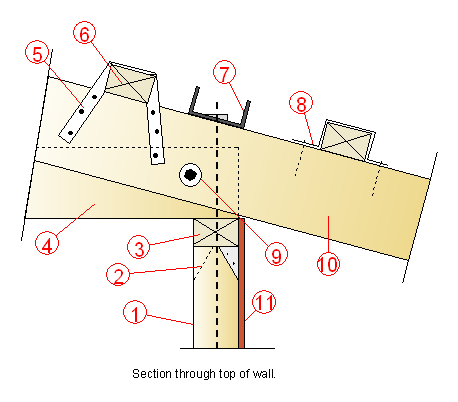
Detail, rafter wall connection.
 |
| Hurricane upgrade- Rafter to wall connection. |
- Stud.
- 2/triple grips.
- Top plate
- Ceiling joist.
- Purlin strap, batten strap. One at each purlin. These are fixed with the same nails as the Triple grips. An important thing with there is that they are fixed on alternate side of the rafter. That is the next one up the roof from the one in the sketch will be on the back side of the rafter.
- Timber roof purlin.
- 75 x 40 taper flange mild steel channel, used as an over-purlin. Use tapered washers under the nut head. Bolted to steel angle under the wall.
- Another method of fixing the purlins, used where the rafters are exposed. A top hat strap fixed to the top of the rafter.
- Rafter.
- 12mm bolt, rafter/ceiling joist connection.
- Shear ply.
Back to top
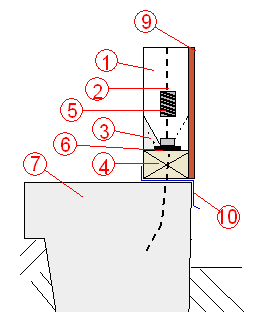
Wall to concrete slab connection
 |
| Hurricane upgrade- Wall to slab. |
- Stud.
- HD rod.
- Triple grips.
- 50 x 50 x 4 plate washer and nut.
- Bottom plate.
- A joiner nut that joins the the bottom section of the HD bolt to the top section. The bottom section is fixed to the slab either with epoxy, Chemset fasteners, or they are cast into the wet concrete.
- Concrete raft slab.
- 9.) Shear ply
- 10.) Pressed metal flashing. Outside wall cladding (not shown) runs over wall-slab join.
Back to top
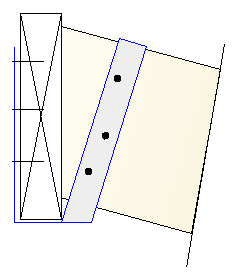
Hoop Iron Strap.
 |
| Hurricane upgrade- Ridge to rafter fixing |
Even though there are many different purpose made straps available, sometimes it is necessary or easier to make your own. Hoop iron is 25 wide by 2.0mm thick. It is galvanised and comes in rolls of various lengths. I always found it convenient when doing upgrade work to have a roll on the job.
We simply cut it to length, punched the holes with a roofer's prick punch, and fixed it with the same nails as the other straps.
Because it is 2.0mm thick instead of 1.2mm thick that the other nail plates are, it is harder to use. On the job shown here it would be a fair bit cheaper than any other purpose made hanger.
On the job shown we start off nailing the middle of the strap to the rafter top, then bring both ends down, nailing to each side of the rafter, bending them 90 degrees then bringing them up the back of the ridge.
The opposite rafter is fixed the same way.
This is only one way of improving the rafter-ridge joint.
- A short length of 125 x 50 timber bolted across the two opposing rafters, up hard against the ridge, similar to a collar tie.
- A couple of similar pieces made up out of 20mm ply, sandwiching the rafters between them. Use bolts for the connection.
- Standard triple grips or rectangular nail plates.
Back to top
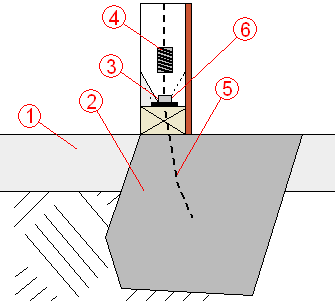
Internal Shear wall hold down
 |
| Hurricane upgrade-Shear wall hold down |
Certain walls inside the house are designed to shear walls. That is they are upgraded to provide extra stiffness.
- The existing slab is nearly always too thin to give a good anchorage to the HD rods.
- The existing slab is cut and holes excavated for new thicker concrete.
- Triple grips.
- Joiner nut to make one long bolt. The bolt goes into the roof, fixed to ceiling joists or the rafters, depending which way the wall runs.
- Bottom section of the bolt cast into the new concrete pads.
- Plate washer and nut.
Back to top
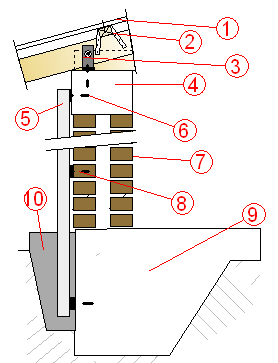
Cavity brick walls
 |
| Hurricane upgrade- Connecting the roof to the foundation. |
- The roof sheeting and the fixings have to be upgraded. It has to be removed to do other work inside the roof space, so it is false economy to put the old sheeting back, even if it looks to be in good condition.
- Once again the purlin fixings have to be improved.
- The rafter to concrete bond beam connection will be bolts through an angle bracket, and they have to be upgraded in size. The bolt into the bond beam is usually 12mm with 110mm embedment into the beam.
- The existing concrete bond beam is sat on top of the brick wall, with only it's own weight to hold it in position.
- This is a 75 x 75 x 6.0 RHS steel mullion with 6mm plate cleats welded at the bolt positions. At the bottom it has the same cleat and Chemsets.
- 2/M12 Chemset bolts either side of the mullion.
- Existing cavity brick wall.
- Intermediate cleats and bolts at max. 900 centers vertically. Chemset into the brick wall.
- Existing raft slab.
- The concrete pad as shown is just to protect the underground steel from rusting. However if the engineer deems that the footing is too small, then the mullion is cast into deeper pad footings that underpin the existing slab.
Back to top
Leave this hurricane upgrade page and back to home.


