|
|
||||||||
The versatile threaded rod.Engineering trades have bee using threaded rod long before us builder's got in on the act. The air conditioner guys have been using it to hang their duct work from. On my hurricane upgrade page I talk about using it as hold down bolts for upgrading houses to cyclonic coding. The whole emphasis on structurally upgrading an existing house is improving the connections. Nails replaced with bolts, rafters bolted to hold down rods passing through wall and into something solid. In the drawing above I show a HD rod (5.) passing through a wall and into a new concrete footing.
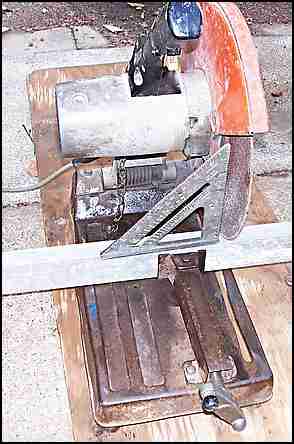
The humble threaded rods. AKA "all thread" are lengths of rod which have a thread formed all the way, no smooth section as in normal bolts. These are available in Zinc plated, galvanised or even in stainless steel. (I recall seeing a very simple but effective set of shelves suspended from stain lees steel rods.) If you have a project where you require a lot of different lengths of bolts, then threaded rods may be just the thing. They will be cheaper and if you get extra rods, you will always be able to make up any odd bolts that you need, instead of making a separate trip to the store. You can of course saw the rods to length by hand with a hack saw, but my tool of choice for this job is the metal cut off saw on the right.
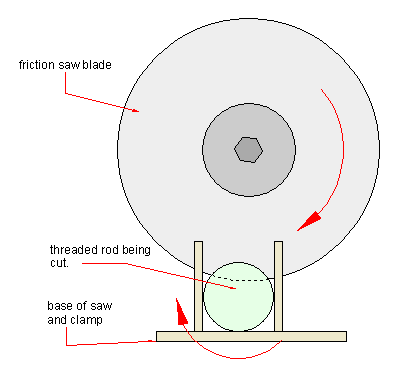
The trick to cutting clean ends, first time, so that the nuts are easy to run onto the rod by hand only is shown in the sketch above.
Joiner NutsNormal good practice for bolted connections is for the nut to be completely on the bolt with a minimum of two and a half threads extra sticking clear of the end of the nut. Joiner nuts are nuts that are about three to three and a half times as long as ordinary nuts, and they allow us to join two lengths of bolt together and still retain the full strength of the joint.
Quite often before threaded rods and joiner nuts came on the scene, we had to get threads cut on the end of rebar steel. Leave this threaded rod page and back to home. Not found it yet? Try this FAST SITE SEARCH or the whole web |
Hire Equipment Furniture Fittings - Architectural Hardware - Electronic Locking Systems - Technical Hardware BuilderBill sponsorship
Quick Definitions
Chamfer: A small 45 degree flat, on what would otherwise be a 90 degree corner. Used with joinery etc. Arris: The simplest form of chamfer, just a shaving to take away the sharp edge. |
|||||||
|
|
||||||||
|
Please Note! The information on this site is offered as a guide only! When we are talking about areas where building regulations or safety regulations could exist,the information here could be wrong for your area. It could be out of date! Regulations breed faster than rabbits! You must check your own local conditions. Copyright © Bill Bradley 2007-2012. All rights reserved. |
||||||||