|
|
||||||||||||||||||||||||||||||
Roofing Angles
Getting the Rafter TriangleMost angles can be learned from a basic rectangular hip roof. When the hips are not equal, or the plan has irregular angles, the same principles apply. I have to thank Jack in Connecticut for his correspondence on the subject and his information on the steel square etc. Good on you mate. You got me motivated! For the purposes of this exercise let's forget about overhangs at the eaves.
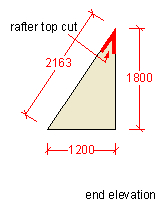
Let's say that I am given the plan, with 2400 as my span of the roof. I am also given a couple of elevations. The slope of the roof is given in the US style of the slope ratio which is 18 in 12. I will use this example as a roof that is 24ft x 48ft. It could just as easily be 2400 mm x 4800 mm and using Aussie manner of degrees. This particular pitch of 56 and a bit degrees is hard to draw, so I would have to use a good protractor or a calculator. The 18 in 12 couldn't be easier.
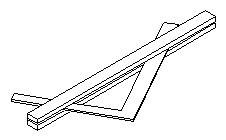
So by drawing it out at a fairly big scale I can get very close to the exact size. I have my main roof angles and my roof surface length. Drawing it out like this is not new. For centuries people have been building roofs with extreme accuracy by just drawing it out to scale. If you have the room you could draw it out full size, nothing wrong with that. You can also do it with a calculator but for all practical purposes what's the point of getting a figure of 21.633307653 when the practicalities of cutting and fixing on site say that you will be lucky if you get it within 1/4 of an inch. As an aside, just before typing that last bit, I went to accessories and clicked on the calculator. In the view menu I selected scientific and did the old Pythagoras trick. Square root of 12 x12 + 18 x18. = 21.633307653 Easy I could have got a lot more decimal places if I had wanted too. I never knock calculators, they are great, but I like to have a manual back up to check to see if I made a mistake. Developing the surfaces and getting the top cutsBack to business, with that triangle and the plan we have all they information that we need to solve most of the problems in this roof. Imagine that you had on the table in front of you a cardboard model of this roof. The four pieces joined at the ridge. From the top the angles at the hips would all look at 45 deg, as in the normal plan drawing. Now imagine pressing down on the ridge and flattening the model. What you would see is this.
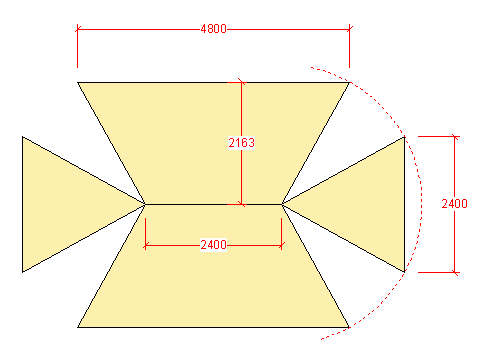
The eaves and the ridge lines have not changed. The only thing that has changed is that the true length of the roof surface, 2163 has been used. This is know as developing the surface. As all the roof surfaces are the same length from the ridge to the eaves (2160), and the hips are the same length I only need to draw out one of these roof shapes at my scale on my MDF drawing board to get lots more information.
Here I get into using quite technical terms, but I will try to explain them as I go along. Let me just say this now, we are not talking about just carpentry work, the structural steel worker, the sheet metal roofer etc can adapt this information to their particular needs.
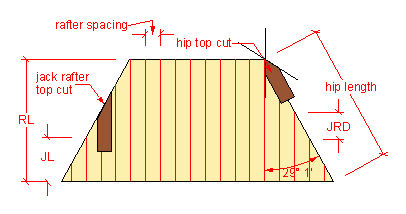
I could pencil in vertical lines and get the:-
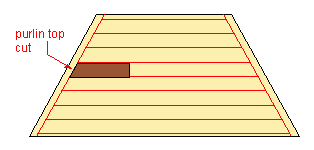
I could pencil in lines parallel to the eaves/fascia and get:- The number and lengths of the roof battens, or purlins. Battens is the more usual term for tile roofs and purlins are used to fix the roofing sheets to. Same angle for steel ties, under purlins and the end of the hips. Getting the side cutsThere are a few bevels that we haven't seen yet. I will use a rectangular hip roof again as an example.
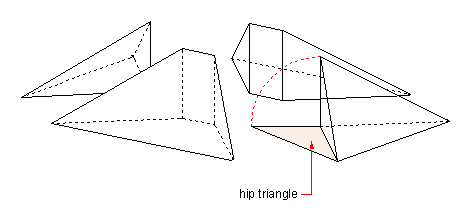
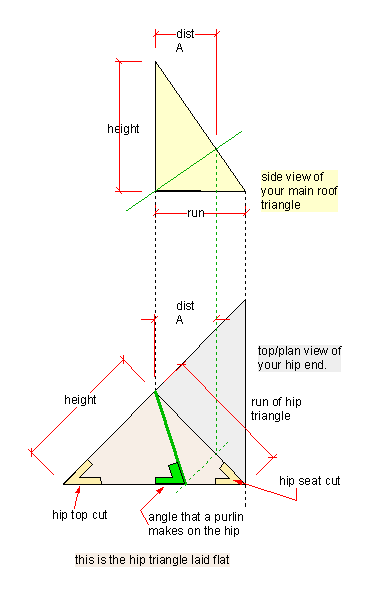
If the roof were a solid, and I could slice vertically down through the ridge and hips I could make something like the above sketch. Where the four sections are separated at the hips I can see the hip triangles. It is easy enough to draw one out as though it was flat. I have a right angle triangle with a known height and a known run. Let's call one of the smaller four sided figures the hip solid.
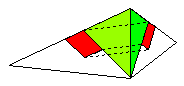
Now if that same hip solid had a huge purlin in it, I would see something like the sketch on the right. The tops of purlins are in line with the roof surface, so the sides of the purlins are square off the roof surface. That is at 90 deg. to it. So if I sliced off a section (the green bit) square off the surface of the roof, underneath it I would see another triangle with my purlin side cuts on it. Purlin side cuts.
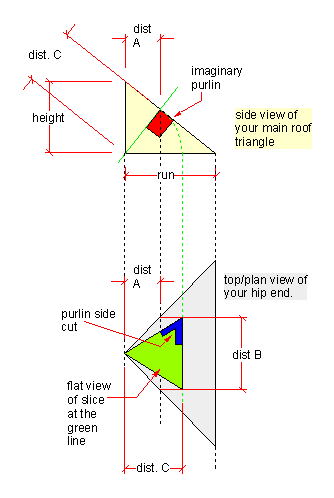
So here it is laid out as If on a sheet of MDF, using a tee square and compasses etc .The point that I made earlier still stands, all the work you see here can be drawn at a scale of 2" to a foot on a bit of ply with just a square, a ruler, a straight edge and pencil. I get my distances A, B and C and lay them out on the plan view of the hip end. It is just as though I have laid down the section through the roof at the green line flat. This way of drawing it out, and then emphasising the angle with a marker pen and naming it always reminds me what angle I am looking at. Some roofs have very similar angles, not a lot of difference in them, and if you don't make it clear which is which you could easily make a mistake.
Here I do the
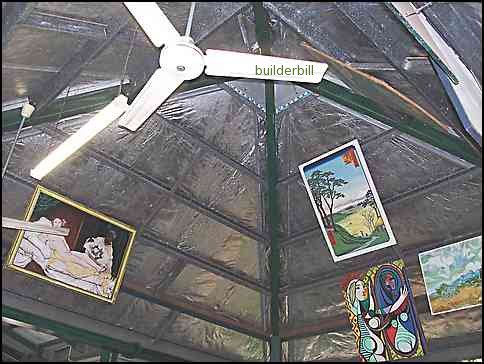
same to get the hip triangle. Hip / purlin side angleThere is one more bevel that I can get out of the hip triangle. It is a line that is drawn on the hip to show the angle that a purlin makes when it touches the hip. I only came up against this one when I started do structural steel roofs. The first one I built, I got wrong and put my cleats square off the hip. What a bummer! I had to cut my cleats off and re weld them on again. Good job it was small job and easy to do. Here is the photo from the steel roof section of the main roof page again to show you what I mean.
The steel cleats are about 6mm thick and punched for the purlin bolts. They are welded to the RHS hip. The "C" purlins are then bolted to the cleats. A cheap way to get a large roof. Not found it yet? Try this FAST SITE SEARCH or the whole web |
Hire Equipment Furniture Fittings - Architectural Hardware - Electronic Locking Systems - Technical Hardware BuilderBill sponsorship Quick Illustrated Roofing Glossary Pages.Types of roofsRoof Features Roof Framing Roof Trusses Roof Coverings In Depth Roofing Articles
|
|||||||||||||||||||||||||||||
|
|
||||||||||||||||||||||||||||||
|
Please Note! The information on this site is offered as a guide only! When we are talking about areas where building regulations or safety regulations could exist,the information here could be wrong for your area. It could be out of date! Regulations breed faster than rabbits! You must check your own local conditions. Copyright © Bill Bradley 2007-2012. All rights reserved. |
||||||||||||||||||||||||||||||