 |
|||||||||||
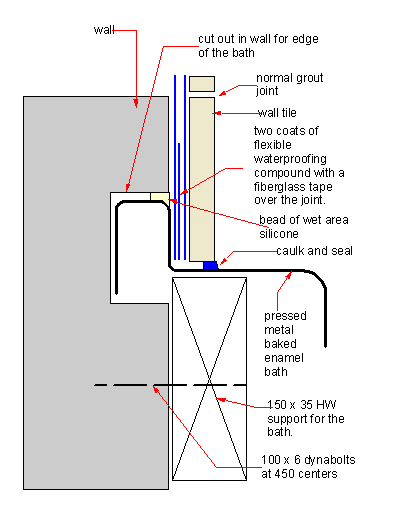
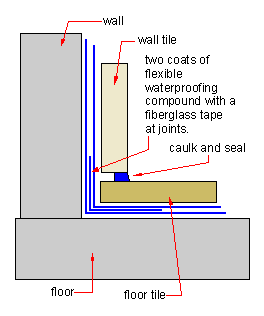
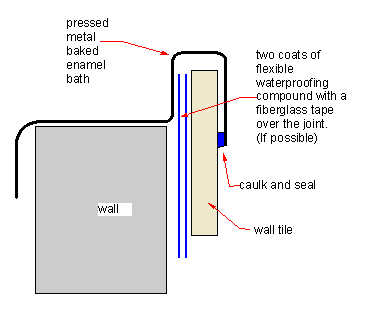
The all important bathroom waterproofingWhere I live bathroom waterproofing or indeed waterproofing any wet area is not a matter of choice, but it is the law. All new work has to be inspected and certified correct under the provisions of the BCA (Building Code of Australia).
I believe that the most important thing I did in the whole renovatin was the bathroom waterproofing job, to do it well and to get it inspected and approved before I covered it up with ceramic tiles.
Partly of course I did it because I was going to sell the house when my small renovation project was complete, and so I needed that waterproofing certificate along with all the other paperwork to reassure prospective purchasers. The main reason though is that I have seen some terrible disasters when the old style waterproofing measures break down. Water running under walls and rotting out carpets in adjacent rooms. Water persistently ruining ceilings below. Bathroom Waterproofing, Wet Area Walls and floor.The BCA requires that all new wet areas, that is kitchen splash back, laundry, WC and bathrooms be waterproofed with an approved flexible membrane system, prior to the fixing of ceramic tiles. On new houses inspections are required before proceeding with the ceramic tiling. Otherwise excellent bathroom work has in the past failed the test of time, due to building movement. Different rates of movement between the bathroom floors and walls. Sometimes the internal walls are a different construction to the external bathroom walls. There are many different kits for doing the job. I got my waterproofing and tiles from a shop that imports quality tiles from Italy and Europe, and I went with the Mapei (Italian manufacturer) system, for both the bathroom waterproofing and the tile adhesive. I prefer to get materials like this from a specialist shop, rather than a general hardware store. A few words of informed advice from someone who has "been there and done that", can make all the difference. Here is a quote from Mapei tech sheet - "Mapegum WPS is a ready-to-use, solvent-free, single component, grey-coloured paste with a base of synthetic resins in water dispersion. Mapegum WPS has a thixotropic consistency which makes it easy to apply on horizontal, sloping and vertical surfaces. After rapid evaporation of the water content, Mapegum WPS forms a flexible membrane which is not sticky and which is strong enough to withstand light pedestrian traffic. It also forms an excellent surface which bonds perfectly to adhesives used for laying ceramics" The real break though with these type of products is indicated by the word "flexibility".
On our first house (timber frame) I fixed the ceramic tiles in the bathroom and WC onto two layers of 6mm flat cement wall sheets. After about 3 years a crack appeared in each tiled wall, straight on the joint line of the cement sheets, which happened to be right in the middle of a tile. What a bummer! The tiles were set solid, but the expansion, contraction and other movements in the timber frame inevitably caused something to give. The movement was probably very small, but white shiny ceramic tiles being what they are, the cracks stuck out like dogs balls. The point I am making is that if I could have used one of the modern flexible bathroom waterproofing compounds that are available today, the cracking of those tiles would not have happened. The bathroom would still be acceptable.
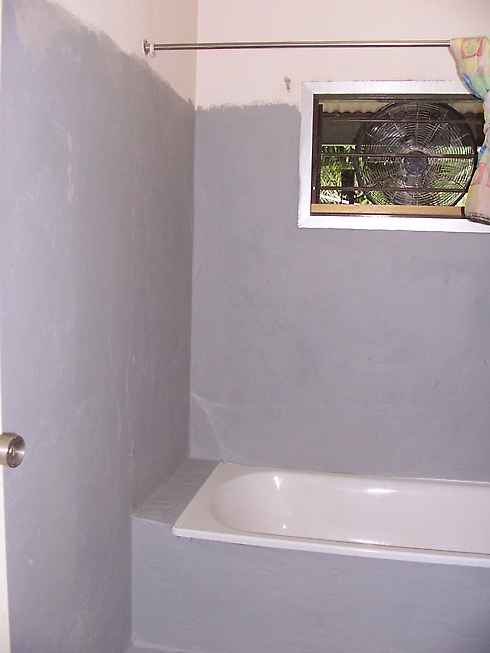
So, even if you don't have to comply with any bathroom waterproofing regulations, I highly recommend you waterproof your bathroom before fixing the ceramic tiles. Don't build it good enough for the next five years, until you sell the house! Build it to last. Waterproofing is cheap and easy to do. If you can use a paint roller and a brush you can do it. It is definitely messy, but the good thing is that it is water clean up. The BCA is quite complex in the minimum areas to be waterproofed, with variations where there are showers screens or not, whether the floor is concrete or some other construction etc. etc. In my case the minimum area to waterproof would have been 1500 radius from the floor waste with turn ups of 150 at the included walls and all around the bath. All around the bath/shower area to a min. height of 1800. If no shower screen is fitted the min. width should be 1500 from shower head. I did the whole floor and and almost all the walls to a height of 2000. (I purposely left the bit behind the cupboard, in case I ran out of material, and sure enough I had a small patch that didn't get covered). I don't see any point in trying to save the odd square metre here or there as the regs are quite complex so it is always better to do extra rather than get a knock back and have to do extra, along with the delay and extra inspection fee. My tile height was 2100 (top of door frame). If I had been cheap and only done the exact area that the code requires I might have saved $30. Here's how I did it:-
It's a poor photo again, a wider angle would have been nice. Here is it ready for the inspection. Note the fan in the window, it is a cheap floor fan that I tied temporarily in place to suck out dust. If you didn't find exactly what you are looking for try this search tool that will search the site and the web. |
Hire Equipment  Furniture Fittings - Architectural Hardware - Electronic Locking Systems - Technical Hardware BuilderBill sponsorship |
||||||||||
|
|
|||||||||||
|
Please Note! The information on this site is offered as a guide only! When we are talking about areas where building regulations or safety regulations could exist,the information here could be wrong for your area. It could be out of date! Regulations breed faster than rabbits! You must check your own local conditions. Copyright © Bill Bradley 2007-2012. All rights reserved. |
|||||||||||


