Square, Squares and Squaring
Squares are tools that we use to test something for square. That means at right angles to something, that is 90 degrees. Or in another way, we say something is square if it is a true rectangle.
We have or can buy hand tools, try squares, steel squares, adjustable squares etc. that are made to draw or test for right angles.
On occasions I have made temporary ones from three pieces of say, 75 x 25 timber as aids when doing the very first setting out of a house block.
Apart from a physical square we can also use a bit of basic geometry to check our larger jobs for being truly rectangular.
So how do we make sure that our projects, from a coffee table to a house are square?
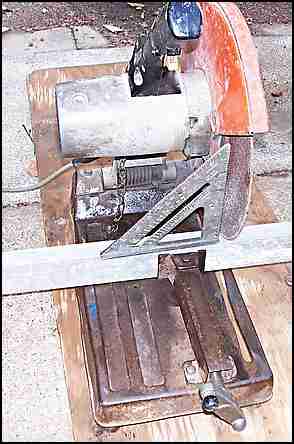 |
| Squares - Squares - Using a Swanson Square to test a saw set up. |
 |
| Squares - Using a try square. |
 |
| Squares - Testing a try square. |
- We can set our machinery to cut our materials at true 90 deg.
- In the photo on the right I am using a Swanson type square to check that my setup on a chop saw will make a square cut.
- I could use the same system to check other saws like radial arm or miter saws for true.
- When I make my first cut I can use a square on the cut end, to make sure that the cut is in fact a true 90 degrees.
- Another type of widely use tool is the carpenter's try square.
- As the name implies, it can be used for testing or trying the edge of a piece of timber for square as in the photo.
- It is also widely used for marking out and checking frames etc. that are being made in a joinery shop for square.
- A try square is prone to damage if it is dropped, and although it doesn't happen often, it should be checked for square every time you suspect that could be out of true.
- Apart from checking it against something that is known to be true, the easiest way to check a square is to use it to pencil a mark on a board, and them flip it sideways 180 and use it again to check that the square is showing true with the pencil line.
Squaring a Stack Of Pieces.
Below is a sketch of a carpenters steel square, which is a piece of flat 3mm thick steel with it's longest leg at 24' or 600mm long, being used to mark
out a stack of timbers.
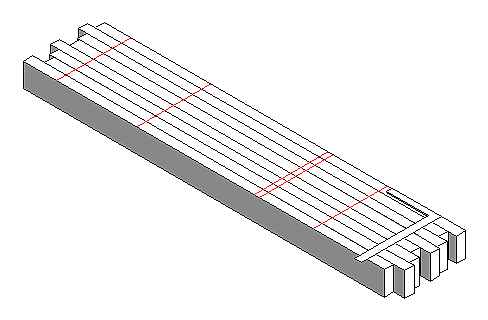 |
| Squares - Marking out more than one at a time |
Above is a basic building and fabrication technique. Get one piece marked out correctly and then use it and a square to mark out many more, without needing to measure each one again.
- If say twenty pieces are all to be cut to the same length, then stops are fixed on the saw bench and all the timbers can be cut without any other need for marking.
- However, when there is a need to mark out something more complicated, like say 30 rafters, with their top cuts, birds mouths and maybe even the purlin positions, then marking them out in a stack becomes a viable and quick method.
- Mark out one member as a pattern.
- Double check it for being correct. Did you get that? There is an old saying in the building game "MEASURE TWICE AND CUT ONCE !"
- On critical work get someone else to run their eyes over it.
- From the first one mark across the rest with a square.
- If the stack is too wide, then mark out two of them with a small square, and transfer one of them to the other edge.
- Square the two with a steel square and a straightedge (eg. a 1200 aluminium level).
- Join the marks with straightedge and pencil.
- Each piece is then squared around the sides with a small square as needed.
Using a Squaring Rod to Check The Diagonals
For a rectangle to be true, that is with all the corners being at 90 degrees, the diagonals distances between opposite corners will be the same length.
This is so simple and well known that sometimes we forget it completely. All the time I see people squaring something up with say a steel square when a check of the diagonals would be far more positive and accurate.
 |
| Squares - Using a rod to square a door under construction. |
- Above is a rough sketch of a door, let's say it is clamped up and glued, and ready for the wedging up.
- Just before this, even though I know my shoulders on my tenons are all spot on square, I reach for my squaring rod and give it a final check.
- The rod is just a length of beading, say 20mm x 12mm with a smaller piece of the same material pinned underneath.
- The smaller piece underneath has a long tapered point on it to allow it to fit right into the very corner of the frame.
- I mark off one diagonal length and then the other.
- Above the door I have drawn the staff again, and shown a couple of marks, "A" and "B".
- If these marks represented the two diagonal distances, the distance between the marks is double the amount that the door is out of square.
- So a pencil mark in the middle of the two is the correct diagonal length.
- In this example of a door, I would loosen off the clamps and push along the longer diagonal until both diagonals are equal.
- As with setting out rods, the squaring rods were made with pine timber that a swift stroke with a smoothing plane would clean off the old marks and leave it fresh for the next job.
I can't remember the last time I made a mortise and tenon door, or a timber window frame with fitted sashes, but I can remember a couple of years ago when I used a squaring rod to check steel gates that I was fabricating.
I am not saying let's go back to using rods, but intrinsically it is more accurate than a tape measure, and there is no mental arithmetic to do. Also it is a one man operation. No second pair of hands holding the end of the tape, when he could be doing something else.
The point of using a diagonal measure is that an individual piece of material in a frame, can have a bend in it, and so throw out any readings that you might take with a hand square. By checking the diagonals with a rod or a tape measure your work will be far more accurate.
A hand square measures a small length, a diagonal measure is a lot longer and therefore more accurate. In addition the gap between the two distance marks is double the actual error and so easier to see.
Larger Setouts
 |
| Squares - Squaring a wall frame. |
We use rectangles a lot in building. Take wall frames for example.
You could easily get a wall frame that is a bit too long for you to check the diagonals with your tape measure. Easy, find a convenient stud that you can use as your squaring edge.
Diagonal measures work well when they are at a reasonable angle. When the angle is flatter they are less effective.
 |
| Squares - Using a 3,4,5 triangle |
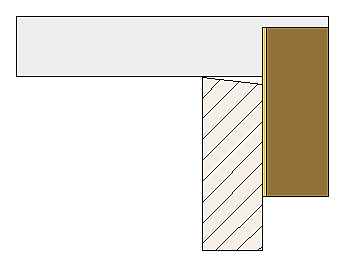
Look at the sketch here. Let's say it is a plan of a house slab that you have to form up.
- You should first have an idea of which will be the most important side, that the rest are made square and parallel to.
- Split it into rectangles and check the diagonals for equal. The dotted red lines.
Also on this plan I have incorporated a right angle triangle known to builder's the world over as a three four five triangle.
- Two thousand five hundred years ago the ancient Greek philosopher and mathematician Pythagoras discovered his truths about right angle triangles.
- Anyone with a cheap student's calculator can use Pythagoras' theorem to get the length of the diagonal if you know the lengths of the other two. (The sum of the squares of the two shorter sides is equal to the square of the other).
- There is a unique triangle that is often used to demonstrate this principle, 3,4,5. ( (3x3=9)+(4x4=16) 9+15=25, so does 5x5=25)
- So any triangle in this ratio, will have a 90 degree corner opposite the long side.
- Ratio is the key word.
- The units don't matter as long as the ratio is the same.
- 3,4,5 miles, or 3,4,5 centimeters, the right angle is still there.
- So If we are looking at a house plan in the sketch above, I could use say 2M as my unit.
- I would bang a nail in the formwork 8M (that is 4units of 2M each) from the bottom right hand corner.
- Another one would go in at 6M (3units of 2M) along the other edge.
- I would check the distance with my long tape between the two nails and if it was within 5mm of the 10M (5units at 2m) that I was expecting, I would modestly say to my offsider, "crikey we were lucky there mate".
- If it was a bit more out like 40mm or so then I would move the nail holding my string line on the profile to correct the error, and then work from the altered line, thinking myself lucky that I had checked the Set out before we had done a lot more work.
Leave this page on squares and zip back to my home page.