|
|
||||||||
Checking a Laser Level, Builder's Auto or Dumpy Level For True
Above is a shot of a laser in use. The guys have it set up level and it was spinning when I took the photo. They are using it to get their levels for the top of the sand bed / bottom of the concrete footing. The guy on the top. from time to time will pass the staff (the white thing leaning on the pile of sand) down to his mate in the trench. When the staff is at the right height, the receiver on the staff (the crosspiece just behind the tripod leg) will give a series of beeps.
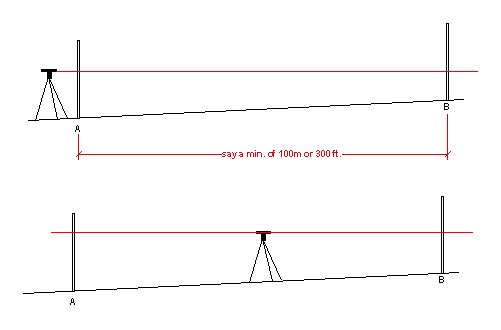
This method will work with a laser or any other sort of optical level. If you are using an auto (dumpy) level you will need an assistant to hold the staff. You won't need one if you have a laser level as you set it up and take the readings yourself, but the principle is the same. Find a clear stretch of open ground and mark on it two fixed points that are minimum of 100 metres apart. If I am on the street I put chalk marks on the concrete kerb, otherwise I put down a couple of bricks to rest the staff on. You must be able to find the same exact spot for the staff at least twice. Set up the level so that you will be able to do the readings without swinging the level too much, as in the top example, then take the two readings at "A" and "B". Then subtract the height at "B" from the height at "A". Let's say in this case the difference is 132mm. Move and set up the level again between points "A" and "B". Take the two readings again, this time you will have to swing the instrument through 180 of so degrees. Measure the difference between the two readings again. It should be the same as before, in our example it is 132mm. If the difference varies, say by 10mm then your level is out 5mm in 100 metres. Don't get too critical and worry about a couple of millimetres, you can very rarely achieve that accuracy in the actual construction work anyway. You just need to satisfy yourself that the level is not a mile out. This way gives a worst case measurement. From almost no movement of the level to a full 180 turn of the level to get the readings. When you do an important set out check the level first. Even if it is a Laser level that you have just hired. Unless to have a really old level with two long bubbles at a right angles to each other, you will have an automatic level. It will have a small circular glass bubble. This includes some laser levels as well. Don't go to extremes trying to get the bubble spot on, near enough is OK as the machine sets itself level if you get it into the ballpark. With a dumpy, keep your hands off it apart from a light touch to adjust it. Don't lean on it! Set up to one side so that you can level the job with the least amount of swinging around or changing position. Set up out of the way of working machinery. Backhoes and the like. I hired a laser a couple of years ago to set out a complex curved roof, and it was ideal as it sat on the top of the blockwork wall without a tripod. I had tried my dumpy on the scaffold but the vibration made it impossible to read. Not found it yet? Try this FAST SITE SEARCH or the whole web |
Hire Equipment Furniture Fittings - Architectural Hardware - Electronic Locking Systems - Technical Hardware BuilderBill sponsorship Other Pages.
|
|||||||
|
|
||||||||
|
Please Note! The information on this site is offered as a guide only! When we are talking about areas where building regulations or safety regulations could exist,the information here could be wrong for your area. It could be out of date! Regulations breed faster than rabbits! You must check your own local conditions. Copyright © Bill Bradley 2007-2012. All rights reserved. |
||||||||