 |
||||||||
More on concrete stairs.This extra page on concrete stairs is the result of another informative and thought provoking e-mail from Tommy Sanford who lives in the Philippines. Thanks again Tommy for getting me into gear again and adding more information to the site.Below is Tom's input in blue and I give my take on it in the brown areas.
You never finish the faces of the steps???
Concrete stair jobs that I have done personally, no I have never been game to give it a try. I have left them until the following day to strip, and as you imply, sometimes they leave a bit to be desired. Quite often though, we have extra finishing done afterwards, either cement render or ceramic tiles.
I have seen it done on short flights of wide steps, like in landscaping type work.
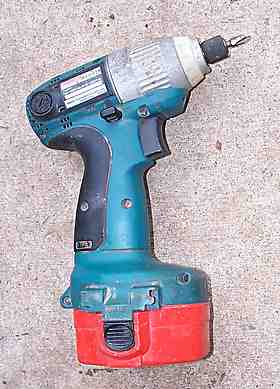
I picked up on screwing a few years ago, mainly using 14G hex head screws, and my small Makita impact gun, but so far most form workers over here still use a lot of nails . This is why I guess that for the most part we don't finish the surfaces of the risers and treads as good as we could do. Just too much risk of knocking a corner off. Screwing is far more positive, and screwed formwork strips strips easily without the twisting and wrenching that you have to do to get nails out.
Cut ply to protect the steps while curing.
Once again, we do it on special jobs, but sadly not often enough. It's cheap enough to do.
You did not show the bottom of the riser form, and, it is cut on a 45 deg angle to allow the finisher to reach the back of the step on his first pass.
Yes we do that all the time.
No screed on the back of the riser.
You got me there again. Being a carpenter and not a concrete finisher, if I had to do the finishing myself, I might think it worth while, but most of the concrete finishers that I come across are descendants of the proud race that built the Colosseum. As such they don't take kindly to Pommie/Aussies telling them how to do something that they have had twenty five centuries of experience with.
I always place a bar at the toe of the step, to stop chipping off. placed in wet cement.
That's another good idea, one which is so cheap to do and yet (again) is rarely seen over here. There is always a lot more work to be done on site, after the concreter is finished, with great potential to drop material or a tool onto a nosing and chip it off. Another for the E-Book.
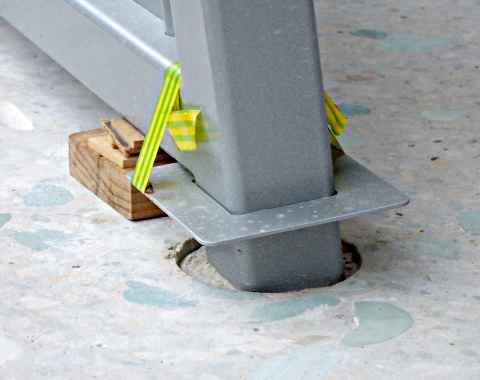
Handrail uprights are easiest to place if the finisher places a coke can ( or beer can depending on the finisher) in the tread/step. Then when the metal hand rail uprights are placed and positioned, you can set it with quick cement or molten sulphur. getting bolts and plates exactly right is really hard.
I agree, I never like setting in bolts for concrete stairs. The beer can idea is a good one. Tommy, tell us more about that molten sulphur, I've never heard of it being used like that.
A more sophisticated version is shown in the photo above. The handrails to the concrete stairs and landings on the previous page were all fixed by the supplier. He had his own diamond core drill that cut a 65mm (from memory) hole in the concrete. This way he measures up after the concrete work is finished, and he has the freedom to change his setting out.
I always pour steps from the top to the bottom, using a vibrator or tamp to move the cement to even height with the next steps lower, did your page say that someplace? otherwise you spend all your time trying to remove cement from the bottom over fill to the top slumped down... got it? easy to move cement down, really hard to move it up. That way the finisher can stand on the risers below and know that the cement height will remain the same/correct. If poured from the bottom up then if he walks one down he will assume that the cement has over filled and remove some making the step low compared to the others.
I take your point there Tommy, bucketing up to the top is no fun, but I must admit we don't do it like that. We fill from the bottom and work up vibrating as we go, then a final vibrate going back down again, and throw away the excess. If it is a good mix, we don't lose much.
No mention of scaffold or support for risers so that the finisher can work without accidentally adjusting the step below. Never saw a form that could take a lot of walking by 130 kilo guys.
I can see the need maybe for scaffold to work on of you are going to strip the risers and do work on them like exposing the aggregate, but we don't seem to need it.
130 kilo guys? You gotta eat a lot of pasta to get to that.
No notch in the supports under the stairs so the the sloping to vertical joint will not slip.. just a little bit... and make everything connected to it just a little wrong...
Most of the concrete stair jobs I've seen done recently have all had props vertical, with a minimum amount of bracing. They get by without accidents, but only just I think, mainly by good luck and the odd braced frames that they use as the stair gets higher.
Myself I favour leaning the props, steel or timber in towards the slope of the stair to lessen the angle, (see the PDF) and then fixing decent cleat to stop slippage or settling. I guess a guy that cut notches out of the supports here would get abused by his boss for wasting material. It is logical though, we put birdsmouths in rafters don't we.
so.. some advise, if you don't like me picking at your web page ya should just tell me...
Right Tommy, it's a pity we can't discuss this over a beer! :-)
Not found it yet? Try this FAST SITE SEARCH or the whole web |
Hire Equipment  Furniture Fittings - Architectural Hardware - Electronic Locking Systems - Technical Hardware BuilderBill sponsorship Other Formwork Pages.
Other Concreting Pages.
Joints in concrete flatworkOther Pages.
BuilderBill Books Building Maths  Stair Design |
|||||||
|
|
||||||||
|
Please Note! The information on this site is offered as a guide only! When we are talking about areas where building regulations or safety regulations could exist,the information here could be wrong for your area. It could be out of date! Regulations breed faster than rabbits! You must check your own local conditions. Copyright © Bill Bradley 2007-2012. All rights reserved. |
||||||||

