How to make a garden shed concrete slab.
Here's a question from a reader about a garden shed concrete job.
"I need to put down a 3m x 3m x100mm slab for a garden shed. First off I have never done any concreting ever. I am handy with tools and car repair,but can you let me know how to set out and level for my slab.
Thanks for your time.
Regards,
Doug" (Doug B from Brisbane Australia).
Back to top
Setting out, pegging out
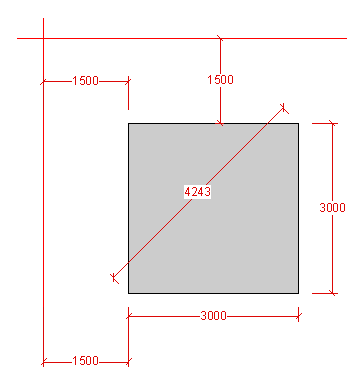 |
| Garden shed concrete - Plan view of the proposed slab |
Hi Doug,
OK lets get the preliminaries out of the way.
- If you have got a plan to work to it will give you the position of the shed in relation to two of your boundary lines, unless you are on a huge block and it gives you a position off the house or something else.
- We have a 1500 set back from both front and rear boundaries, so that's what I have drawn in my sketch above. Measuring off one fence line, and then the other I belt a steel peg in the ground 1500 plus say 50 for errors, to get the corner position closest to the corner of the boundaries.
- Then I add the others. For a job like this I just don't bothers using profiles like on my setting out page.
- Quite often I use big old screwdrivers for pegs, or short star pickets. If available I string my lines between Besser blocks.
- String lines between your pegs and scratch the ground under them with a pick or a mattock. You just need a mark on the ground to work to without the string in the way. I often use a bag of lime or old cement to mark out lick this for a backhoe.
Back to top
Excavation .
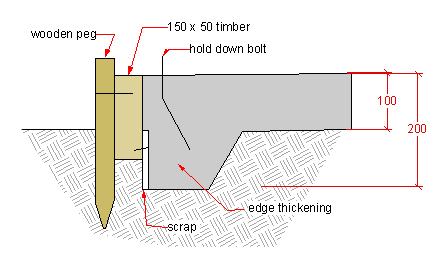 |
| Garden shed concrete - Sectional view of the form and slab. |
- Remove the lines and the pegs and dig a shovel width trench around the marked perimeter about 100-150 deep, throwing the spoil outside.
- The reason for this trench is to make a reverse kerb into the ground.
- We want this thicker edge to stiffen up the slab where we will be putting in hold down bolts or other fixings.
- Also it stops runoff water scouring under the slab.
- Clean off any loose crap and the vegetable matter inside the area. Some people don't do this but it is just good practise on any job.
- If the site has a slope, say it falls 150 from corner to corner, you may want to level the area with clean fill sand, as sand is cheaper than concrete.
Back to top
Formwork for a guarded shed concrete slab
At this stage you can start fixing your formwork. Just about any sturdy timber will do, I have drawn in 150 x 50. I have also drawn in a bit of scrap that you may need to extend the depth of the form if the ground slopes I usually try to get hold off offcuts of 6mm cement sheet for this because it can be left in afterward without any problems.
 |
| Garden shed concrete - Nailing the pegs |
- Cut two of your timbers say 3200 and the other two to 3000 spot on.
- Nail them together in the trench and drag them into position, measuring to the fence lines and trimming the trench as needed.
- When it looks to be in fairly good position check the diagonals for being the same length. Push and pull as needed until it is right.
- Knock in a couple of wooden pegs on each side and check the sizes again.
- Get odds and ends of packers, bits of brick, cement sheet etc to hold the timber in a level position, using a 900 or 1200 long spirit level to check.
- If you have a straight edge to use with the level, so much the better.
- What you are aiming for is to get the top of the forms 100 higher than the natural ground level at it's highest point.
- You can now put in more pegs and nail them to the forms. Because I have a few good clamps I always hold the peg to the board with a clamp while I am nailing it, to stop it shacking everything to pieces.
- Another way is to get someone to hold a heavy sledge hammer against the form to keep it solid while you are nailing.
- Run around the edge of the forms with a shovel and put some soil or sand down the back of them, firming it up by pressing it in with your foot, to stiffen the forms up more.
- Place the reinforcing mesh, if none is specified, then think about doing it anyway.
A couple of points, if the garden shed concrete slab is to be used for something a little better than a simple storage shed (I know of a few that later got turned in home offices etc. with the addition of insulation, lining and A/C) then I'd say lift it a min 150 off the ground, add a vapour barrier and put in reinforcing mesh. Then takes photographs before the concrete is poured. You never know, it could help you out, if and when you decide to sell the place.
Back to top
Hold down bolts.
On my little sketch I have draw cast in hold down bolts. I always try to cast in the bolts on jobs like this. Using threaded rod cut to length with a hack saw and using standard nuts and washers there is no cheap,stronger or quicker way.
- Before the concrete is poured go around the forms and mark where the door is and the HD bolts will go.
- Then when the concrete is poured ( see my other concrete pages) and just starting to firm up you push in and jiggle the bolts a touch to compact the concrete around them.
- At the same time that you drop in the HD bolts run an edging tool to the concrete at the doorway.
After a couple of days strip and clean the form boards, back fill around the slab edges and clean up the area. Your garden shed concrete slab is finished.
Back to top
Fixing the shed
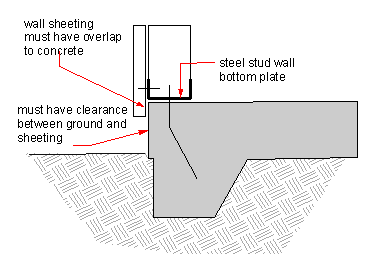 |
| Garden shed concrete - Wall sheeting overlaps the concrete. |
- If you are building a steel shed yourself or if it is a kit, put something between the steel and the concrete to protect the steel.
- Some damp proof material or paint it with a bitumenised paint.
- Use a sturdy washer under the nut when bolting the bottom plate down.
- Make sure that the outside cladding runs down at least 25 past the concrete edge to weather it.