|
|
||||||||
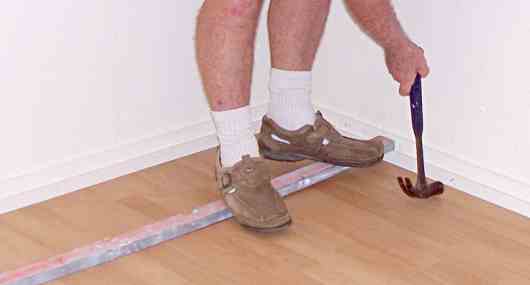
Skirting Boards, Baseboards, Fixing.I fix the skirting boards when the walls are finished (plastered) and the door frames and architraves fixed. Always at the same time as the architraves (if any). I have seen on the web that in the US sometimes they fix skirting after the floor covering. Or they leave the baseboards set up to allow the floor covering to go under. Strange. Never in my experience. I saw a bit on a web site, referring to a shoe moulding. I thought "here's a go, something new from the States". it turns out to be what we call a quarter round, or quad moulding (quadrant of a circle) , about 3/4". Which went out of fashion 35 years ago as far as I'm concerned. If I had to resort to covering stuff up with a 3/4" quad on new work, I'd give the game away. The floor finish is the last job. A polished timber floor, ceramic tiles, vinyl or carpet, the floor layers are the last trades in before clean up and hand over. Except for the painter, who may do some touch ups. I almost always use ceramic tile skirting to a ceramic floor. So to fix timber skirting I set up my miter saw in a large room or better an outside covered area. If you have not already seen it check out my scribing page for actually making the joints. If I need a neat fit to the floor, say on polished timber, vinyl or even bare concrete I always scribe the bottom of the baseboard to the floor surface. That is no gaps in the hollows. FittingI scrape any loose crap off the floor/wall joint and sweep it away.Mostly our skirting is in standard lengths 5200 long finger joined pine. For cutting to length I run around the rooms and cut them all a bit oversize. starting at the longest first and then down the range to the smallest last out of the offcuts. I hate cutting a short length out of a full one, when I know I might need the long length later. Then I just work from room to room cutting the boards to length, fitting them and fixing them. If I have a long wall that needs a joint, I miter the joint too. The overlapping part of the joint facing away from the door if possible. Rather than bending the tape measure at the wall and guessing the size at the bend, I might tick the floor with my pencil at say 4000, then turn the tape and measure the remaining 672 exactly. Sometimes if I get the size spot on, I have to put a bend in the skirting and spring it into position. Make sure it is the right length. If you force spring one in that is a touch long it will compress the plasterboard and look bad. For cutting very small pieces with my drop saw I cut them off a longer length off cut. If they still need a bit of trimming it is either the hand plane or throw it away and start a new one. Holding tiny bits close to a machine blade is a no no.
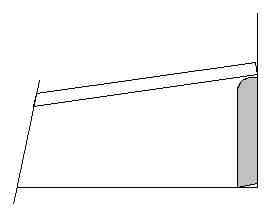
I start off with my buzzer, or hand plane, and bevel the bottom of the skirting so that any crap in the very corner of the wall/floor does not hold it up. In the photo you can see what I mean. This may be enough to do the trick if it is a good floor. If the Skirting piece itself has a bend in it , or if the floor has a smooth bend in it, I can usually force the skirting down by laying a timber board on the top of it, (a few feet long) and standing on the board, using my body weight to push the skirting down while I nail or screw it to the wall. (I have shown the board in the sketch, but I have not included an overweight figure perched on the board while belting in nails, with the blood running to his head:- ) It does work though and a lot of times you can get away without any more work. If it needs planing to shape, unless you have a really bad floor, a run along the bottom with a pencil sat on say a 5mm packer will give you the line to plane to for a good fit. Fixing itFor timber stud walls, through plasterboard I just use two 50 x 2.8 bullet head nails at each stud. Punched below the surface to keep the painter happy.Same with steel stud walls except that I use 8g self embedding wing teks. No pre-drilling needed with these screws. For Masonry fixings a lot of guys just drill straight through the skirting and wall, whack in spaghetti, (a coil of thin plastic plug material ), cut it off and bang in a nail and punch it. A bit rough. I mostly drill the same way and use the cut to size plastic plugs and then screw in a self embedding screw. On good jobs with decent skirting I pre drill and countersink the holes first and then run in the masonry drill. On small pieces, or near the ends I usually pre drill to stop splitting. Very small bits I fix with stud glue, (the stuff for gluing plasterboard sheets), too risky with nails or screws. When I have had no stud glue handy I've used acrylic gap filler to stick them in place. (covers up a bit of sin too). I also use a smear of glue on external mitres now for the same reason. Wipe any smears off quickly with a wet rag, especially stud glue. It's tough to shift after. If you are doing the whole job yourself, run around the top edge and wall joint also with gap filler in a caulking gun Leave skirting and back to home page. Not found it yet? Try this FAST SITE SEARCH or the whole web |
Hire Equipment Furniture Fittings - Architectural Hardware - Electronic Locking Systems - Technical Hardware BuilderBill sponsorship Other Carpentry and joinery related pages.
|
|||||||
|
|
||||||||
|
Please Note! The information on this site is offered as a guide only! When we are talking about areas where building regulations or safety regulations could exist,the information here could be wrong for your area. It could be out of date! Regulations breed faster than rabbits! You must check your own local conditions. Copyright © Bill Bradley 2007-2012. All rights reserved. |
||||||||