|
|
|||||||||||
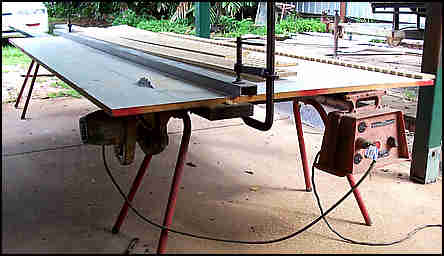
A Quick to Make Circular Saw BenchA saw bench in twenty minutes, no sweat. Take it down in less time than that and use the gear for something else.I like keeping things simple, but at the same time if there is an easier way of doing a repetitive job, I am all for it.
As you can see from the photo, it is a very simple job. It is not a lot different from the "Triton" and similar purpose made saw benches that accept power saws. It has advantages over them, it is a couple of hundred dollars cheaper, and it has a large long table that makes it easy to cut full size sheets, without other accessories like roller stands. I have a couple of saw horses with a couple of salvaged planks on them. I roughly check that they are in twist. (Not twisted). From time to time I pick up cover sheets of MDF (medium density fiber board) cheaply from our panel supplier. I use them for heaps of jobs, from covering up excavation holes, throw away formwork, temporary flooring on decks, and making temporary benches. The one I used here has a melamine face. I take my old 235 Makita circular saw and screw it down to the sheet. It's been used for this job a few times, so the holes are already drilled in the saw base.
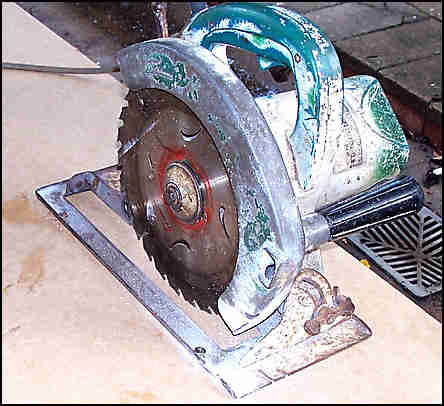
Note! the saw in the picture is one that I keep specially for cutting steel. That's the reason for no guard, it clogs up with the grit etc. ( There are now better cold saws for that job, and as soon as this one dies on me I'll get one :-) I do not use it for normal hand held timber sawing. (honest :-). As you can see the blade is fully retracted and the locking lever is clamped firm. I used four timber screws to hold the saw down. They were purposely bit too long, for a better grip, so when it was turned over I had to grind them off flush with the sheet. A better job would be to use 4/ 8mm bolts. I didn't have any handy. I tried my best to keep the saw parallel to the sheet edge, but it is not essential. I made sure everything was secure and clear, and fired up the saw. loosened the clamp lever and slowly lowered the blade into the sheet, until it was through the other side and with enough blade showing to do the job. This is a technique called "dropping on". It is used on planers or spindle moulders etc for many jobs. In this case it is the saw that is dropping onto the work. Usually it is the work onto the machine. When dropping on you have to stop the work, or in this case the saw kicking back. Usually with a stop clamped to the machine fence or bed. No sweat, this time, the saw is firmly screwed down. it aint gonna kick. Lets say that I wanted to cut a rectangular hole in the sheet. I would set the saw with the blade retracted over where I wanted to start and then I'd clamp a piece of board or timber to the sheet, touching the back of the saw to stop it kicking
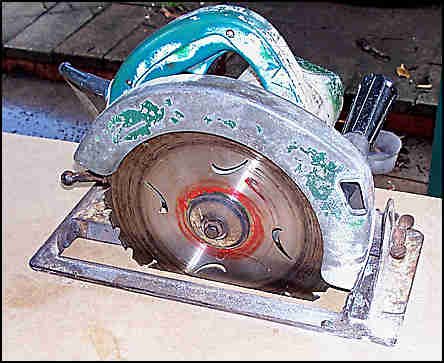
OK here's the saw after I dropped it down. All I do now is unplug the cord and fix the trigger in the on position. With tape or an electrical cable tie. Roll it over and screw the sheet to the planks. I fixed my safety box to the end of one of the planks, and use it to switch the saw on and off. I put my straightedge (a piece of aluminium, but it could be timber) alongside the blade and ran a pencil line up the length of the sheet to give me a starting point for my measurements. I use the straightedge clamped each end as a saw fence. It could easily be a strip of ply etc, but I like to have something thicker than the material being cut as it is easier to see the contact of the work and the fence.
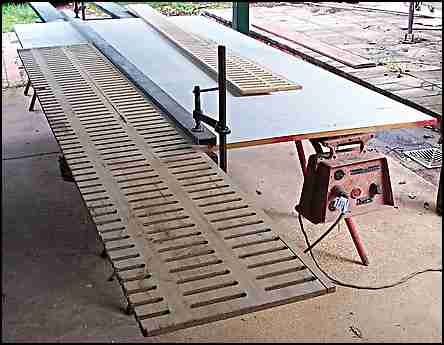
Here it is cutting up some sheets of slotted ply about 16mm thick. Just at my back as I took this shot is another pair of stools with a half sheet of ply on that I use to rest the heavier full sheets on while I am lining them up with the fence. Makes it easier for solo working. I purposely made the setup overhang the stools, to give me toe space around the saw. Toe space is important for comfort and safety. I have it on my kitchen benches, and I make it on my temporary benches too. When I have been running the saw for a while, I stop and feel how hot the motor is. Warm to the touch is OK, but if it gets so that it is almost to hot to hold, I let it have a rest and cool down. It is easy to forget that there is only a small motor doing a lot of work. This saw bench is ideal for cutting up sheet material. If I had to cut solid timber like this I would fix up a guard, maybe a small sheet of metal screwed to the top of the fence, covering the top of the blade. At the very least I would wear a full face guard. Not just gaggles. I keep a soft broom handy and sweep off the saw bench every few cuts. Cutting solid timber etc. I have often done this saw bench trick with the saw dropped through just a single timber plank clamped to a couple of saw horses. On of the reasons this works so well is that when the saw drops through the sheet it is a perfect fit. No sloppy gaps around the blade, like on the purpose bought metal benches. I hate these things with gaps around the blade, they are a menace. A small off cut can lodge in the gap at the back and be thrown up at me. Or it wedges in the front of the blade and pushes the blade sideways. Yeah, I know that's what guards are for, but I'd sooner it didn't happen in the first place. As soon as it gets worn around the slot, I move the saw and cut a brand new neat slot. Not found it yet? Try this FAST SITE SEARCH or the whole web |
Hire Equipment Furniture Fittings - Architectural Hardware - Electronic Locking Systems - Technical Hardware BuilderBill sponsorship Power tool related pages
|
||||||||||
|
|
|||||||||||
|
Please Note! The information on this site is offered as a guide only! When we are talking about areas where building regulations or safety regulations could exist,the information here could be wrong for your area. It could be out of date! Regulations breed faster than rabbits! You must check your own local conditions. Copyright © Bill Bradley 2007-2012. All rights reserved. |
|||||||||||