|
|
|||||||||||||||||||||
Scribing
Scribing Skirting, or Baseboards.The main reason that scribed joints are used on baseboards is that timber shrinks in width far more than it does in length. By using a scribed joint rather than an internal mitre joint the effect of shrinkage is minimised. Also it is possible to arrange the scribed joints pointing away from the most common viewpoint (usually the doorway of a room) and so present the best appearance.
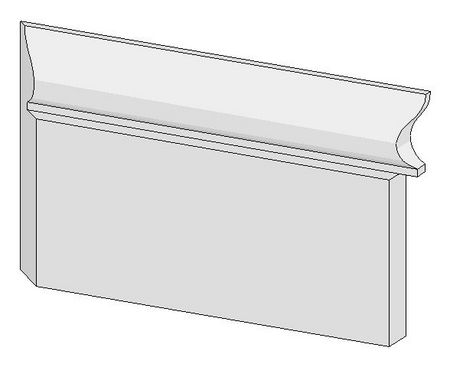
Here is a shot of a piece of skirting. On the left end it has a 45 degree mitre cut. On the right hand side is the scribe cut.
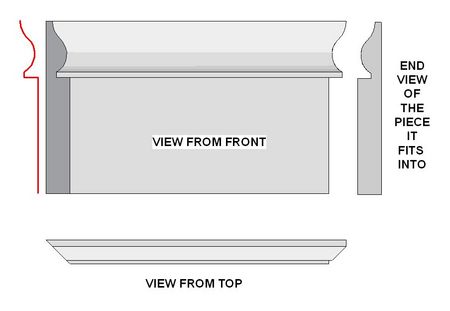
Here are the standard views of the same piece. If you look at the top view, you will see that the left side is a standard internal mitre, done with a mitre saw or a hand saw in a mitre box. The right side from the top looks almost identical, but it has a couple of right angle bits, showing that the timber is cut square to achieve the same look as the mitre. On good quality joinery work, these small square sections are the only way you can tell if the joint is mitred or scribed. OK,so how to do it. Scribing like this always starts with a mitre cut. Look at the red line in the sketch above. That is the shape that the mitre forms with the face of the board. So I use the mitre cut as a guide for making the square cut. I take my panel saw or tenon saw and cut out the straight sections first and then I cut the curved section with a sharp coping saw. because the back is not seen, I usually undercut the back a bit, to make sure of a good fit on the face. Just for interest, this type of skirting sometimes gets the name "Lamb's Tongue" because of the shape. click here for the hand saws to use. Here is a page with photos of scribing a timber cornice with a coping saw. back to topWall Sheets
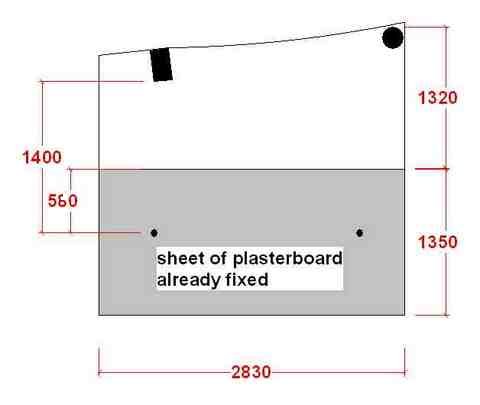
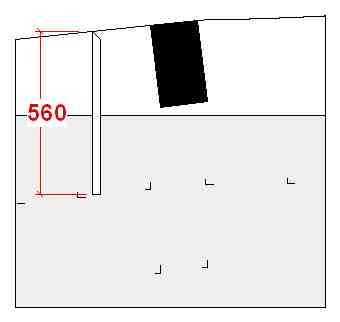
In the sketch above I am trying to show a wall that I need to clad with plasterboard. It could be any sheet material. The size of the beam and the sag in the ceiling are a bit exaggerated to show clearer what's going on. Lets say I am using 1350 wide sheets (4'6"). I fix my first sheet and do a bit of measuring. Yep my next sheet will do the rest OK. So I measure down from the lowest point 1400, to give me 50 play', and I whack a couple of temporary screws into convenient studs to hold the sheet. I cut my next sheet to width and rest it on the screws.
I Have set my screws level and the bottom sheet is level. I know that the top sheet has to go up 560 to sit on the bottom sheet. So all I have to do is plumb the important points from the ceiling 560 from the ceiling. I could use a level and a tape measure easily to do this and then join up the marks and cut it. The measurements MUST be vertical, not square off the ceiling line.
A way that I like to do sometimes is cut a bit of scrap timber to the size, in this case 560. That way there is only one measurement being made, less chance of mistakes. I put a bit of a point on it so I can turn it into the angled corners. I then put pencil marks on the bottom. Sometimes I can hold my pencil on the bottom of the stick, a small spirit level held to it and just about draw a long pencil line instead stopping for each point. The little bit behind the beam that I can't reach with my stick I just draw the back parallel to the front. That little corner,(The shaded bit at the back of the beam) could cause problems in a stiff material and have to be cut off and patched in later, but in something a bit flexible like plasterboard I would try to bend the right side of the sheet out a bit as I was lifting it into position and so spring it in. roof flashings
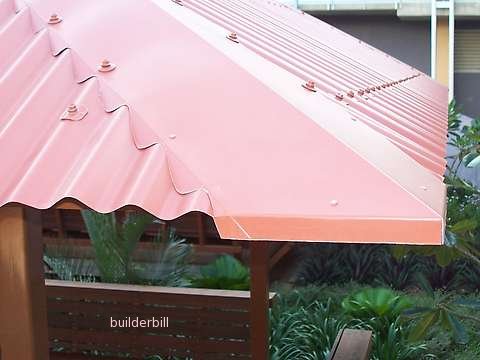
The main thing to remember when fixing these types of flashing is that the spacing of the corrugations is NEVER one hundred percent accurate. It is when it leaves the rolling machine, but as soon as it gets screwed down then the amount of pressure one each screw can vary the spread of the sheet and the shape of the corrugations. So there is no real easy way that these things can be automatically cut with a machine or tool and have them fitting neatly. I am only talking about small differences here, when the roofing sheets are fixed the two end corrugations are fixed first so that the width of the sheet is maintained fairly consistent and then the middle ones are finished later. An experienced roofer will temporarily tack the flashing in place (to stop it moving when the cutting starts) and then mark say the high or low points of each corrugation and just start cutting with the flashing in place. It is a pleasure to watch an experienced guy doing this.
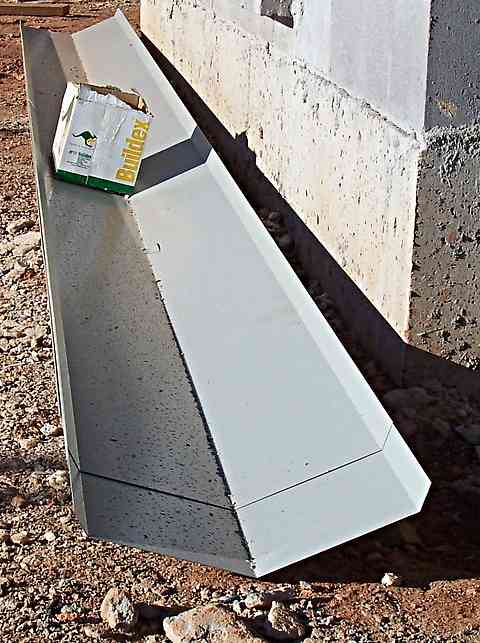
Above we can see some hip or ridge capping that is as it comes from the sheet metal shop. It is usually fairly stiff at this stage and if it is held in the middle of one edge only then it will hang vertical and can be carried easily. As soon as the scribing is done then the thing loses a lot of it's stiffness, so care should be taken when carrying it. For this reason the flashings are carried onto the roof intact and then scribed in place with little moving about once they are cut.
As I said the professional roofers cut by eye but for the odd job or until the skill and confidence is gained to do it that way then it is better to use a template.
When making a template for cutting the notches into hip flashing (like in the photo above) the procedure is just the same. When stood on a roof it looks like quite a complicated cut but in fact it is exactly the same as the two templates above, EXCEPT that the template will be significantly wider. Using templates.Using templates is not just confined to repetitious work like roof sheeting scribing. It is also very useful when cutting holes for pipes or any other really odd shaped cut-outs in sheeting. Basically what happens is that a scrap piece of material is used to make what is in effect a throw away template to test the fit first. It may take a few tries before a good fit is made, but it is better to make the trial runs on scrap or cheaper material first rather than the expensive sheeting. Not found it yet? Try this FAST SITE SEARCH or the whole web |
Hire Equipment Furniture Fittings - Architectural Hardware - Electronic Locking Systems - Technical Hardware BuilderBill sponsorship Other Carpentry and joinery related pages.
|
||||||||||||||||||||
|
|
|||||||||||||||||||||
|
Please Note! The information on this site is offered as a guide only! When we are talking about areas where building regulations or safety regulations could exist,the information here could be wrong for your area. It could be out of date! Regulations breed faster than rabbits! You must check your own local conditions. Copyright © Bill Bradley 2007-2012. All rights reserved. |
|||||||||||||||||||||