Stair design from the ground up.
Here I will be going through some points of stair design that I have used when designing a house, an addition or simply just changing a stair into something a little better.
It is just a personal view and I will be thinking mainly about ordinary home construction as I write it.
Back to top
Some basic points when designing the space to put a stairway.
There are quite a few things to consider when first sitting down to do a stair design. Most of the points here do not go well with each other. The trick is finding a good compromise.
- We want a good looking stair,built with quality materials that will last the life of the building.
- At the same time we want it to be, maybe not cheap, but at least cost effective.
- In most places when building a stair we have to comply to various regulations and guidelines, so these have to be taken into consideration during the design process.
- These regulations fall into separate categories,
- The design details of the actual stair, the minimum width, the allowable slope (the ratio of rise to go), the number of steps in any flight without a landing, height and position of the handrails and balustrades, the head clearance above the stair.
- The position of the stair. This is to comply with fire regulations. There are minimum distances required to an exit stair. If you cannot achieve them with one stairway (usually somewhere in the middle), then you have to build another stair or at least some form of fire escape.
- It has to be structural sound, which usually means a structural engineer's approval of the design.
- Apart from placing a stair with fire safety in mind, we also have to place it in the best position for the convenience of the users. For example, a stairway that is of
used to go from a a garage to a kitchen area with shopping should be as direct as possible. It may be cheaper to build a straight flight, but if shorter distances can be achieved with a half space landing, then the extra cost is well worth it.
- Take into careful consideration the headroom to a stair, a rule of thumb is to make it at least the same as a door height, we use 2030.
- Regardless of where you are and what regulations if any you have to comply with,
- Think long and hard before using any sort of spiral stair design, or using even just a few winders. See my reasons on the stairs intro page if you have not already seen them.
- Never make a stair less than 900 wide (3 feet).
- always have a minimum of 900 clear space at the top and bottom landings. Make this more like 1200 if there is a door near bye.
- Try to arrange good lighting, preferably from above. High set windows or even a skylight can transform an otherwise dreary stairwell.
- You must be accurate with your calculations. In these days of inexpensive calculators and computers there is no reason for anything else.
- There is a term known as the "critical angle". This means the angle of a stair above which it is considered to be unsafe to make a stair. This is said to be about 50 degrees.
- The preferred angle is a lot less than that, say between 28 and 36 degrees.
- Over the critical angle we are looking at a ladder type installation, (access to lofts etc.) which should be of a narrow enough width to enable a handrail on either side to be comfortably grasped. It is normal to descend any ladder facing inwards. It is more comfortable to do it this way and the steps are easily seen, but the main reason not to descend ladder type steps facing forward is that a slip can result in serious back injury.
Back to top
Some useful stair design details
Below is a table of requirements laid down by the BCA and I use this to get the number of riser I need. It may not be exactly what you have to work to, but it is a good starting point for any stairs, anywhere.
| RISER
(R) | GOING
(G) | SLOPE RELATIONSHIP
= 2R+G |
| MAXIMUM | MINIMUM | MAXIMUM | MINIMUM | MAXIMUM | MINIMUM |
| 190 | 115 | 355 | 240 | 700 | 550 |
The slope ratio of twice the RISE plus the GOING stops you from
choosing a slope that is a bit extreme, like a maximum or minimum (G)
and (R) together.
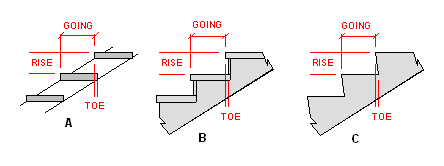 |
| Stairs - Toe space on different types of stair, it should be there in every case. |
Above I have sketched three different types of steps. You can see
that the the same deal applies to them all. You have a rise, a
going and a toe space. The example "C" is of a good concrete stair design.
So many times you see concrete stairs without the inward slope to the
riser that provides the toe space. It is wrong. It is just as
easy to do it right.
Back to top
First find the rise.
Once we have decided the position and the space that will be used for the stairway, or maybe it is already there on the plans and we just have to work out the stair details because none are provided, then:-
- Get the total rise. Either measure on site or off the plans. Let's say that we have a total height of 2870.
- Looking at the table above I see that my choices of the rise lie between 115 and 190.
- 115 is a very small rise and more suitable for large public stairs, old folks homes and the like. Plus a very small rise means more treads which equal more cost.
- From experience, house stairs fall between the range of 170 to 185, so get out a calculator and try them.
- 2850/170= 16.76 rises
- 2850/185= 15.4 rises
- so it seems 16 might be a good one to try.
- 2850/16= 178.125 rise.
- 2850/17= 167.64
- 2850/15= 190
- It is obvious to me that 16 risers at about 178 will be fine
- The reason that I say about 178 rise, is that I only work out the exact height and step rise on site when there is something to measure from and the floor finishes have been decided.
Back to top
Next find the run or go
By this time I would already have in mind the stair that is going to be built.
- At this stage of the stair design, quite often it is a case of working back from a known tread width. By this I mean the width of the physical piece of material that I will be using for the treads.
- The last stair that I built we used pre-made laminated bamboo step treads that were 1000 x 280 x 40. The length we could trim, but we didn't want either cut anything off or add anything to the width. We were fixed with 280 overall width, less 30 nosing so we made the stair with a 250 go.
- Likewise if I were building and external stair that used pre-cast concrete step treads that were 300 wide, then I would set the go at 270.
- If I was laminating two pieces of ex 150 x 50 Jarrah together, then I would allow for machining and probably finish up with a finished step tread of 280 and a go of 250.
- The times that we have the opportunity to make the stair treads any convenient width is of course in a reinforced concrete stair.
- If there is a compelling reason for a non standard tread width then of course it can be done, but at an extra cost.
So lets say that we have arrived at a step rise of 172 and a go of 275.
Back to top
The Step Triangle
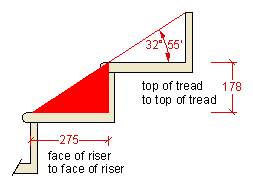 |
| Stair design - The step triangle |
We have decided three things in our stair design, the total height, that the height can be divided into 16 risers at 178 and that we will try to use 275 for our tread run or go.
I've sketched it out on the right. We also know that we do not have to have a landing in the stair because it is less than 18 steps.
Now, let's do a few checks, from the BCA table above:-
- The 178 rise fits between 190-115.
- The going of 275 fits between the recommended 355-240.
- The SLOPE = 2R+G is 631, nicely in between the 700-550.
- From the rule above, the preferred angle of between 28 and 36 degrees is good also.
That's great, we are going to build a stair that will comply and will be comfortable to use.
Note! I got the angle from my CAD program, but I could have done it with my pocket calculator like this:-
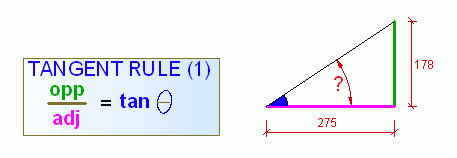 |
| Stair design - The tangent rule. |
 |
| Stair design - A few swipes with a calculator. |
If you did't follow that, check out my E-Book, Building Maths With a Ten Dollar Calculator
Back to top
Some examples
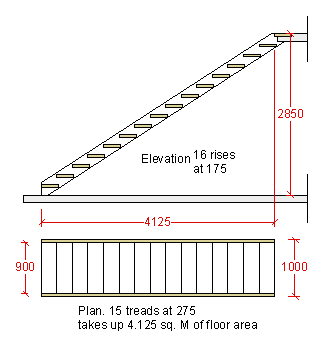 |
| Stair design - A straight flight of stairs. |
This is probably the easiest stair to make and to design. I could be between two walls, against one wall and open on the other side. Often they have room for a small pantry underneath.
There are many fine examples of straight flights or similar with just a single quarter space landing, that are placed right in the living area and as a feature they look great.
It all comes down to personal choice I guess, whether to place the stairs in a dedicated stair well area or whether to place them in a living area and make a feature of them.
You will notice that I have drawn a plan (view from above) and an elevation. (a view from a side.
I have also put on the plan the area in square metres that this takes up.
I have allowed the minimum widths of 900 for all these stairs and I have allowed 50 either side for stings and handrails.
Don't take these sizes too seriously, I am just using them for illustration.
 |
| Stair design - A stairway with a half space landing. |
This type of stair is also known as a "dogleg" stair. A dogleg being a sharp bend. This is my own personal favourite. I have used them many times. They cost a little more than a straight flight, and they take up a touch more space.
One thing to notice when looking at the amount of space each type takes up, is that they vary, but not by a lot. So it seem that really what matters is to get a stair that you are happy with, because there are pros and cons of each type shown here, and as there will be pros and cons of the different methods of construction that I will be going into on other pages.
 |
| Stair design - A stair well |
Here is conventional type of stair well that can go well in multi-storey buildings. I have used this stair design to good effect in a house where it had full height windows running past the landings.
 |
| Stair design - Winders at the bottom of a straight flight. |
If you have almost enough space for a straight flight, then this might be the answer.
As a general rule, winders on quarter space landings don't make for a comfortable stair, (but they do get you up there in a small space), and I wouldn't suggest that they be used at the top of a stair, but they are not too bad at the bottom of a flight.
Note that the strings take on a curved look and are not as simple to build as a straight flight.
Back to top
Head height
 |
| Stair design - Head height and bottom space. |
Watch out for the head clearance if part of the floor above overhangs the stair.
As I mentioned before, it is 2030 in the BCA, which is easy to remember if you think about a standard door being 2040, less the rebate, then they are both the same.
I have come across two really bad examples of stair design from architects.
In on instance we had to a section of overhanging eaves back about 600 where they interfered with an external stair head height.
In another external stair there were hopper windows that had to be restricted to only about a quarter of their potential because of people walking upstairs into them. So, try to think of all the other factors when doing a stair design, not just the obvious ones.
The measurement is done from a point along the nosing line vertically up to the edge of the overhang.
In a small house where space is at a premium the stair space may encroach upon a room above. The trick in this case is to create a sloping soffit, parallel to the nosing line for the width of the stair at that point.
The resulting sloping surface to the floor of the room above is often boxed in, and the room itself sometimes gets called a "box room".
Another point that I make in the sketch is that at the bottom of a flight, if there is a wall facing it then the bare minimum width of the floor area or landing should be 900. Once again up to 1200 is better.
Back to top
Balustrades
 |
| Stair design - Balustrades |
The yellow shaded area in the sketch here is the area under the handrails, the sloping one to the flight, and the horizontal one to any landings, internal and external.
- The BCA states that in any balustrade there should not be a gap large enough to put a 125 diameter ball through.
- So if we make a handrail frame on a landing then the bottom rail can not be more than 125 off the landing.
- The same applies to the sloping ones.
- I will go into this in more detail on the construction pages.
- Also you can see that the height of the sloping handrail is 865 measured vertical from the nosing line.
- On the landings this height changes to 1050. Both of these heights are minimum. You can make them higher of course.
Not too long ago we had to make that sharp jump at the end where the sloping section meets the higher horizontal section.
We are now allowed to run them together smoothly. That is we can cut off the small green triangular area if we wish.
One other point that I am making in the sketch is that if there is a wall facing the top of the flight, then again the bare minimum landing area is 900. It is permissible to have a door opening out onto a landing like this, but again good practice says to make the landing wider.