|
|
|||||||||||||||||||||||||||
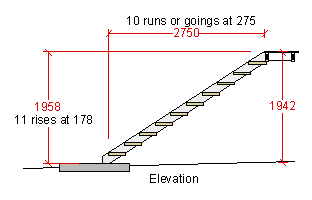
Setting out and making a simple StairFor our first steps (sorry for the pun, couldn't resist) in setting out I will be using a single straight flight stair as an example.
The overall height
What we are going to be talking about here is the actual marking out of the stair strings.
Find the slope distance.
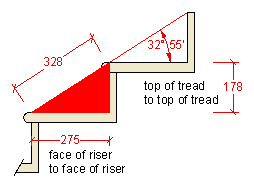
On A previous page we covered the basic of design and we finished up with a step triangle that had a run of 275 and a rise 0f 178. Here its is again, but this time I have shown the length of the third side of the triangle which is the hypotenuse. For simplicity I'll call it the slope distance A reasonable way to get this distance is to draw it out on a piece of board very accurately with a sharp pencil, and then measure it. I prefer a pocket calculator for speed and accuracy. Using the calculator we use Pythagoras theorem, so it is:-
If we want to be super accurate we could put that distance in our calculators memory and use it for the next stage. If in doubt draw it out.
It is quite easy once you have the correct rise, go and slope distance worked out, to start marking out your strings. I very rarely do. I almost always draw part of the stair out full size on a bit of ply, MDF. or something similar. A couple of saw horses and a sheet of ply. I am not talking about a big deal here, only three treads or rises, that's all I need. I pencil in the rise times three on a square end of the sheet, and the go time three on the edge of the sheet and join the points to give me an exact stair angle to set my squares and bevels to. I mark out the layout at the top, It could be double timber joists, it could be concrete or I might have to fit inside the flanges of a steel beam. I draw it out, correct, full size, down to the thickness of the floor covering (if any). I do the bottom the same and gradually draw the lot. Most times it is very simple, and once it is laid out, it is clear which bits of the strings I have to cut off to fit snug here and there. I don't physically use this drawing as pattern. In many
cases I don't need to refer too it much at all after doing the sketch. Because I have gone to the trouble of drawing it out, when I get to the stage of marking the strings then the details are clear and I can go ahead with confidence. Marking the top edges of the stringsGood practise when making any type of joinery or carpentry work is to mark out the pieces in multiples whenever possible for a few reasons.
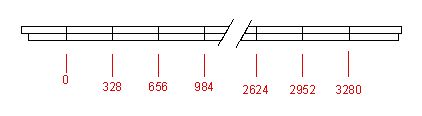
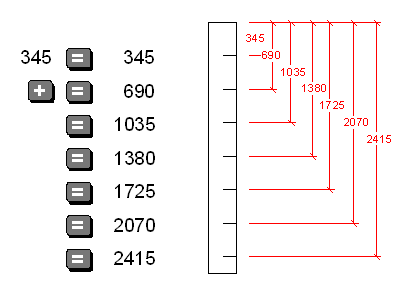
So why do we do it this way, and more to the point how do we do it? So how do we do this chain dimension thing? Easily, that's how. If you use Windows, fire up the calculator in the accessories menu. What you have just done when you hit the "enter" button is to add 328 to the previous total. Talk about easy peasy! Just about every calculator does this. You just have to find the method for your own calculator. I have two of them and each is slightly different.
If you did't follow that you may be interested in my ebook "Using a Ten Dollar calculator to solve Construction Problems" This is a useful thing to remember, I have used it heaps of times, not just on stairs. The last time I did it was when setting out a ceramic tile floor. Marking the inside faces of the stringers.
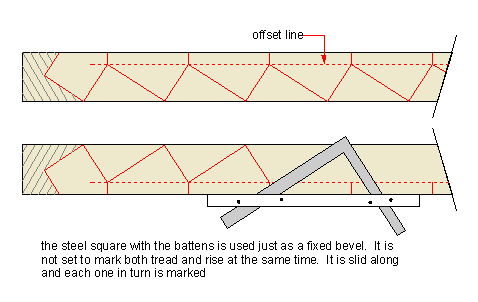
From here on it is a matter of squaring the top marks onto the face, marking any offsets, and marking the tread lines. Each type of stair has it's own particular design but the main principle remains the same, whether its is a steel stair up to and outside deck, an internal closed string stair or the formwork for a concrete stair.
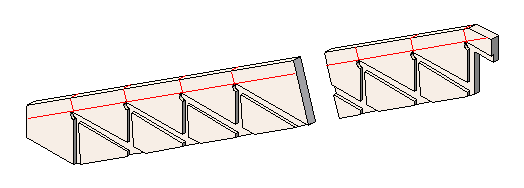
A timber closed string stair
The sketch above shows the few actual setting out marks on the string. The rest is done by aligning a pre-made jig to the marks. You can see how the jig is made on my router jigs page. A steel string
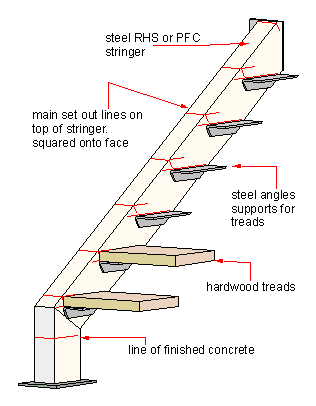
Here is a quick and easy steel string for an outside stair. Again a fairly simple set out, very few lines needed. The steel can be either RHS or PFC. The main line for the welder to weld the angles on is set back the thickness of the tread. The treads are fixed later to a string line or straight edge, or just kept in line with the front of the steel, Not found it yet? Try this FAST SITE SEARCH or the whole web |
Hire Equipment Furniture Fittings - Architectural Hardware - Electronic Locking Systems - Technical Hardware BuilderBill sponsorship Other Pages.
BuilderBill Books Building Maths  Stair Design |
||||||||||||||||||||||||||
|
|
|||||||||||||||||||||||||||
|
Please Note! The information on this site is offered as a guide only! When we are talking about areas where building regulations or safety regulations could exist,the information here could be wrong for your area. It could be out of date! Regulations breed faster than rabbits! You must check your own local conditions. Copyright © Bill Bradley 2007-2012. All rights reserved. |
|||||||||||||||||||||||||||