Making and using a home made stair jig
This is more information on the stair jig seen on my router page.
A question from a reader
Peter T. who lives in Bishop Auckland in the UK sent me this e-mail.
"Bill, I wish to make a timber staircase router jig as you describe from Jack Churchill from Conneticut and I need a bit more detail to get it right. I have 12" stringers with 1.5" thick treads and 3/4" risers. Any more detail would help. Perhaps Jack's email address?
Thanks
Peter
Back to top
Intro to using a collar.
I think I have said this before, but it stands repeating. The modern router is one of the most versatile power tools in the workshop.
Unlike most other power tools though, it is almost never used freehand.
The reason for this is that as the blade rotates the action of the rotation pulls it sideways into the work, so you need some sort of a guide or fence to keep it under control. The guide or router jig can of course be any shape, straight or curved.
A router comes with a fence and usually a couple of base plate jig guides.
It's possible to use neither, and still make up a jig that is related to the outside edge of the base plate only, but they get large and terribly clumsy for all but a simple trench.
What I am talking about here is using the steel inserts that set into the base plate.
 |
| stair jig - How to find the offset for the collar. |
- Set up the router with say a 16mm bit in it with a base plate collar that is intended for use with that bit.
- Set the plunge depth to say 6mm.
- Select a piece of scrap board and nail two battens onto it, parallel at say 22mm apart.
- Place the router on the work, plunge down and run along the left side, then back along the right side.
- In the example above I finish up with a 22mm wide slot.
- So for this particular combination of collar and cutter, then I know that I have to make my jig 6mm wider than my finished sizes.
- So if I am making a trench for 16mm MDF board then I make my jig 22 wide.
Back to top
A basic jig
 |
| stair jig - A simple router jig, say for grooving for shelves |
- The two battens are clamped to the work square off the edge and the correct distance apart.
- Two more battens are screwed underneath, with a snug sliding fit.
- When the first cut is made, these two end battens get cut also, and the edges of the cuts are used to line up to the marking out lines for other cuts.
- When the router breaks through the material, the end battens support the edge from spitting. As they get worn it may be better to replace them.
- Another way to prevent splitting on quality work is to work in from each side rather than passing all the way through in one go.
Back to top
Making a plywood stair template
 |
| stair jig - |
Before you start to actually cut anything give a bit of thought to the shape of the bullnose on the tread. Say that I have a 20mm dia. router cutter that I will be using to cut out the stair strings, then I will get a bullnose cutter for my treads that matches it. Easy peasy, no hand work at all.
If I wanted a full half round on my tread nosing then I would have to be prepared to do a bit of hand work on the template, jig saw, rasp etc. to get a smooth curve for the router collar to travel around. I would really take my time doing this to get it right, because any imperfections will be copied many times.
- You may only intend to ever make one flight of stairs, but the amount of work is still the same. I don't think that there is a quick and easy way for a "one off". You could of course use a cheaper material, say 12mm MDF instead of ply.
- Make sure that you make it wide enough, so that it all holds together.
- Mark it out accurately, allowing for the thickness of your timbers, the wedges and the nosing overhang.
- There is only one piece of ply cut for stairs, as we are looking at the sketch, it will be used to make the left hand side stringer going up. To use it for the other stringer just flip it over like turning a page of a book.
- Use a series of battens spaced with the extra added for the collar thickness, nailed to the ply as guides for the router and cut in the normal way.
- Place pencil marks for the datum, the particular rise and go that you are building the stairs to.
Back to top
Section header
 |
| stair jig - Setting it up on the actual stringer |
If you have a quick glance at the
stair set out page you will see that there is a margin of timber under the joint between the tread and the riser. Here's how I use this margin to set the stair jig for
a particular rise and go.
- Refer to your full size sketch of two or three treads that you have already done on a piece of spare board.
- Measure the distance and mark it onto both strings. This is represented by the red line in the sketch above.
- Simply swing the template around until the rise and go marks just tough the offset line.
- Clamp the stair jig to the stair string.
Back to top
Final touches and using
 |
| stair jig - The jig in use. |
- With the Stair jig held firmly in position screw a batten to the underside of the ply jig.
- Remove the clamps. It is now possible to slide the jig along the stair string.
- When you have finished one string,remove the batten.
- Square your rise and go marks to the other side of the ply.
- Flip the stair jig over and set up on the opposite string as before.
Back to top
Another simple jig.
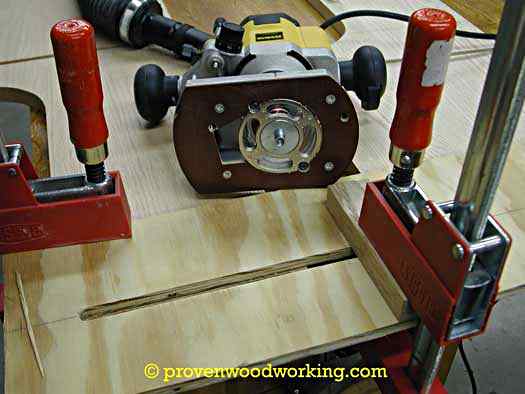 |
| stair jig - A Dewalt 621 plunge router with jig used for cutting a bookcase ends. |
Here a a couple of photos sent to me by a friend of mine, Jim from provenwoodworking.com Jim has a lot of good info on his site for anyone who loves woodworking. I find the photos interesting, it is always good to see other ways of doing things.
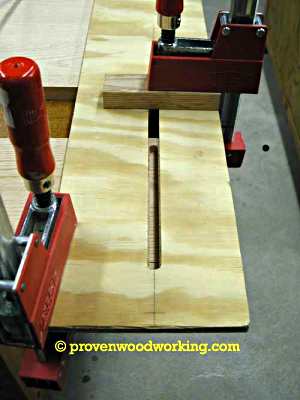 |
| stair jig - Jim's jig for routering a bookcase ends. |
- Straight away looking at the shots, I notice how clean the area is. in part this is due to the vacuum attachment to the router.
- Jim comments
"The router is a Dewalt 621 plunge router and the base is standard. The Dust Extraction on the router is standard. I developed the hook-up to a 2½" hose that goes into my cyclone dust collector. It works for both my ROS and plunge router".
- Another thing of interest with this router is the narrow parallel sides. This has the advantage of being able to clamp patterns and jigs closer to the actual work area than would be possible with a full circular base like on my Makita.
- For the bookcase end jig on the right, Jim has made it fairly long and uses a stop held by a clamp to set the width of cut. This way I guess that he can do different widths with the one jig.
- I notice the use of Bessy clamps. You won't find me arguing with that choice. They have to be among the best in the market. Before they became widely available in Australia, one of my welder mates brought about six heavy duty ones back from Europe via air. I don't know if he paid excess baggage, but it must have been worth it to him.