|
|
||||||||||||||||||||||||||||||
Circular Saw, Power Saws
In the photo above, note the arrow on the blade guard. This shows the direction of the rotation of the blade, so that you get the blade teeth pointing the right way. it also shows the direction to turn the spanner to undo the nut that holds the blade. These nearly always use TCT (tungsten carbide tipped) blades. The all have an adjustable depth and adjustable angle setting on the base plate. I always for many years used the bigger saws, 235mm, saying (in good Lancashire fashion) that "a good big un 'll beat a good little un any day". I've learned to eat my words. This size of saw is just about ideal for most jobs. They cut up to 55mm which makes them ideal for cutting battens etc on a roof, or on a plank cutting off rafter ends.
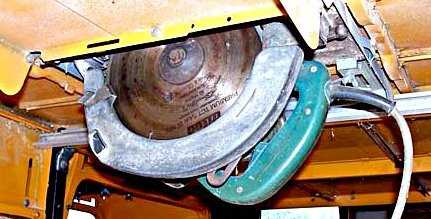
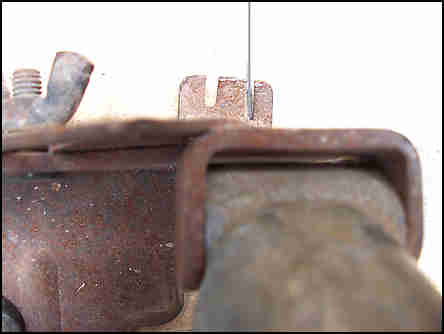
Here's the 235mm size, mounted under a Triton work bench. This larger size will cut up to 85mm and is also better for angle cuts, as the depth of timber you can cut though on an angle reduces quickly with the angle.This type of saw is, I believe called a sidewinder in the US, a good description as the blade is mounted on the side of the motor directly on the main shaft. Another type that has the blade mounted at right angles to the axis of the motor through bevel gears is called a hypoid saw in Aust. I can't show you a photo of my hypoid saw, as it was stolen a few years ago. The thing is I never replaced it, as I found it clumsy to use. All the weight is forward of the handle. This outweighed (ha ha) any of the advantages it might have had for me. Every circular saw in this category of saw, that I have ever seen has been designed for right handed use. That is, when you are sawing in the normal position, the body of the saw is between your face and the saw blade. If you are a left hander be aware that any chips of sawdust, etc. are flying out on your side. So don't forget your safety gear. Not just left handers of course.
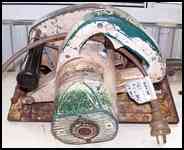
This particular circular saw has had a hard life. It is the one I mostly set aside for using with a friction disk for cutting steel. I use it for long, sometimes angled cuts in RHS (rectangular hollow section) where I clamp a guide to the steel. A lot neater, but slower, than the more normal cutting disk in a 225 angle grinder. I have never seen anyone else using one of these for steel, specialist fabricators would laugh, they have better gear, and I guess everyone else would reckon I was ruining a good saw. Still, as a contractor, getting the job done cheaply and effeiciently is sometimes the point of the exercise.
With a steel friction disk set up, they are often used for cutting sheet metal roofing and walling profiles. Not recommended. Rough as guts! The correct tool to use is detailed on my roof sheeting page. Also with a steel friction disk, I have used it for cutting vinyl cladding (siding) where a fine timber blade splintered the plastic. With a masonry cutting disk, I can cut flat cement sheets, say 4.5 mm to 7.5mm typically used for lining walls and ceilings in wet areas. (Backer board etc.) So you can see a standard carpenters power circular saw is a very versatile tool. Carpentry UseIf you buy one of these circular saws it will probably have a plain HSS (high speed steel) saw blade in it. Get a TCT blade if you can afford it, as they are so much more durable, especially in tough hardwoods. Also plywoods and composite boards are hard on blades so TCT blades are needed on them.Don't dismiss the HSS saw blade, though, as so many do, it may come in handy. It's a good standby. You can always sharpen it yourself. Unlike TCT which has to be sent away. I ripped up a pile of boards once to make strips for doing a stripped plank deck on a boat that I had. The fact that the HSS blade was thin meant I could get two more strips out of each board. As a general rule it is said that you shouldn't have much more of the blade showing than you really need for the job you are doing. So to cut 40mm thick timber, set your blade to about 45mm or 50mm. This helps to minimise kickback. Keep your saw guard in smooth running condition. It should spring back in place as soon as you lift the saw off the work. It should slide up smoothly as you push onto the work. Make sure it's DOWN before you put the saw down. Using the guides
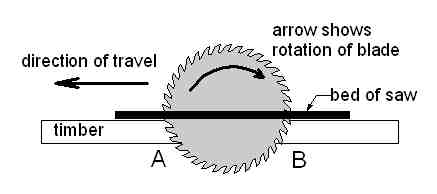
I then look at the front of the saw to the two guide notches. The right hand one is a guide for cutting with the blade set in the normal position, and the other one is for when I have the base angled at 45 deg. So I line the notch up to my pencil line. When I start cutting after a quick check to the front of the blade (photo 1) I keep my eye on the guide (photo 2) all the time. This puts me in a natural position looking forward along the pencil line, and out of the way of any sawdust. The guard is between my eyes and any flying crap. ( use protective glasses of course). As soon as I get into the cut I make sure that I am keeping the base of the circular saw flat on the timber being cut. Handling Kickback.Kickback is a fact of life for anybody who uses a circular saw often. It is caused by the timber that is being cut, bending in some way, so that it jams on the back of the blade, making the saw buck or stall.
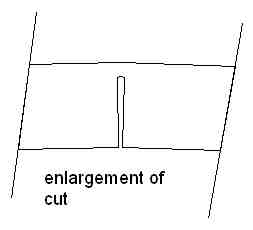
In the sketch above when all is going well the action of the teeth cutting into the timber at "A" helps to keep the saw bed and the timber in close contact. If the timber starts pinching the blade at "B" the opposite happens, the saw wants to climb out of the timber. Sometimes with a vicious jerk. The easy answer is to not let the timber bind on the back of the blade.
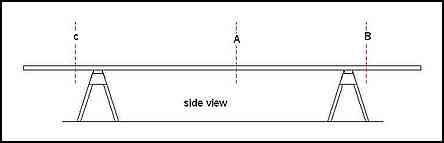
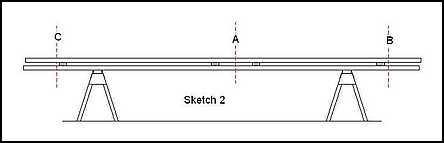
In the sketch above I have a length of 150 x 50 (6" x 2" for you metrically challenged :-) sat on a couple of saw stools. I can with my nice sharp saw slice straight through it at point "B", holding the main length of timber with my left hand, and letting the offcut fall to the ground. No sweat, except that there will probably be a big rough split on the end because I needed another hand to support the offcut. (I am right handed). A better way to do it would be to cut at point "C", where, as I am getting almost through the cut, I support the offcut with my left hand, and in such a way that I help the cut to open up. If the timber wants to slide about on the stools I clamp it down. I might think that it would be OK to cut through at point "A" , holding one piece with my left hand and letting the other drop to the ground. (Splintered again). It is fairly safe, but I have another thing to consider. Look at the sketch below.
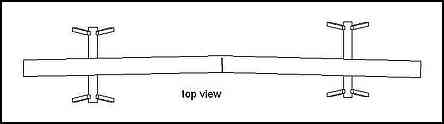
What I have to do is stop this happening. The two ends on the stools want to stay put, but I'm pushing in the middle, and as soon as the bit of timber left to cut becomes small enough the whole lot wants to bend, and sure enough, bind on the back of the blade.
An easier way altogether is when you are cutting a lot of pieces up, you use some of them to make a bench. Then with a few lumps of offcuts under the one being cut you can go for it. Or, make a bench out of a couple of planks. Or failing that, cut with your circular saw on the ground, using packers and one foot on the timber being cut.
To sum up, once you know what causes kickback, you are almost there to preventing it. Clamp your work firm if you can. Support in some way heavy offcuts, small ones are no problem. If you are cutting off rafter ends to fix a fascia, you should either have them precut to size before you fix them, or close to it, so that the offcuts are small enough to be no problem. That way you have one hand to hang on with and one to cut with. Cutting JigA short while ago a lady asked on a DIY news group how to cut square with a small power saw. She was a first timer and was cutting floorboards with it. The answers were a bit vague, and didn't really address her problem. I guess she was talking about boards that would be no more than 95mm (4") wide and they could be less.Let me tell you after a fair bit of power saw experience I think I would have trouble cutting square also. It is not easy. What I would advise her to do is build a variation of the age old joiners mitre box, but with a power saw in mind. I would go to my local joinery shop that makes kitchen cupboards etc and buy off them a mob of MDF or ply offcuts. They are cutting up full sheets all the time and get plenty of small strips left over.Here is what I'd make with them.
The base can be any size, in fact the longer the better. The rails "C" and "D" make them fairly short, say 450mm. This is to stop bent boards jamming in the jig. This jig could even be screwed to an odd corner of my homemade saw bench. Were ever you use it, fix it firm. I use clamps most of the time. Fix a stop along along a bench and cut many length to the same size. Pieces "D" and "C" are full lengths and only cut in two when the whole thing is ready to use. The gap between "D" and "C" is the same as the width of the floorboard plus plus a couple of mm for clearance. The gap between pieces "A" and "B" is the width of the base plate of the saw plus a couple of mm for clearance. Pieces "A" and "B" are set square off "D" Piece "C" is as wide as to like, to give the saw a good stable base to start on. "A" and"B" are set slightly more than the thickness of the flooring from the base. Again a couple of mm for clearance. Use bits of packers to get the clearance. Anything will do, bits of thin ply, Masonite, plastic even cardboard. Pepper it together with timber screws (or nails) and cut your first board, with your blade set 5mm deeper than the board.
Here you see a board in position, ready for cutting along the dotted pencil line which is lined up with the saw cut in the jig. A little job like this would give the lady plenty of practice with the saw, and then help her to cut her floorboards up neatly, quickly and safely. It is safe because it is made to hold just one size of timber, so there is no slop to allow the saw to kick and jam. I would say to her, don't even try to make it a work of art, rough enough is good enough. The beauty of all these sort of jigs is that they are so quick to make that they are thrown away after the job is done. OK so we used flooring as an example, using straight square cuts. You would make one of these up if you did not have a mitre saw. So make another for cutting mitres if you have a few to do. You can set your saw blade at 45 deg. to the base of the saw and cut mitres that way too. One you have the basic idea you can adapt it for many jobs. I use exactly the same system for routering end panels for shelves etc. When you get used to thinking in terms of making up jigs, you will soon speed up or increase the accuracy of many repetitious jobs. Not found it yet? Try this FAST SITE SEARCH or the whole web |
Hire Equipment Furniture Fittings - Architectural Hardware - Electronic Locking Systems - Technical Hardware BuilderBill sponsorship Power tool related pages
|
|||||||||||||||||||||||||||||
|
|
||||||||||||||||||||||||||||||
|
Please Note! The information on this site is offered as a guide only! When we are talking about areas where building regulations or safety regulations could exist,the information here could be wrong for your area. It could be out of date! Regulations breed faster than rabbits! You must check your own local conditions. Copyright © Bill Bradley 2007-2012. All rights reserved. |
||||||||||||||||||||||||||||||