|
|
|||||||||||||||
Concrete Column Formwork
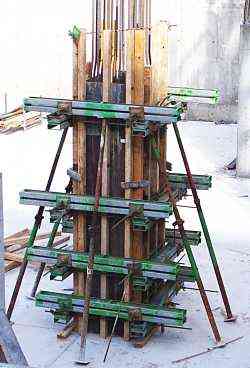
On the right we have a shot of concrete formwork for a column. Just behind it we see a column that is completed, with it's cranked starter bars sticking out of the top, ready to connect to the next stage, the suspended floor slab. The finished column would have been left in it's concrete formwork for a day or so, then stripped and the clear plastic immediately wrapped around it to stop it drying out too quickly. This is known as curing the concrete. More on concrete curing here. The footings are poured in the ground, and starter bars will be coming out of the footing, and the column rebar steel will be fixed the them. The carpenter makes up two pairs of formwork shutters or forms, and nails them in place around the rebar steel. He has already shot pieces of timber onto the footing concrete to allow him to locate the concrete formwork in the correct place. You can see one at the bottom left of the close up photo. He then bangs in 75mm nails to hold up the column clamps until he has them assembled and just nipped up. The photo shows the column clamps which come in different lengths. A clamp set consists of four lengths of 75 x 8 steel with a hook on one end and overlapping slots in the other end, to take the steel wedges that do the work.
You can see that the clamps are positioned alternately up the column, So that the wedging force changes direction with each clamp. If they were fixed all the same way, there would be a tendency to put a twist in the column. The props used are the industry norm "Acrow" type props. Which come in varying lengths. The props have large and small holes at the top and bottom for connecting to other fittings, and nailing the props to sole plates, at the bottom and bearers etc. at the top. Steel props like these were designed for concrete formwork, but have found there way into many other applications because of their versatility. Windows in Deep FormsThere is a requirement in the standards for concrete formwork and concrete codes, that mixed concrete should not be allowed to fall freely over a certain distance. The reason for this is that the concrete ingredients tend to segregate when they fall. The columns in this picture would have had to have a removable window in the forms, say half way up, that is used to fill the lower half of the form, then the window is put back in place and usually wedged, then the rest is filled. It is not often done these days , because of the use of concrete pumps that allow the last section of the delivery pipe to be lowered into the column and brought slowly out, as the concrete rises. Also the mix of the concrete is designed differently for pump use. The same thing applies to walls of course. I can remember putting windows half way up some walls that were tapered, thinner at the top. The pump delivery pipe did not have enough room, because of the reo steel, to get down the inside of the form without a risk of getting it stuck. If you are doing small slow pours, say mixing on site, in high forms, use windows. Apart from the segregation issue, the concrete as it falls from the top sticks to the sides of the form and rebar, and can have already taken on it's initial set before you add the rest. This later gives a flaky surface to the finished concrete. Setting up a Column Form
Low Tech Concrete Formwork for Columns
Here is a method that was used before steel column clamps came on the scene. At least where I was. It is easy to make up a few sets of of these. You may say why bother showing something that is obsolete? Well plenty parts of the world still work with home made stuff, and I say "good on em". More to the point though, this method can be used for one off column or larger boxes. It can even be used around a one off beam where no other formwork is needed on the job. Left is a sketch of the wedges from the side. The wedges are put as close to the ends of the bolts as possible, otherwise the bolts could bend under pressure. Note! Clamping the forms together can push the forms in too far if you do not lay out the ply and battens as detailed. There must always be a firm edge to push up to. (desirable with most formwork actually). Not found it yet? Try this FAST SITE SEARCH or the whole web |
Hire Equipment Furniture Fittings - Architectural Hardware - Electronic Locking Systems - Technical Hardware BuilderBill sponsorship Other Formwork Pages.
Apologies for the lack of definition in some of the photos, but if I left them at fairly high resolution the pages would take heaps longer to download.
If you would like any of my shots, with more detail, contact me and I am usually only to happy to oblige. |
||||||||||||||
|
|
|||||||||||||||
|
Please Note! The information on this site is offered as a guide only! When we are talking about areas where building regulations or safety regulations could exist,the information here could be wrong for your area. It could be out of date! Regulations breed faster than rabbits! You must check your own local conditions. Copyright © Bill Bradley 2007-2012. All rights reserved. |
|||||||||||||||