|
|
||||||||||||||||
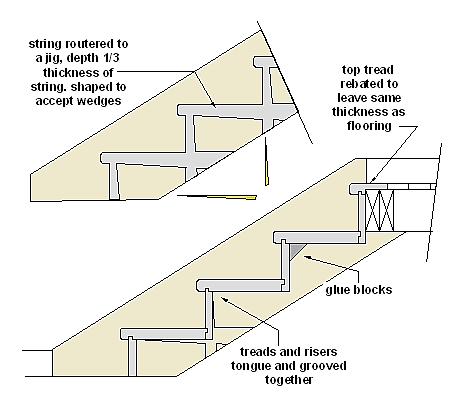
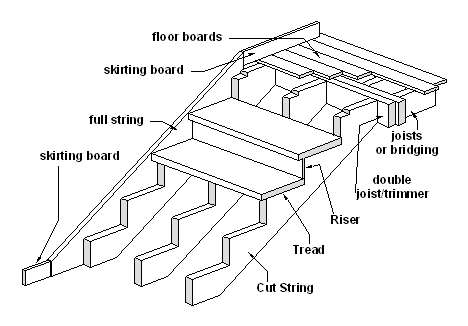
Timber StairsRoutered or Trenched String Timber StairsBelow is a sketch of the setting out for a routered string stair. It looks complicated but this way produces very strong timber stairs with none of the fixings showing.
Setting up the router jig can be tricky, but once done the work is fast. click here for making a diy router jig. Here is another one showing an actual home made jig. If the stair has walls on either side nails can be used in the assembly, to help hold the strings, but usually the job is done with clamps and left overnight for the glue to set. Screws can be used through the back of the risers into the treads. The wedges are the main thing that holds it all together, they are glued before fixing, and they give a really tight joint. From the face of a well made flight it is hard to tell how the joints are made. The glue blocks are essential. Say one for every 300 of width, to the tread to riser joint, and a couple each end at the tread and riser to string joint. They keep the whole structure firm. They stop squeaking in the stair. Building a stair like this is mostly done in a joinery shop, but you can build one on site if you have the room. It needs a few men to lift into position, More details on building on this type of stair here. back to top.Stairs Built on Cut To Shape BearersBelow is a sketch of a stair that has three heavy timber bearers cut to shape. When the stair is finished the bearers are not seen. This stair can have an extra closed string added to a side as required, or be made like the classic cut string stair, with the treads overhanging and the risers mitered on the ends to the strings.
I have never built a stair like this, and my first impression when I saw one on the web was that it was a fairly crude and wasteful way of doing it. Now I am not so sure. It has a few things going for it. One man can do the whole lot on his own adding one piece at a time. The main structural strings can be made out of crap material, rough sawn even, as long as it is basically sound. The exposed parts of the strings can be made out of thin none structural timber, allowing the use of expensive hardwoods. If I had to build a stair like this I would still rebate the treads and risers together, making them a tight fit, with the tongues beveled slightly with a hand plane to start them easily. I would glue the treads and risers to the cut strings with stud glue. I would always put a full string piece against a wall as it provides the same function as a skirting board. Keeping marks off the walls etc. The notch at the top of the strings is to hold a full thickness (say 40mm) part of a tread, up to the thinner floor boards. I would always use glue blocks. Then line the underside. back to top. Simple Outdoor Stairs
This is one of the reasons why full timber stairs are rarely seen as they suffer in our tropical climate. They are made with HW timber and they lead up to a small deck in a children's playground. Strings are about 200x50 and the treads are two pieces of 150x50. The newel post is 75 dia galv pipe and is set into a concrete foundation. It has a piece of 75x50x5 galv. angle welded to it that the string sits on slightly above the surface of the ground.. What you can see on the ground is a 50mm thick layer of a recycled rubber tyre and a urethane mixture that gives the whole of the kid's play area a spongy feel to it. You can clearly see the end of a 12mm galv. threaded rod/bolt that runs under the top tread (one of three of them, under every 2nd tread) that holds the strings tight. The shot taken from under the stair shows the bolt clearly and also the routered slot for the treads to sit in. A rule of thumb says this should not be any deeper than 1/3 of the thickness of the string. It is a quick and easy outdoor stair. Using cleats to support the treads
The cleats supporting the treads are drawn as pieces of timber, but another way would be to use galvanised angles pre-drilled for screws or bolts. If screws are the fixings they can be from underneath. All external exposed timber needs protection. For stairs and decks I use one of the many timber preservatives or decking oils. I like the oil based ones, they soak in well. They need sometimes a fair bit of drying time. The water based ones dry quicker and are able to be used sooner. I like to give the timber at least a couple of coats of decking oil before assembly. This goes for decks as well. Quite often in the past I have got the materials and let the owners do their own oiling over a weekend. If they can get a few extra coats of oil on before fixing, so much the better. Once the timber is fixed there are surfaces that can never be oiled again, so at this stage it is time well spent. Slow down, spend an extra day or so really getting that preservative into the timber. Leave timber stairs and back to home page. Not found it yet? Try this FAST SITE SEARCH or the whole web |
Hire Equipment Furniture Fittings - Architectural Hardware - Electronic Locking Systems - Technical Hardware BuilderBill sponsorship Other Pages.
BuilderBill Books Building Maths  Stair Design
If you have an old stair that squeaks you may be
able to fix it by replacing the glue blocks or by simply adding more
blocks.
Over the years the old glue perishes. You need access to the underside of the stair. Usually it is covered up, so depending on how annoying the squeaks are you may have to remove and later replace the plasterboard or other lining material. Modern glues like the acrylic stud glue used for fixing plasterboard would be OK, and should last years. Otherwise use a more expensive gap filling epoxy. Put a blob of glue on each face of the block, push it into position and then slide it along and back an inch or so a few times to expel the air. Leave the excess glue in place, it all helps. Glue blocks were used quite a lot in furniture, eg. for fixing drawer bottoms, and they can be replaced in the same way. |
|||||||||||||||
|
|
||||||||||||||||
|
Please Note! The information on this site is offered as a guide only! When we are talking about areas where building regulations or safety regulations could exist,the information here could be wrong for your area. It could be out of date! Regulations breed faster than rabbits! You must check your own local conditions. Copyright © Bill Bradley 2007-2012. All rights reserved. |
||||||||||||||||