An Attic conversion
Details of an attic conversion, or creation an additional room in a roof space or loft. If you have come here via a search engine you may want to see
this page first.
Before I get down to details, I am sure that a lot of my visitors will think that I am going overboard with the bolted connection and other fixings for what may be a small attic conversion.
I make no apologies for this, having been through a few cyclonic events in my time, and believe me when that wind starts to blow you do not want to be thinking that you should have built stronger.
- I very rarely used actual shop bought bolts for a job like this, there are too many different sizes to count up and to buy.
- What I used was 3000 long lengths of threaded rod, mostly 12mm and sometimes 16mm. I bought the nuts and washers by the hundreds.
- We cut up the rods on site with a steel drop saw and have a nut and washer on each end.
- Even though in some case 10mm may do the job I couldn't see the point, the cost difference is minor.
- Once you are geared up with the right tools bolted connections are fast and cheap to make.
- Always use washers on timber connections. Quite often i specify 50 x 50 plate washers on important joints to spread the load.
|
| An attic conversion - A section through the roof looking at the new braced wall and rafters. |
Bear in mind that we are still just looking at an addition inside a roof that is using multi-nail roof trusses. Similar principles will apply with a framed roof, but the details obviously will be different.
Shown above is an attic conversion layout with the trusses at 900 centres. or thereabouts.
This means that the floor joists and studs are set at the standard 450 centres and even though I have drawn them just about one on top of the other, it very rarely will work out like this, old ceiling joists around existing walls etc. will confuse the issue.
As I said before, it is fairly common to get spans of up to 1200 centres to the roof trusses, so that we would then put two extra rafters and floor joist in each bay.
I have drawn diagonal braces between the wall studs, similar to what we would put in if we were doing a MiG welded steel wall frame. Shear ply to timber studs would do a similar job.
Looking at the wall framing like this, you can see that it looks like a trussed beam or girder truss, and depending on access to the roof it could be feasible and very cost effective to use multi-nail girder trusses for this job.
I once upgraded an old timber frame house to cyclonic standard, and we set up a scaffold on one end, and after removing the cladding and studs from the gable, we were able with the use of a small crane, to insert a quite long steel framed girder truss down the length of the roof. That saved us days of work fabricating something in-situ.
Getting access for men and materials is the most important part of these sort of jobs. Once the access has been worked out then the designer must work within the limitations set. It's pointless designing something that is not practical.
 |
|
| An attic conversion - A section through the new attic wall showing the fixings |
- The section through the wall shows a metal frame, and the fixing of the floor joists to it is just the same as if they were sat on top of the wall, that is with a purpose made bent angle.
- There is little chance that the truss bottom chord will be the same depth as the floor joists, so every bottom chord will have a new joist bolted to it.
- The bolt through the angle bracket will in that case go through the chord and the joist.
- Note that I have drawn the bolt through the bracket well below the centre of the joist. This is to maximise the strength of the connection. Imagine the joist splitting at the bolt, then if you had the bolt in the centre, only half the strength of the joist would be available.
- For a similar reason we also do not put bolts too close to the end of timbers, so in this case the joist is made longer than you may originally think.
- For the joists not bolted to trusses then the same brackets could also be used, or a less expensive way might be to use pressed metal joist hangers. Purpose made bent up "U" hangers, may be used, depending on the floor loads.
 |
|
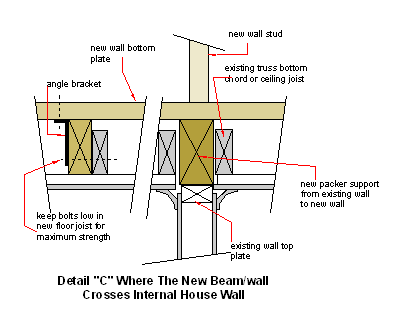
| An attic conversion - A section through the new floor where it crosses an existing wall. |
- At the right is a detail looking through the floor where it crosses an existing internal wall.
- Depending on the spans involved you may have to take advantage of internal walls to support the floor, instead of relying just on hanging from the outer walls.
- You may be lucky, and the new wall above may sit on top of a wall stud, but my preference would be to lay a sturdy piece of timber on top or the existing wall, with packers, to transmit the weight over a greater area.
- The same thing would apply even to a masonry wall, pack it up and don't be mean with the packers. Spread that load.
 |
| An attic conversion - A detail of the new under purlin and the collar tie |
- At the right is a detail at the collar tie and the new under purlin.
- It is quite possible that the under purlins may have to be temporary hung in position with wire before the trusses have their webs cut out and the collar ties are fixed.
- The collar ties are bolted onto the exiting truss.
- I've shown the under purlin as timber with a small timber cleat nailed behind it to keep it in position.
- This purlin could of course be steel also, with welded cleats for bolting to the truss and collar ties.
- In the case of a timber purlin then the trusses and the new rafters could be fixed to it with "Triple-grip" framing type nailed on anchors or hoop iron straps.
- Again the purlin to collar tie connection could be made with nailed straps.