A loft conversion.
Building a room in a roof space, attic or loft space. A loft conversion.
Another question from reader has got me thinking, Alan M. from Melbourne Aus. wrote this.
"I would like to build a room in the roof space of my house. I've just read your pages on roofing and I'm trying to work out how to first build a supporting floor and secondly how to replace the trusses I'll have to cut in the roof space.
Any tips would be much appreciated.
Alan
A simple enough question, but not easy to give an answer to. At least not quickly. There are many considerations which obviously without seeing the design of the house in question I can't even attempt to answer. There are a few things I can talk about though.
- One basic fact stands out above all else, if you remove strength from the structure then you must replace that strength.
- A ceiling structure can be very lightweight, it is only designed to hold itself and to brace the bottom of the roof structure. To turn it into a load bearing floor will take some work.
- All this work must at sometime of other be checked and approved by an engineer. (At least in Australia).
- If you can come up with ideas and concept sketches that partly help out the engineer then you can save some of his time and thus some of your money.
Bearing this in mind, and only in the spirit of giving a bit of general advice, I have decided to write a couple of pages trying to answer Alan's question in some detail.
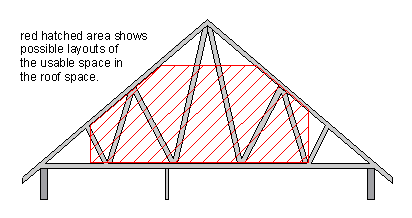 |
| Loft Conversion - A section through an existing roof. The red area shows a couple of ways to utilise the loft space |
In the sketch above I show a couple of possible ways to create enough space inside a roof to do a loft conversion. The left side and the right side.
On this page I am not going to even start thinking about head heights, windows, ventilation, access etc that will make a space into a pleasant room.
I will just give you my thoughts on addressing Alan's questions about a floor and replacing the trusses.
- A multi-nail roof truss on it's own is a pretty flimsy thing, each individual piece can be quite skinny, say 75 x 35 timber for struts and the top and bottom chords can be as small as 120 x 35.
- Once a few of them are fixed into position and braced they become extremely strong.
- If you cut out the struts then you must replace them with something else.
- In a roof like this, I would choose carefully the time of year to do the job. That is the time that has the least chance of adverse weather.
- I'd get all the structural materials on the job before starting and work steadily and uninterrupted to cut out then replace the strength.
- I would only alter say two trusses at a time and stiffen them, before moving on to the next one.
 |
| Loft Conversion - shear force |
 |
| Loft Conversion - Strap bracing on the top surface of the trusses |
 |
| Loft Conversion - Timber bracing to internal truss struts. Wind bracing. |
- When a force is pushing sideways against an object, the object is described as being subjected to shear force or to be under shear.
- A lot of effort goes into designing roofs to resist sideways forces that the roof may be subjected to, for example strong winds.
- To do this we usually we use bracing in one form or another.
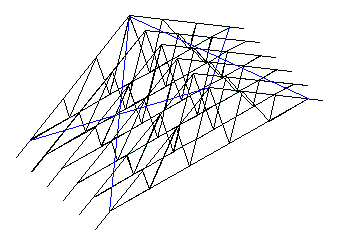
- Bracing in a roof can take quite a few forms. In the sketch above I have shown external strap bracing (in blue) that is nailed to the tops of the trusses.
- You could also have sheet ply nailed to the tops of the trusses which would be excellent for the proposed loft conversion job.
- As we are talking about a loft conversion to an existing house, then these top surface of the roof types of bracing only get disturbed if we start cutting holes for windows and skylights, which I am going into here.
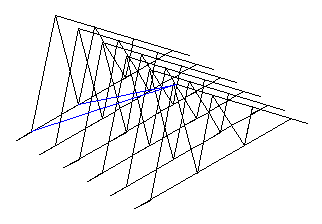
- In the next sketch I have not shown part of the trusses, to clearly show (also blue) two diagonal braces fixed to the vertical face of a row of struts. Again these can be strap braces I guess, but more often they are timber. These are used particularly in gable roofs and they are often called "wind bracing".
- Obviously if we are removing the struts that the bracing is fixed to then we have to find another way of bracing the roof in that direction.
 |
| Loft Conversion - the new roof space |
After looking at our very first sketch with the (red hatched area) it occurs to me that if we ran walls the full length of the roof space, we could use those walls to help brace the roof in that length ways direction.
- For this reason, in the sketch above I have made the walls a reasonable height, not maximising the floor space of the new loft area.
- These walls would have to be fixed solidly at each end, (to gable walls or hip structures), and fixed to trusses top and bottom chords.
- The walls themselves should be braced. My preference would be to make them out of bolt together sections of MiG welded steel wall framing material with built in bracing, or if they were timber stud walls, then I'd sheet them one side with 7.5mm structural ply or as it is sometimes known, shear ply.
So we have killed two birds with one stone, built a couple of walls, which we need anyway, and used them to good effect to help brace the roof.
To add more bracing to the roof and also to stiffen up those two sloping sections of the roof/ceiling, I would also add shear ply to the underside of those roof surfaces, as noted on the sketch above.
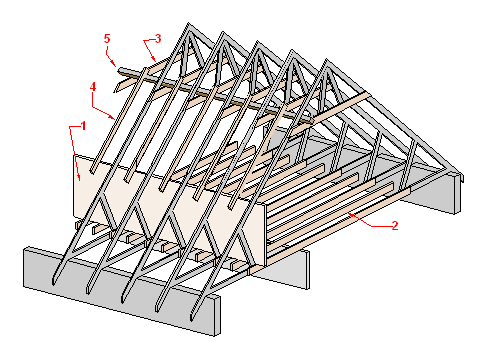 |
| Loft Conversion - sketch of new timbers required.
|
In the sketch above:
- One of the braced walls as discussed. Bearing in mind that the walls are fixed top, bottom and at each end, and that they will be stiff, then they could be used for another job as well.
They could perform the function of a beam. To stiffen up the weakened trusses and quite possibly they could also be used to support the weight and the loads of the new floor. The new floor would in effect hang off these wall/beams if the span is not too great. This means that there is little disturbance to the existing rooms underneath, no steel beams cut through walls, no columns etc.
- Floor joists. The typical floor joist for average house spans are say 150 x 50 at max. 450 centres, and the trusses are only say 120 x 35 at 900 centres or even 1200 centres.
- Collar ties. These help to give back to the trusses some of their original strength, but they also in this instance have another function. that of supporting timber or steel under purlins which in turn support the extra rafters.
- Extra rafters. These may not be needed if the truss spacings are close, stiff battens and shear ply might be all that is needed, but as soon as the truss spacings get wider then this is how I would tackle the job.
- Under purlin. These may not be needed if there is no need for the extra rafters.