builderbill

Rafter cuts. The common rafter.

Table of contents for this rafter cuts page.
A pitch triangle | The rafter length | Marking the rafter | Allowing for the ridge timber | Marking the foot cut | Marking the birdsmouth cut | Adding the eaves overhang. | The finished rafter | Odd measurements


Here's a question from Charles A. who lives in Nashville.

"I am building a 16 x 16 shed in my back yard. The roof pitch I would like to have is a 8/12. How do I get the measurement right in order to cut the board in the right place? I know how to cut the 8 at the top, that ties to the ridge but, I just can't figure out the measurement at the bottom or (notch cut). Thank you for any help you could give.
Charles".

I guess it is almost fifty years ago that I first came across rafter cuts. This would have been in a classroom setting at night school when I was an apprentice carpenter. The jump from seeing the various triangles and drawings on the blackboard, and then realising how all this information is applied in practise was a long time coming for me.

The problem as I see it is that most of us who have gained a bit of knowledge, and I am including my trade school teachers here, tend to forget those first fumblings around in a dark haze, and write as though everyone has the same background as ourselves. So I will do this page solely on the humble common rafter and try to keep it as basic as I can.

Back to top.

A pitch triangle

rafter set out
Rafter cuts - A simple triangle drawn at the pitch ratio of 8 to 12.

If you have read the previous pages, you will know that I am a believer in solving roofing problems by drawing it out, to a large enough size so that fairly accurate measurements can be got directly from the drawing. After the drawing is done then quite often I check my setting out with a pocket calculator.

  • Charles is going to roof a 16' x 16' shed at a pitch of 8 to 12.
  • So I find something to draw on, a sheet of old ply, an old door etc.
  • If it has a square corner so much the better, I work from that, otherwise I draw a line in from the edge, square off one straight side.
  • I need to draw a right angle triangle with the ratio of the height to the width of 8:12.
  • 8 inches by 12 inches is a bit small, so I make it 16 to 24. Same ratio, same angles just bigger and easier to work with.
  • When it is drawn I set an adjustable bevel to the plumb cut. I have also shown another bevel set to the base cut or level cut, but this is not really needed.
  • I could of course set up a steel square with guides on to set both bevels at once. Or cut a piece of ply or Masonite to the bevels. The main thing is to get that plumb cut onto something that you can use for marking the rafters with.

Back to top.

The rafter length

rafter triangle
Rafter cuts - the rafter triangle and getting the rafter lengths.
  • The shed is 16 ft wide, so we say that the span is 16' and because the roof is symmetrical, same slope either side, we only have to draw a half span.
  • So the half span is 8ft.. I already have a triangle drawn to the correct pitch with a base length of 2 ft., so I just carry on and use that one as is, and say that it is drawn at a scale of 1:4. That is every foot on my drawing represents 4 ft actually, every inch = 4 inches.
  • So I already have a bevel set to my plumb cut, the only other bit of information I need is a rafter length.
  • I get this by simply measuring the sloping side of the main triangle. Which I get to be 28 7/8".

Back to top.

Marking the rafter

rafter length
Rafter cuts - Marking the plumb cuts.

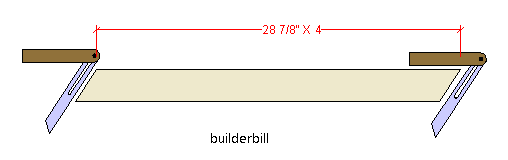
Above is a sketch of the rafter at it's simplest, a plumb cut to start, a measured distance of my size from the drawing times four, because the drawing is at a scale of 1:4.

rafter in position
Rafter cuts - how a simple rafter would look when in position.

We mark out and cut our rafters on a couple of saw horses or stools, but above is a sketch of how this same rafter would look if it was rotated until the plumb cut is vertical and in it sits in the correct position.

  • The only way that I could imagine using a rafter cut like this is if I was making up my own roof trusses, all bolted together with bottom chords that the trusses would sit on.
  • Never the less, this rafter is correct in the angles and lengths.
  • Two plumb cuts and one length do the trick, everything else comes from this.
  • If Charles does not want any overhang at the eaves, all he has to do is make an extra plumb cut at the top of the rafter to shorten it by half the thickness of the ridge, and to trim a bit off the bottom to allow for the rafter to sit solidly on the wall plate.
  • The main point of this sketch is that there is only the one plumb cut and one length for this rafter. The rest is adjusting the depth of the base cut for whatever you are doing. The only effect on the roof is to raise or lower it by a touch, but the pitch and the span remain the same, they do not alter.

Back to top.

Allowing for the ridge timber

setting ridge offset for rafter
Rafter cuts - setting the offset to allow for half the thickness of the ridge.

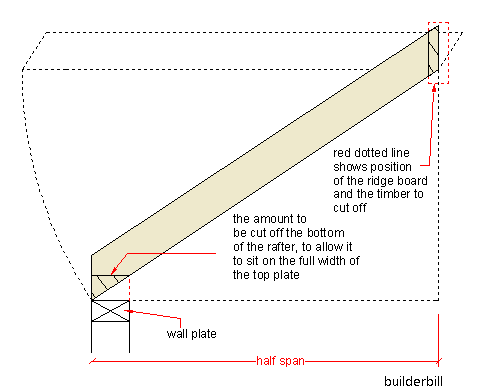
Above is a sketch showing an easy way to allow for the ridge. Remember only half the thickness. The other rafter on the other side is shortened the same way.

Back to top.

marking the foot cut

rafter birdsmouth
Rafter cuts - marking the foot cut.

Above we see a similar way to mark out the level cut, measuring square off the plumb line.

Back to top.

marking the birdsmouth cut.

marking the birdsmouth
Rafter cuts - marking the birdsmouth.

here we show a way of marking the birdsmouth cut.

  • An old rule of thumb says that the birdsmouth should not be more than one third of the depth of the rafter.
  • I will say definitely not more than 1/3rd, but usually less than that.
  • I have done many roofs where there was no birdsmouth at all. It was not needed as we were bolting the rafter to steel cleats or angles.
  • I the days before strict cyclonic fixings came out, we used a small birdsmouth, say 1/6th of the depth of the rafter, as an aid in locating the thing in the right place, but did the real fixing with triple grip type nailplate connectors.
  • Why do I measure down from the top of the rafter, to get the depth of the birdsmouth? This is to allow for any variation in the thickness of the timber. I explain this in more detail on my roof framing page.

Back to top.

adding the eaves overhang.

rafter with eave overhang
Rafter cuts - adding the eaves overhang.

eaves triangle
Rafter cuts - The eaves triangle

In most cases there is an overhang at the eaves. An overhanging eaves is desirable in most cases because it helps to keep a lot of weather off the walls.

  • In the sketch above I have shown a width of 18" at the eaves.
  • I go back to my setting out board and draw in a vertical line 18" from one end of the baseline.
  • From that I can easily get the rafter length associated with a run of 18".
  • Remember that for the main rafter length, I was using my drawing at a scale of 1:4, so I multiplied my drawing length by four.
  • Here I have drawn my 18" overhang at full size, so my reading of 21 5/8" is used as is, no scaling up!

Back to top.

The finished rafter

finshed rafter
Rafter cuts - the finished rafter.

Above is a sketch of the completed rafter with the birdsmouth and the eves added. This just about answers Charles' original question. my roof framing page will provide a bit more information for him.

Back to top.

odd measurements.

extra length triangle
Rafter cuts - adding extra or odd lengths.

That worked out quite well eh! The 8 ft. half span fit neatly with the 24" or 2 ft. base triangle that I had drawn.

You would be right in thinking that in the real world things have a habit of being a bit more awkward than this example.

  • let us say that the the half span of the roof was different, say 8ft. 9 1/2".
  • We do the same that we did with the eaves overhang, and add the extra 9 1/2" up from the baseline of the main set out triangle.
  • This will give us the length of 11 3/8" that we can add to get our new total length.
  • So you can see that a simple right angle triangle can be quite useful and there is no maths involved, just accurate drawing and measurement with some simple arithmetic.


Not found it yet? Try this FAST SITE SEARCH or the whole web


coates hire
Hire Equipment
hafele
Furniture Fittings - Architectural Hardware - Electronic Locking Systems - Technical Hardware

BuilderBill sponsorship

Quick Illustrated Roofing Glossary Pages.

Types of roofs
Roof Features
Roof Framing
Roof Trusses
Roof Coverings

Adjustable bevels.

Drawing on a piece of ply or other board like I show here, is ideal when using adjustable bevels to get your angles, whether for roofing or anything else.

On a hip roof there are many more angles than the two shown here. Whatever way you find your angles, it is a good plan to mark them on the edge of a setting out board or sheet of ply as soon as you get them, and mark on them clearly what they are.

Some of the angles can be quite similar, and you need to mark them clearly.

This way you always have a handy reference to check against, if the bevel has been dropped, or you are changing it for some reason.

If you only learn one thing from this page, it should be a variation of the old "measure twice and cut once" saying, and that is "double check that your bevel is correct" before cutting dozens of rafters.


Please Note! The information on this site is offered as a guide only!  When we are talking about areas where building regulations or safety regulations could exist,the information here could be wrong for your area.  It could be out of date!  Regulations breed faster than rabbits!
You must check your own local conditions.
Copyright © Bill Bradley 2007-2012. All rights reserved.
Page copy protected against web site content infringement by Copyscape