|
|
||||||||||||||
Roof Framing, Traditional Timber Roofs
Table of contents, roof framing basics.
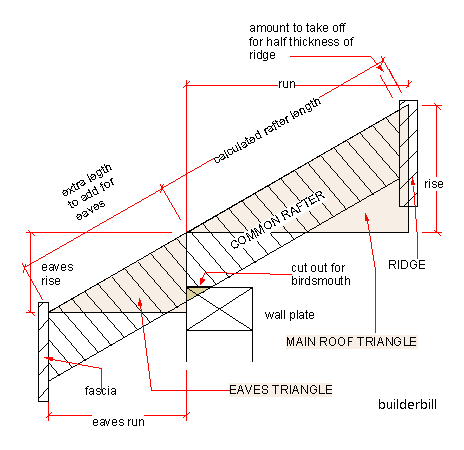
Marking out the rafters | Why use a birdsmouth? | Marking out the ridge | Fixing the roof Many people are confused about the actual marking out of the rafters and roofs in general. After they have a right angled triangle of the main roof from their setting out, how to mark the common rafter? Where to start?
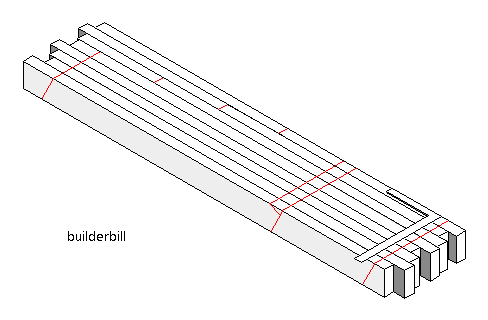
Here I show the two components of the rafter, the main roof triangle, and the eaves triangle. You need them separated (mark them separately), to get your birds mouth line. If you are fixing timber fascias, leave the bottom of the rafter uncut, and cut it off after the roof is finished to a string line. When using a metal fascia with pressed metal clips that are nailed to the ends of the rafters, cut your fascia cuts on the ground, because the clips can take up any small discrepancies. In theory the distance that you should subtract for the ridge is the slope angle distance, but in practice, half the ridge is usually OK. On very steep roofs, draw it and measure it. In roof framing like this, the birdsmouth is essential for one clear reason. When the guys have a rafter almost in position, the guy at the ridge pulls the rafter towards him and he feels the birdsmouth slide onto the flat and come up hard against the top plate, then his mate at the bottom bangs in a couple of nails, he can ease off and nail to the ridge very quickly. No pushing and pulling, to line up with a pencil line. Roof Framing - Marking out the raftersI always mark out my rafters like in this sketch below. I have even drawn in three marks indicating the jack rafter lengths using the diminish found in the roofing angles page.
I set my rafters up like this on a couple of saw stools, with to birdsmouth area set on top one of the stools to have that area as solid as possible.
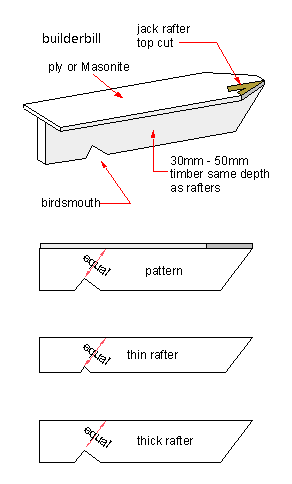
Why use a birdsmouth? I have had this question from Mark D. Here's what I replied, and what I should have put here in the first place. Hi Mark The vertical face of the birdsmouth is a locating surface. That is, if the walls are straight, then by bumping the rafter to be fixed up into contact with the wall, then we know it is in the right position. In general with modern stronger fixings they are going out of fashion, they are essential with nails only fixings. Where I am, (cyclonic or hurricane construction) birds mouths are redundant. Invariably timber rafters are bolted to steel brackets or steel cleats welded to steel beams. In this case each rafter is clamped, drilled and bolted with no need for birdsmouth cuts. We don't waste time or more importantly strength with them. Roof Framing - Marking out the ridge
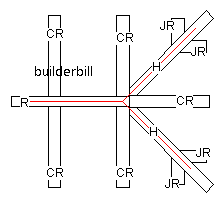
I cut the ridge on the ground and mark it out. That is I mark it on both sides with the rafter positions. If it is a hip roof I use the true length on plan, minus the full width, plus half the ridge thickness at each end. You can see it in the sketch on the right. So the ridge length is Length minus width plus one rafter thickness. When you pass the first two up for a test, cross your fingers and say under your breath, "hope it fits". When the boys on the roof yell down "bloody perfect" you should modestly say, "crikey we were lucky there"!When the end rafters are fixed, we string a line between them at the ridge, to fix the rest of them to. Roof Framing - Fixing The RoofBefore starting make sure all the walls are straight and plumb, level etc. Also check it for square (that the diagonals are the same length). If there is something a bit out, you need to know about it so that it doesn't come as a surprise.
As I said before, where I live we don't do these sorts of roofs any more. Trusses are the way to go. However I get lots of requests from people about framing roofs, so I will be adding more pages from time to time. Check out the menu below, that's where the new ones will appear. Not found it yet? Try this FAST SITE SEARCH or the whole web |
Hire Equipment Furniture Fittings - Architectural Hardware - Electronic Locking Systems - Technical Hardware BuilderBill sponsorship Quick Illustrated Roofing Glossary Pages.Types of roofsRoof Features Roof Framing Roof Trusses Roof Coverings In Depth Roofing Articles
|
|||||||||||||
|
|
||||||||||||||
|
Please Note! The information on this site is offered as a guide only! When we are talking about areas where building regulations or safety regulations could exist,the information here could be wrong for your area. It could be out of date! Regulations breed faster than rabbits! You must check your own local conditions. Copyright © Bill Bradley 2007-2012. All rights reserved. |
||||||||||||||